
Creating a Daily Puzzle Game with React, MongoDB & Google Cloud Run
About GoldRoad
GoldRoad is a daily puzzle game in a browser. Your gold is to find the best possible path between two given coins. The best possible path is the one which allows the user to collect the maximum gold. I created this game as an entry for the MongoDb hackathon on dev.to
The backstory
Some months ago I had come across one Twitter post announcing a new daily puzzle game. I gave it a try and liked the game so much that I implemented the same using Python and published blogs documenting the process.
From then only, I wanted to create a similar, but different game. Recently I was watching a video explaining the greedy algorithm for finding the best path, and that instantly gelled with the Figure game in my mind. So here it is, after some back-and-forth with different approaches and customizations.
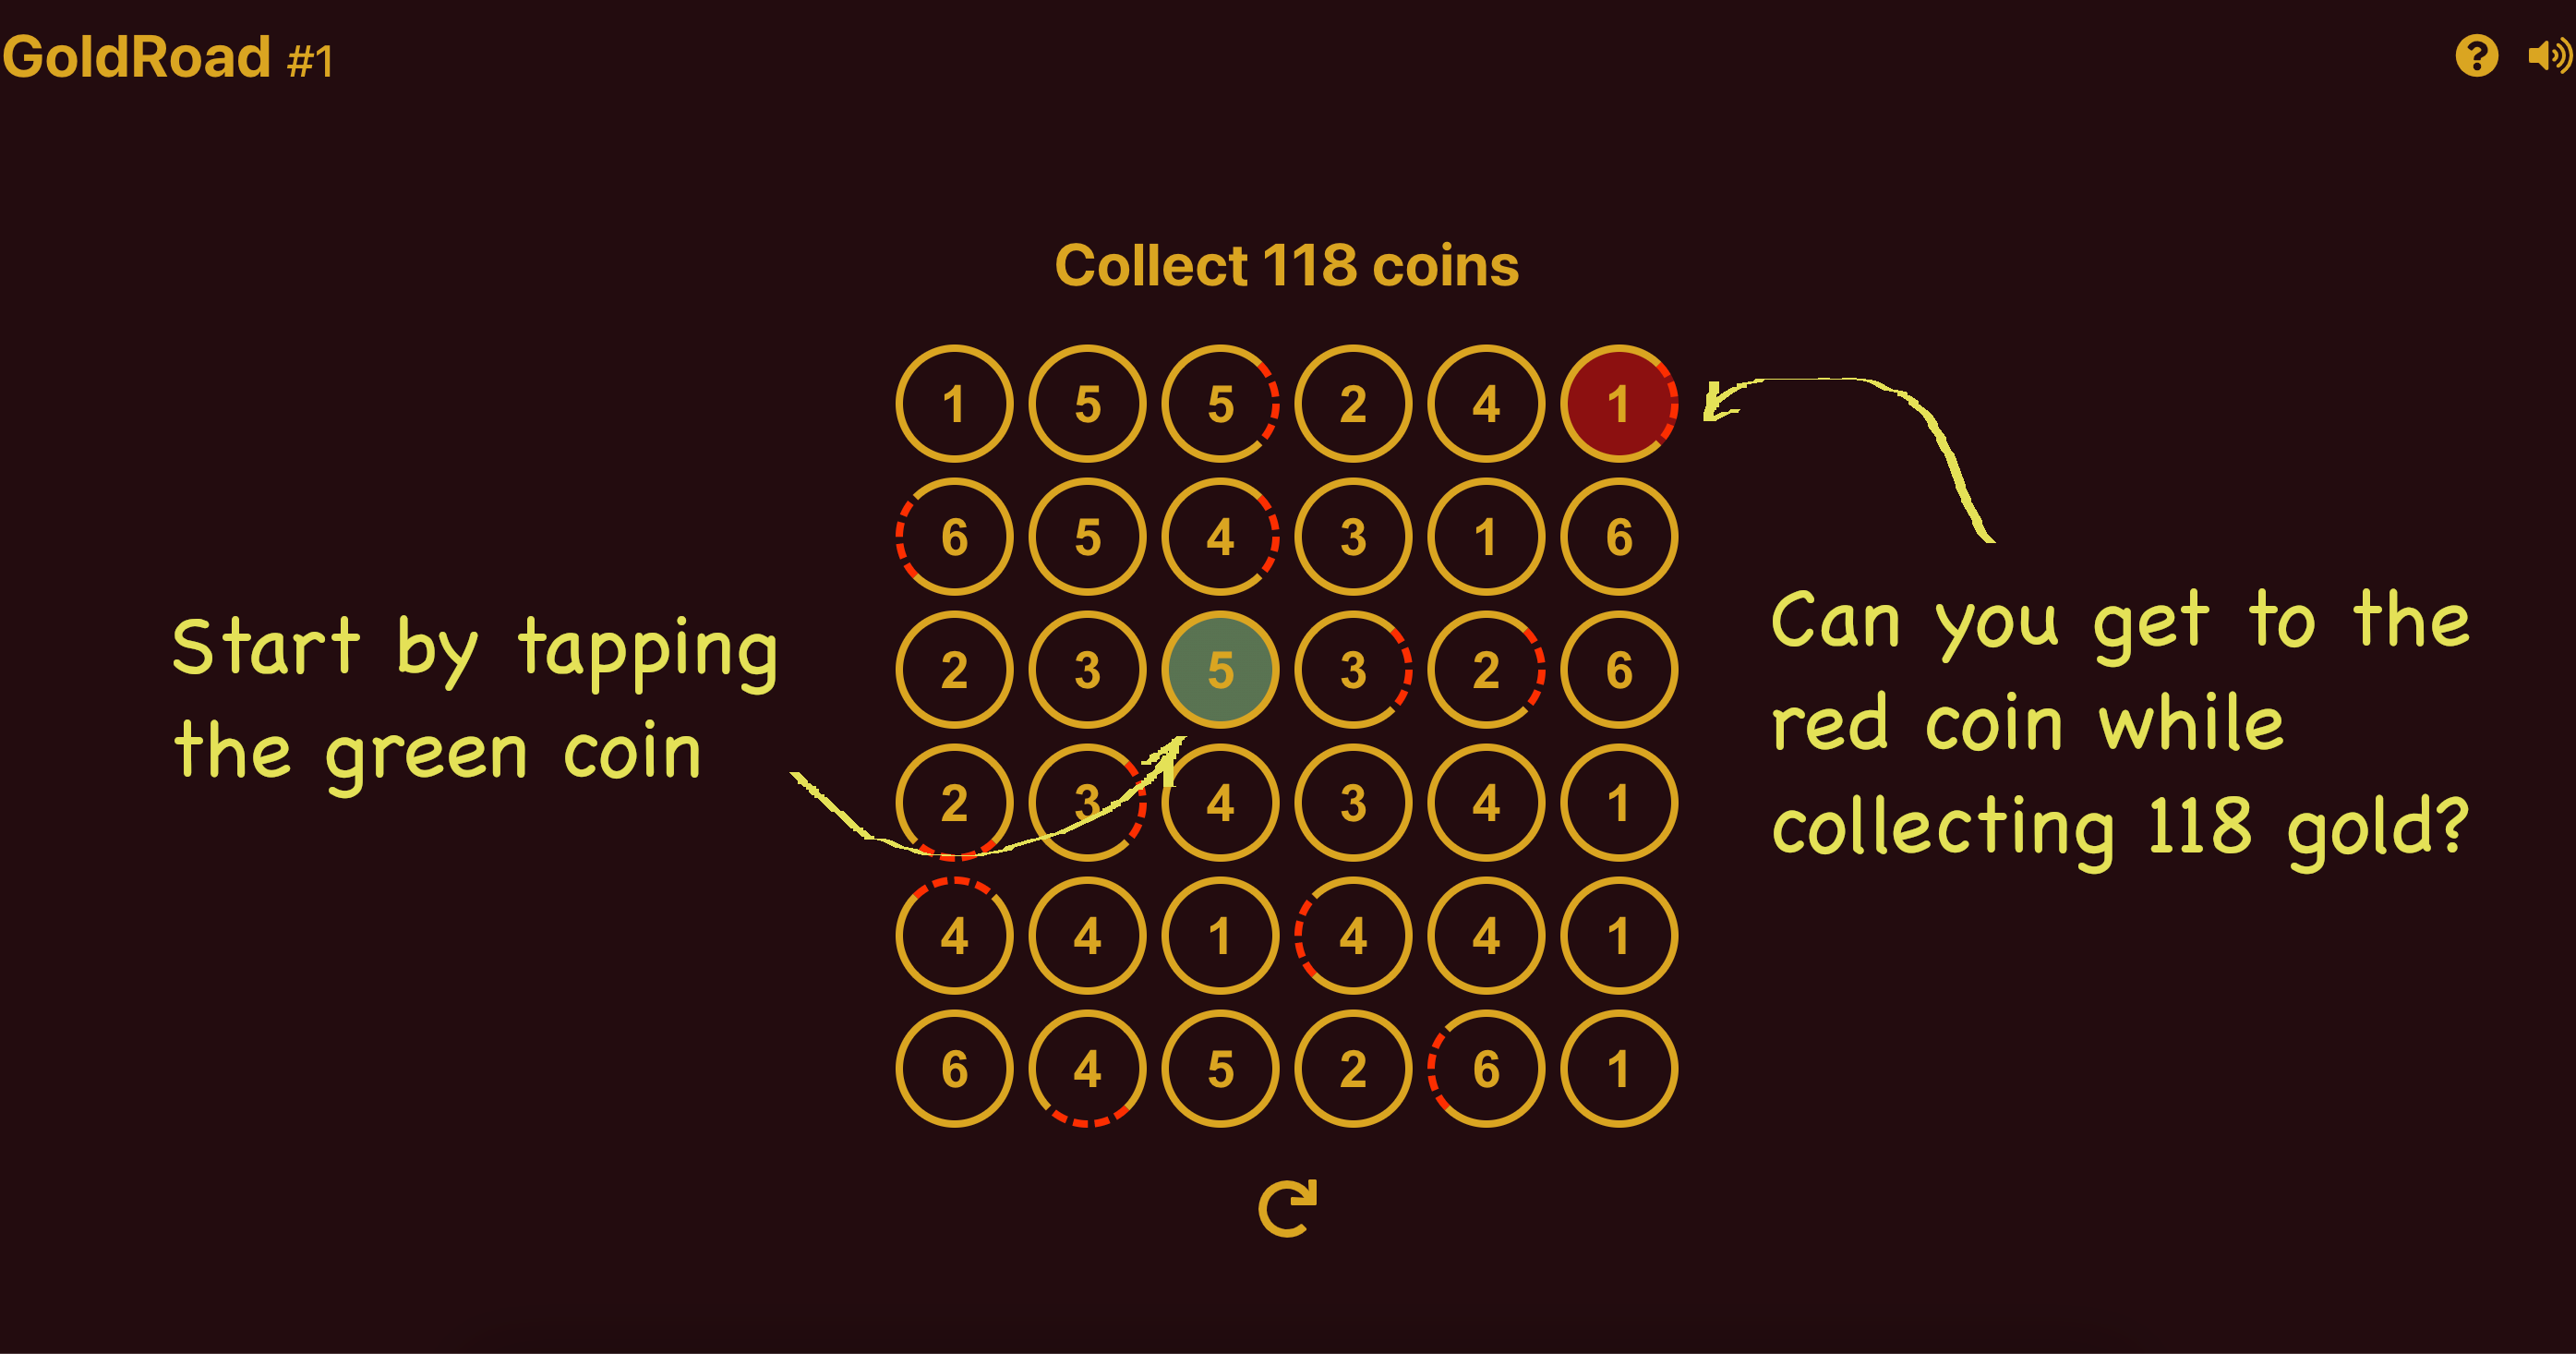
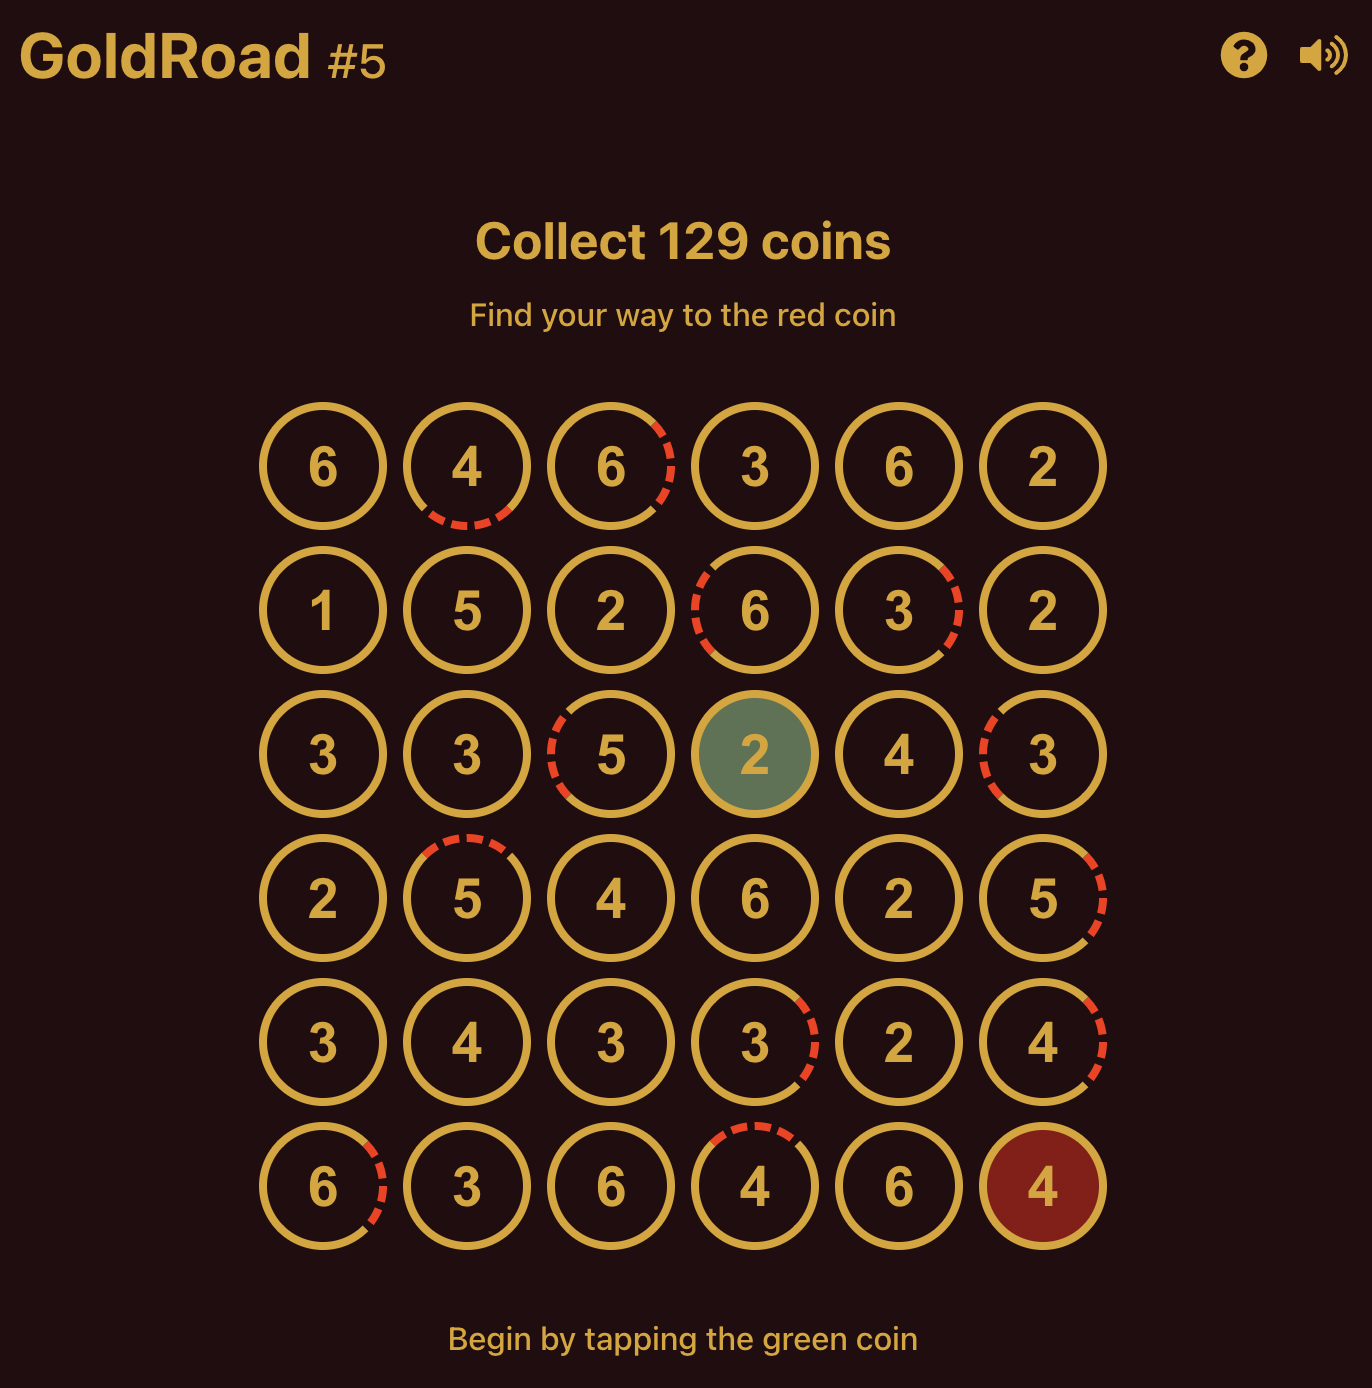
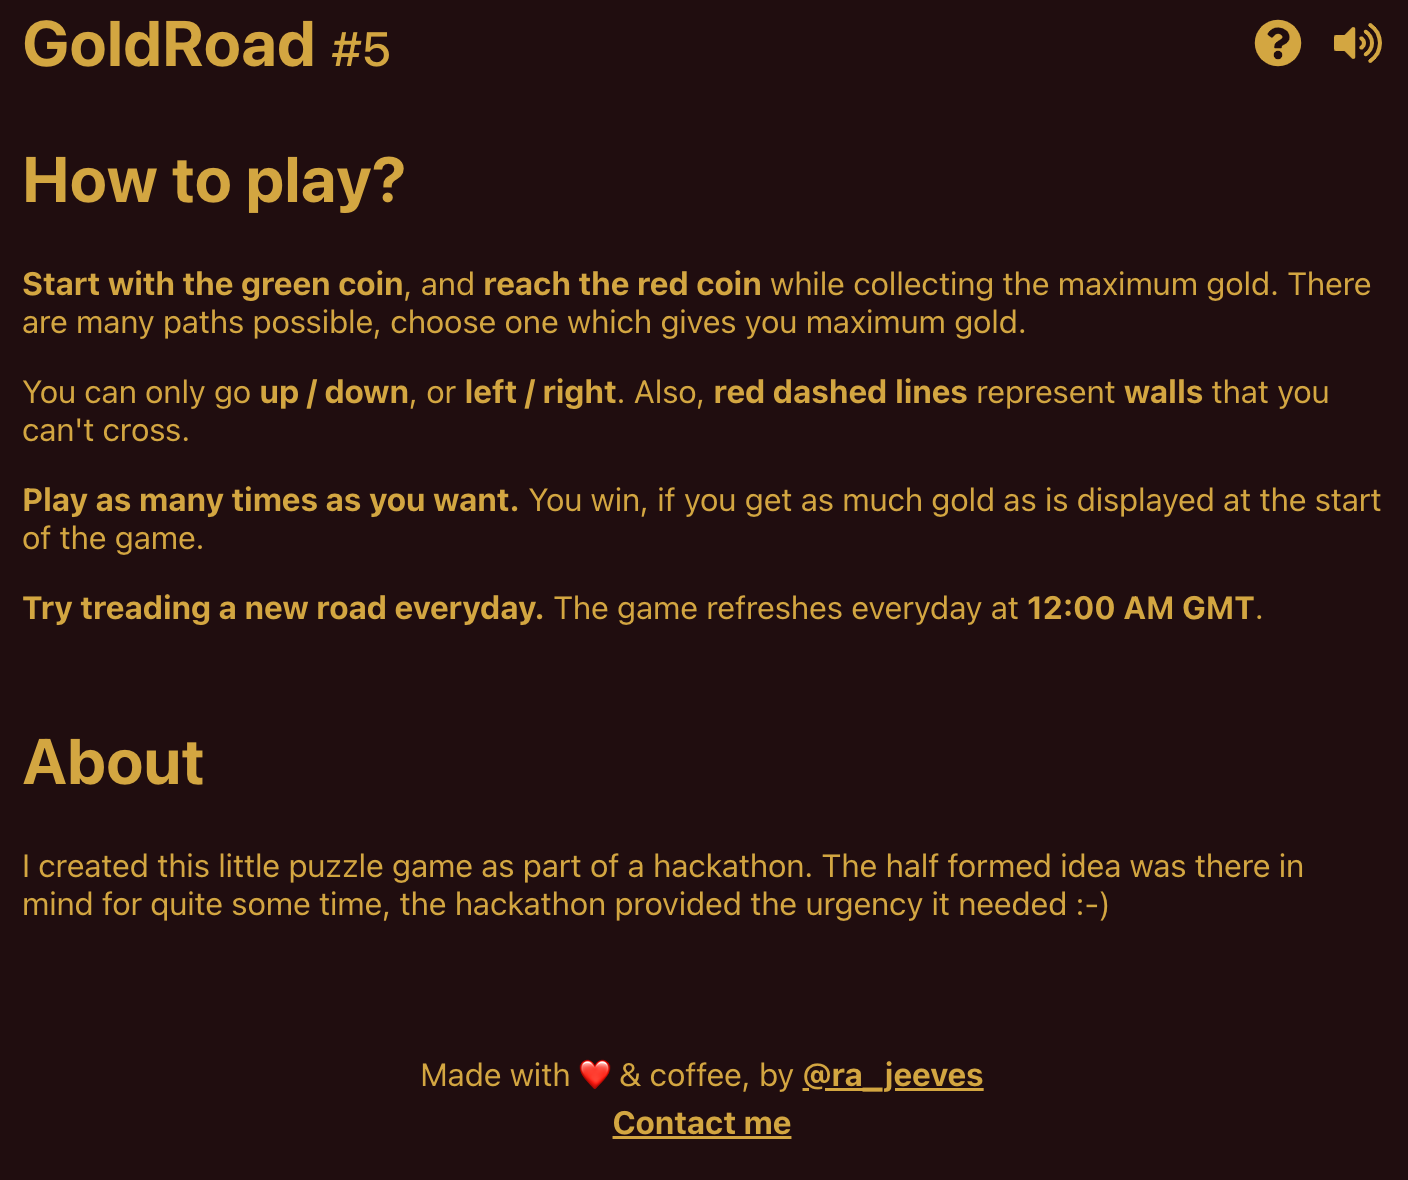
App Link & Screenshots
You can play the game here
The Game Page
The About Page
Why use MongoDB Atlas & App Services?
I came to know about the hackathon quite late. So it would have been easier to stick to my comfort zone, and use VueJs together with Firebase (of course Firestore/RealtimeDb wasn't an option considering you're supposed to use MongoDB). But what is the point of doing that? The spirit of a hackathon is to use the given technology as much as possible (at least that is what I believe), and so that is what I did.
The Implementation
I've divided this section into multiple subsections for ease of reading and following along.
Remote Setup: Creating MongoDB Cluster
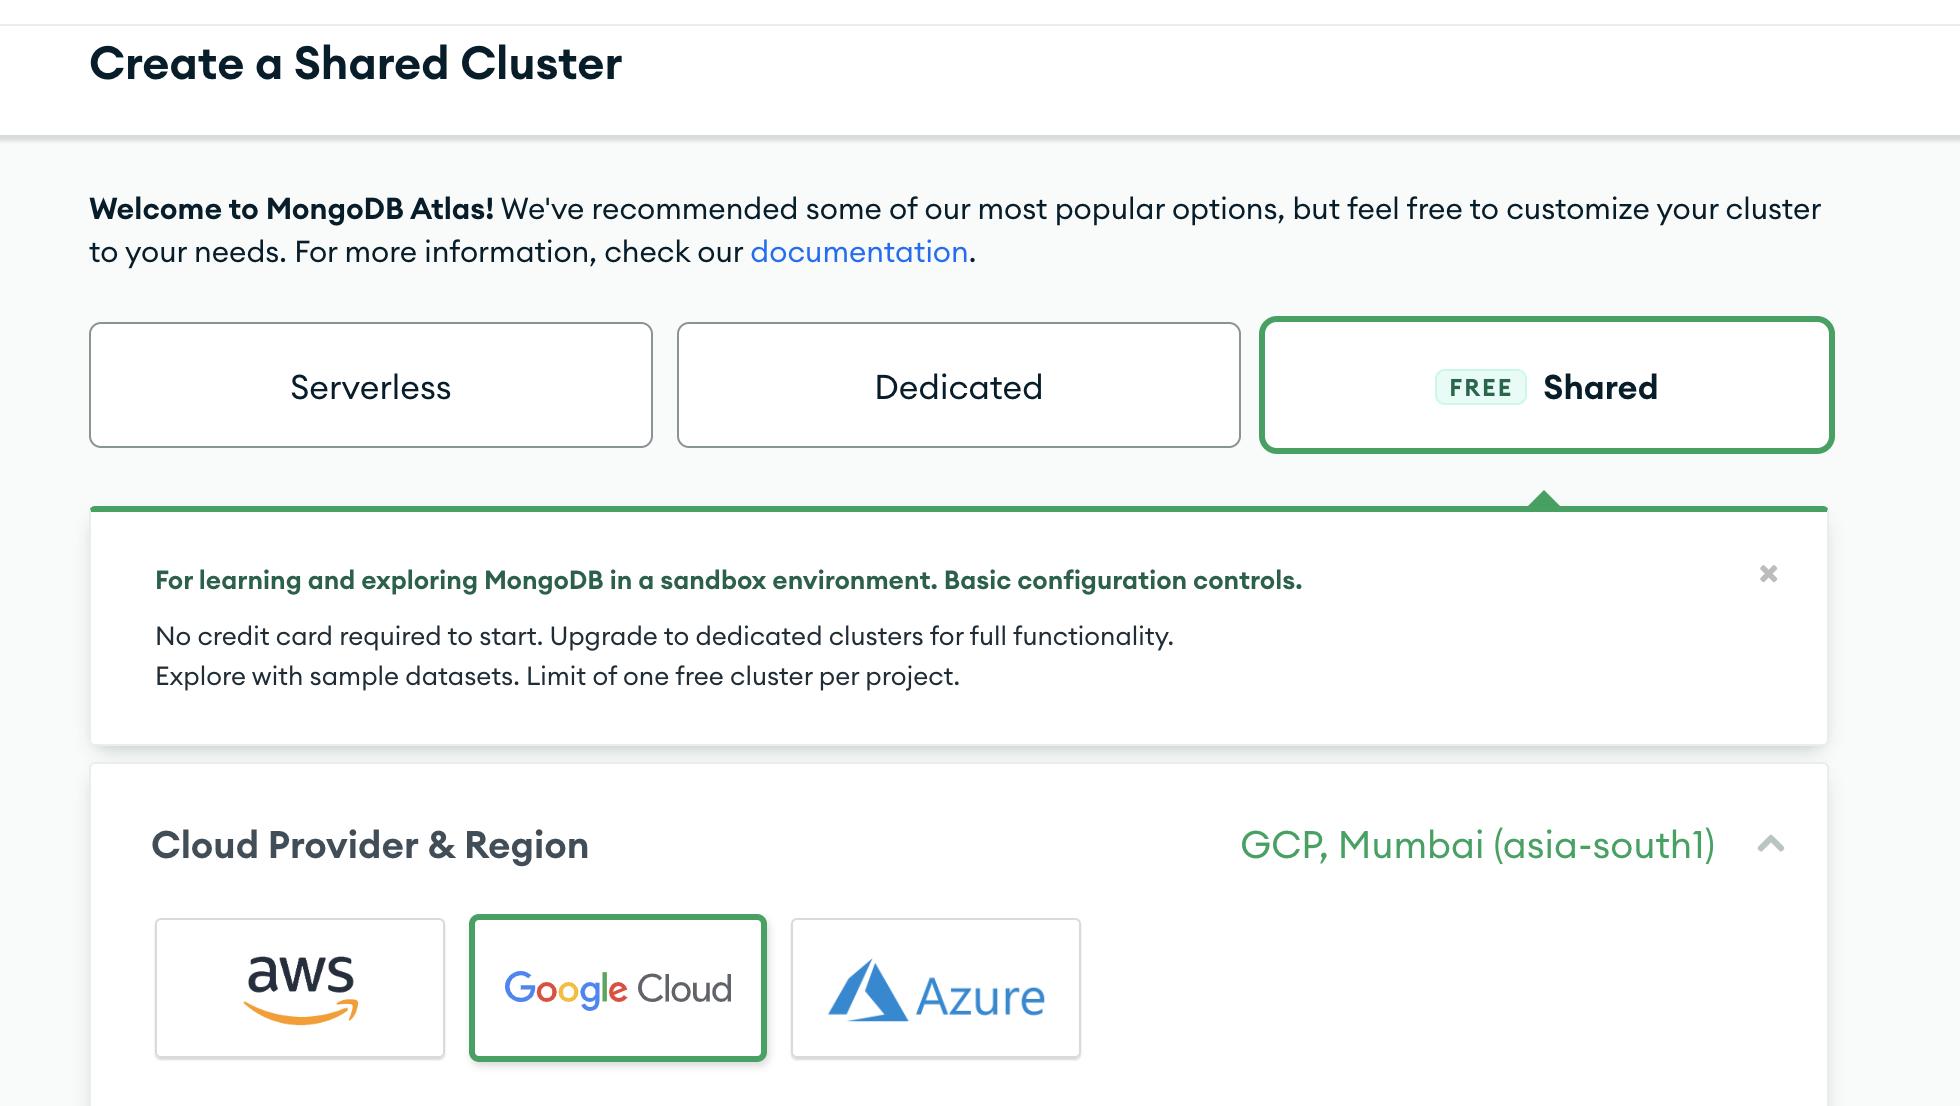
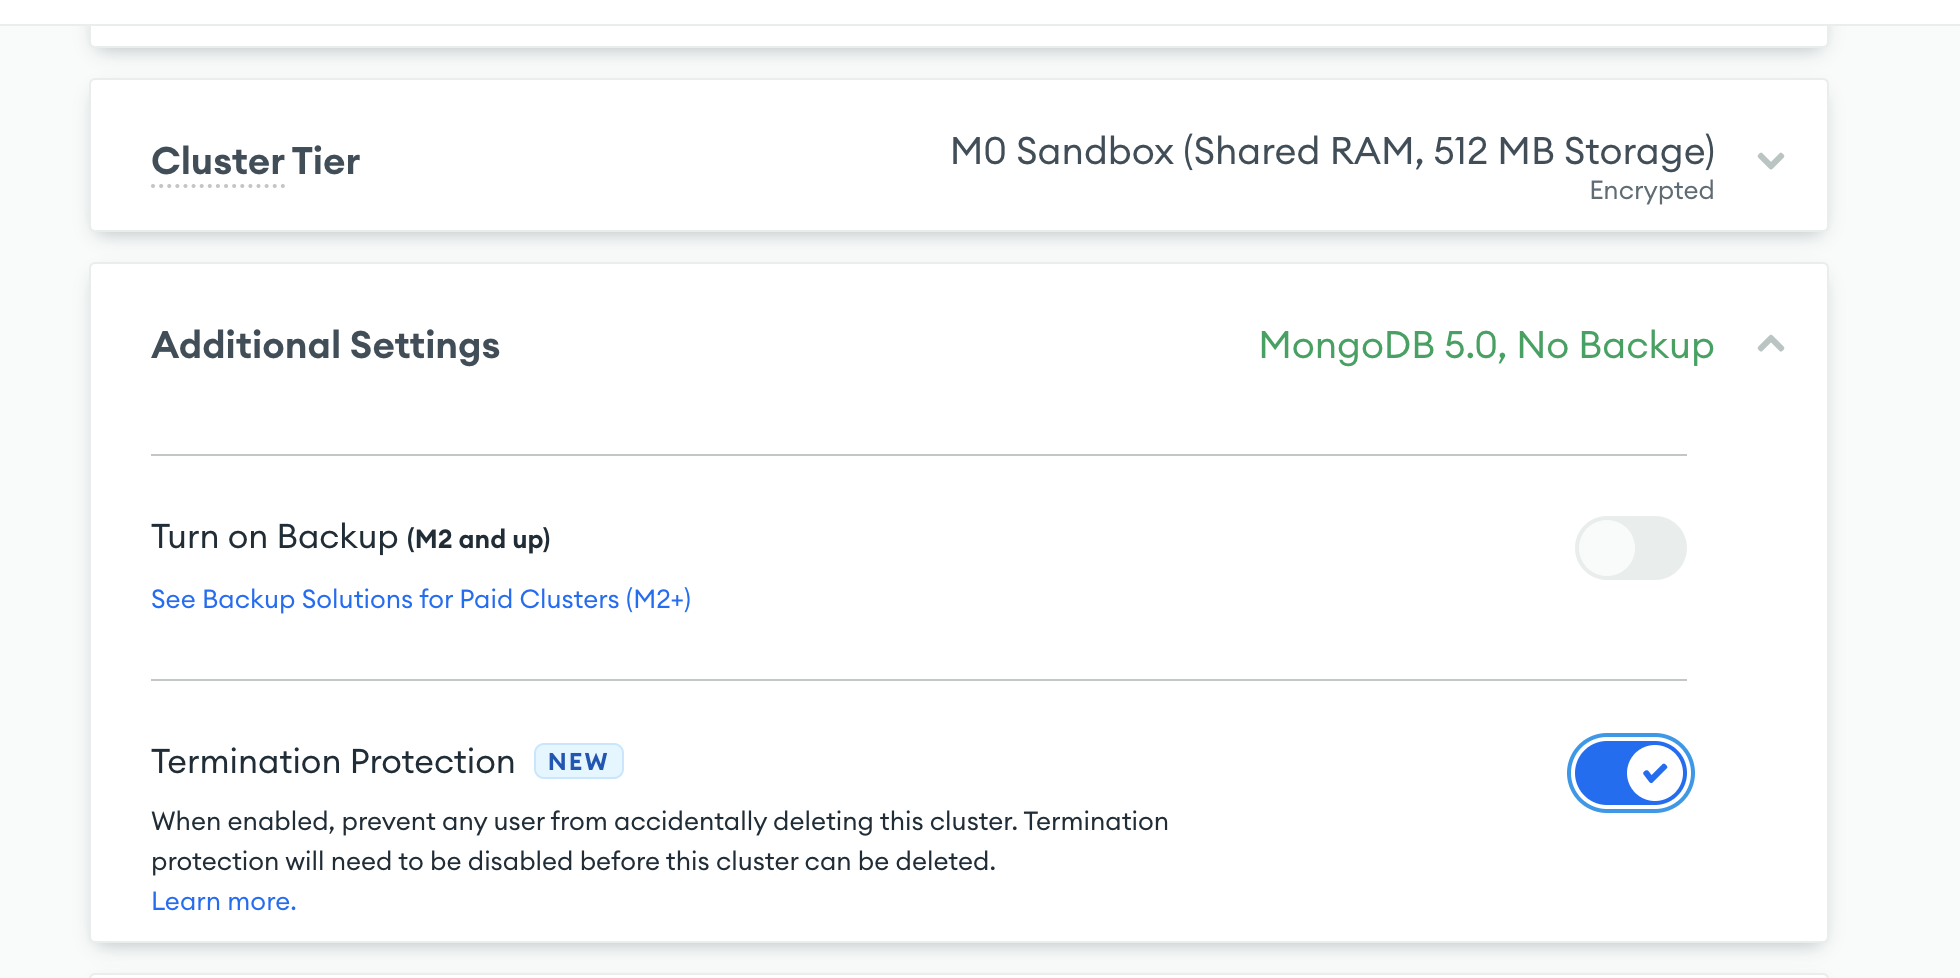
As soon as you create an account, it asks you to create a cluster, I selected the free shared cluster and used the below settings (You can pick the default options as well). In the additional settings, you can enable the "Termination Protection" option (Good to have it available with Free Shared Clusters also). You can give a recallable name to your cluster, or go ahead with the default Cluster0 name.
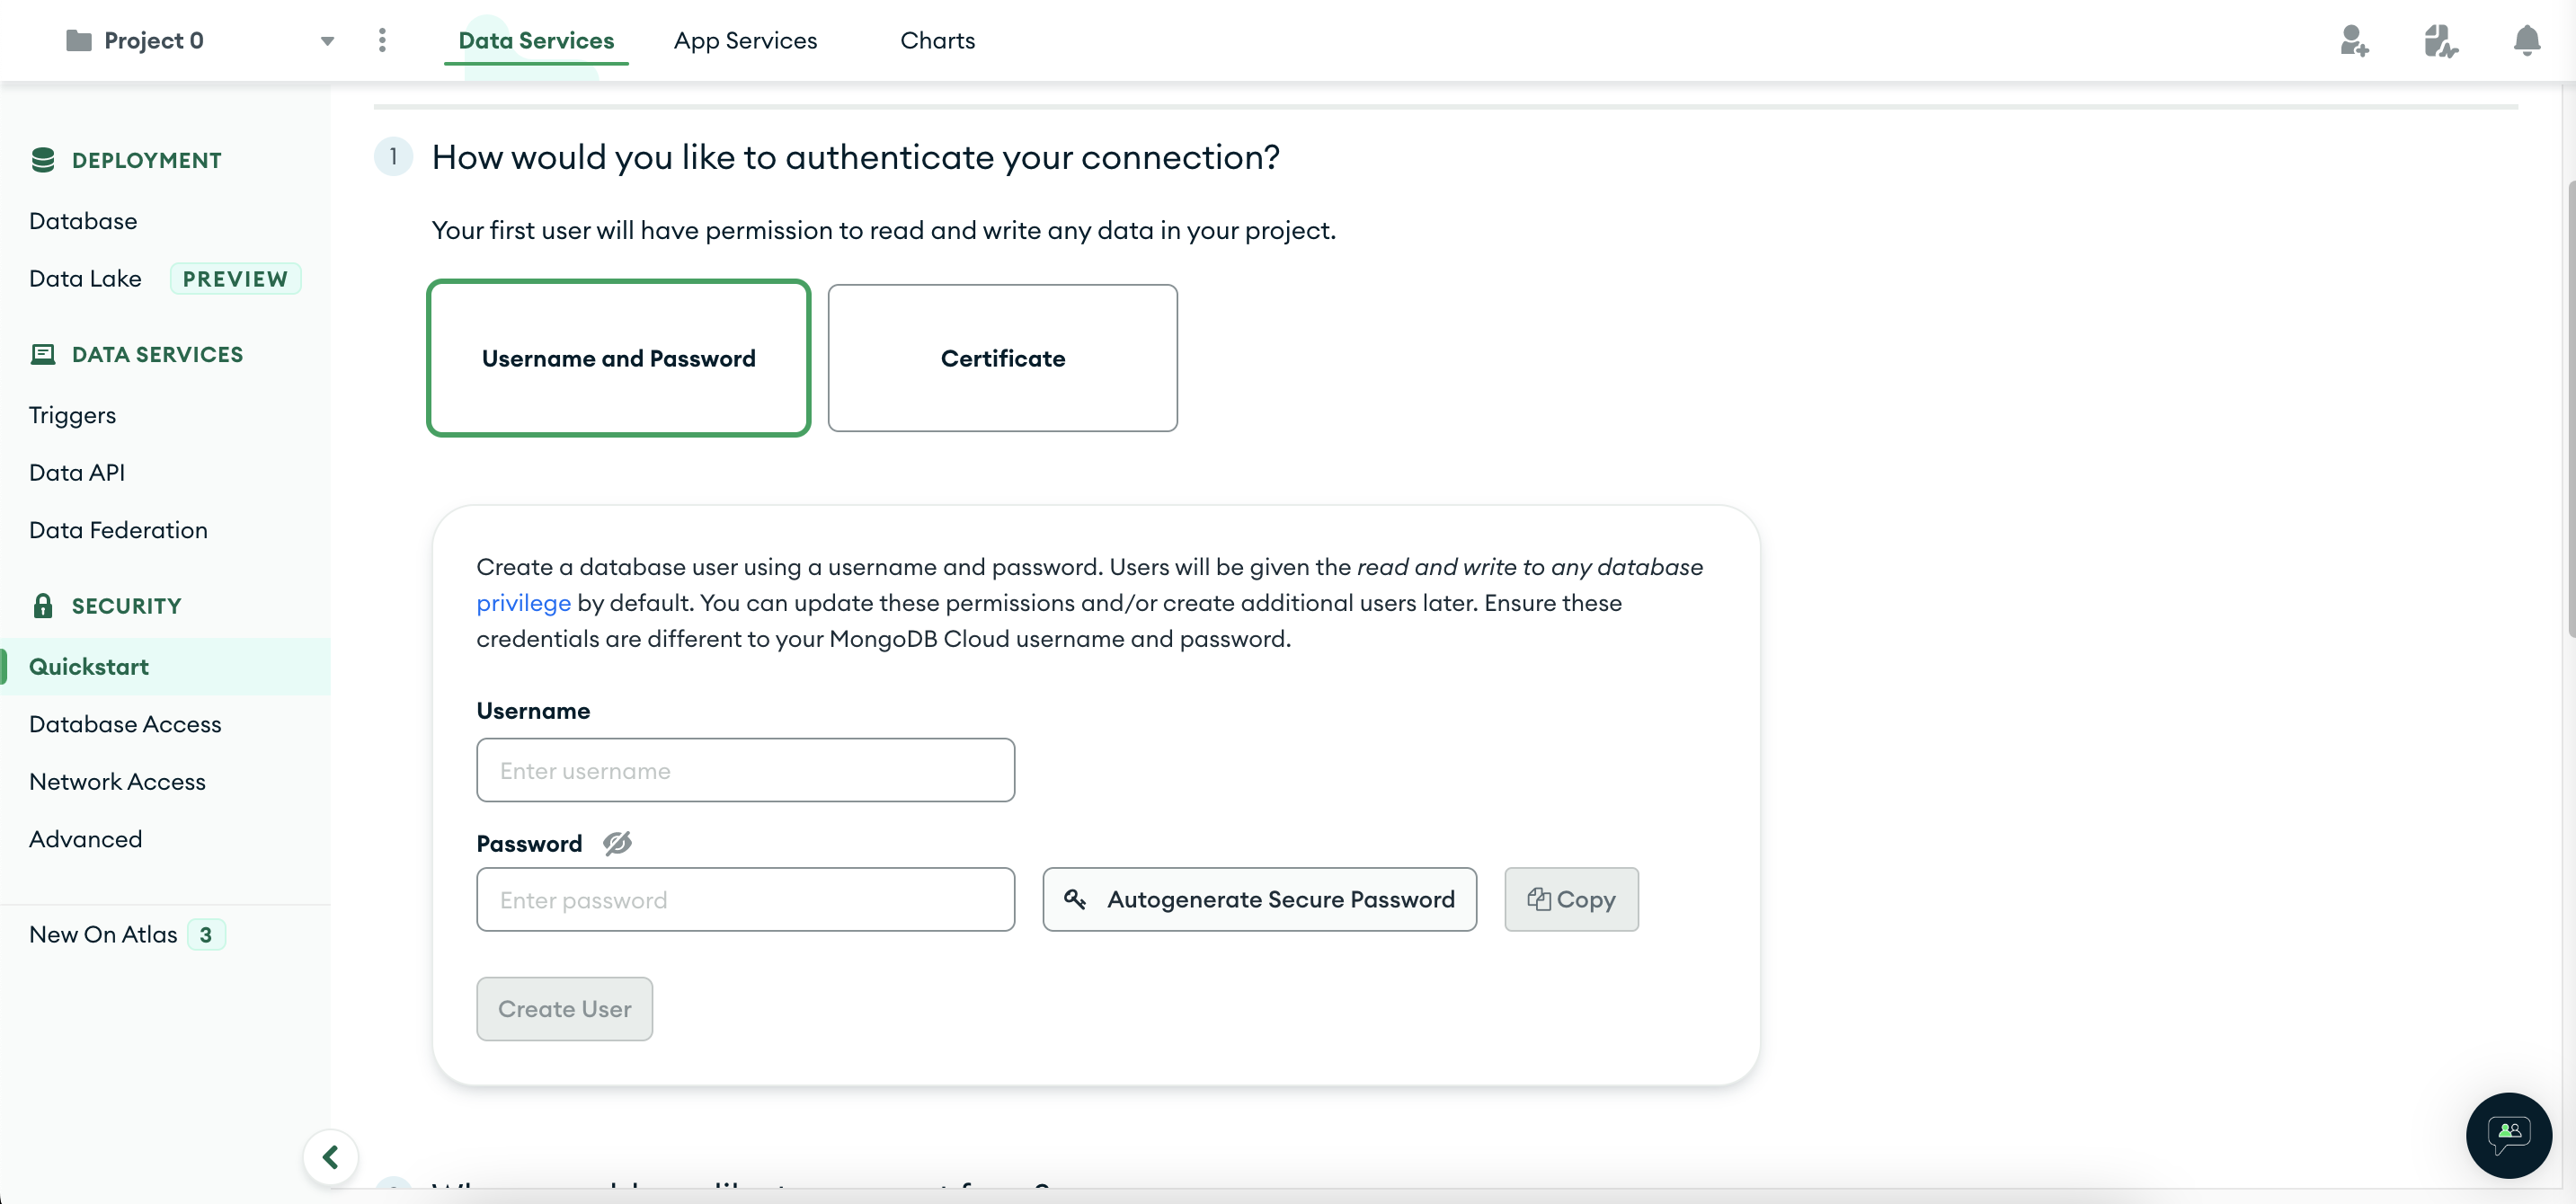
As soon as you create a cluster it creates a project for you (Project 0) and asks you to create a database user and the location from where you'll be accessing the cluster. For network access, I selected my local IP address (there is a handy button available for this).
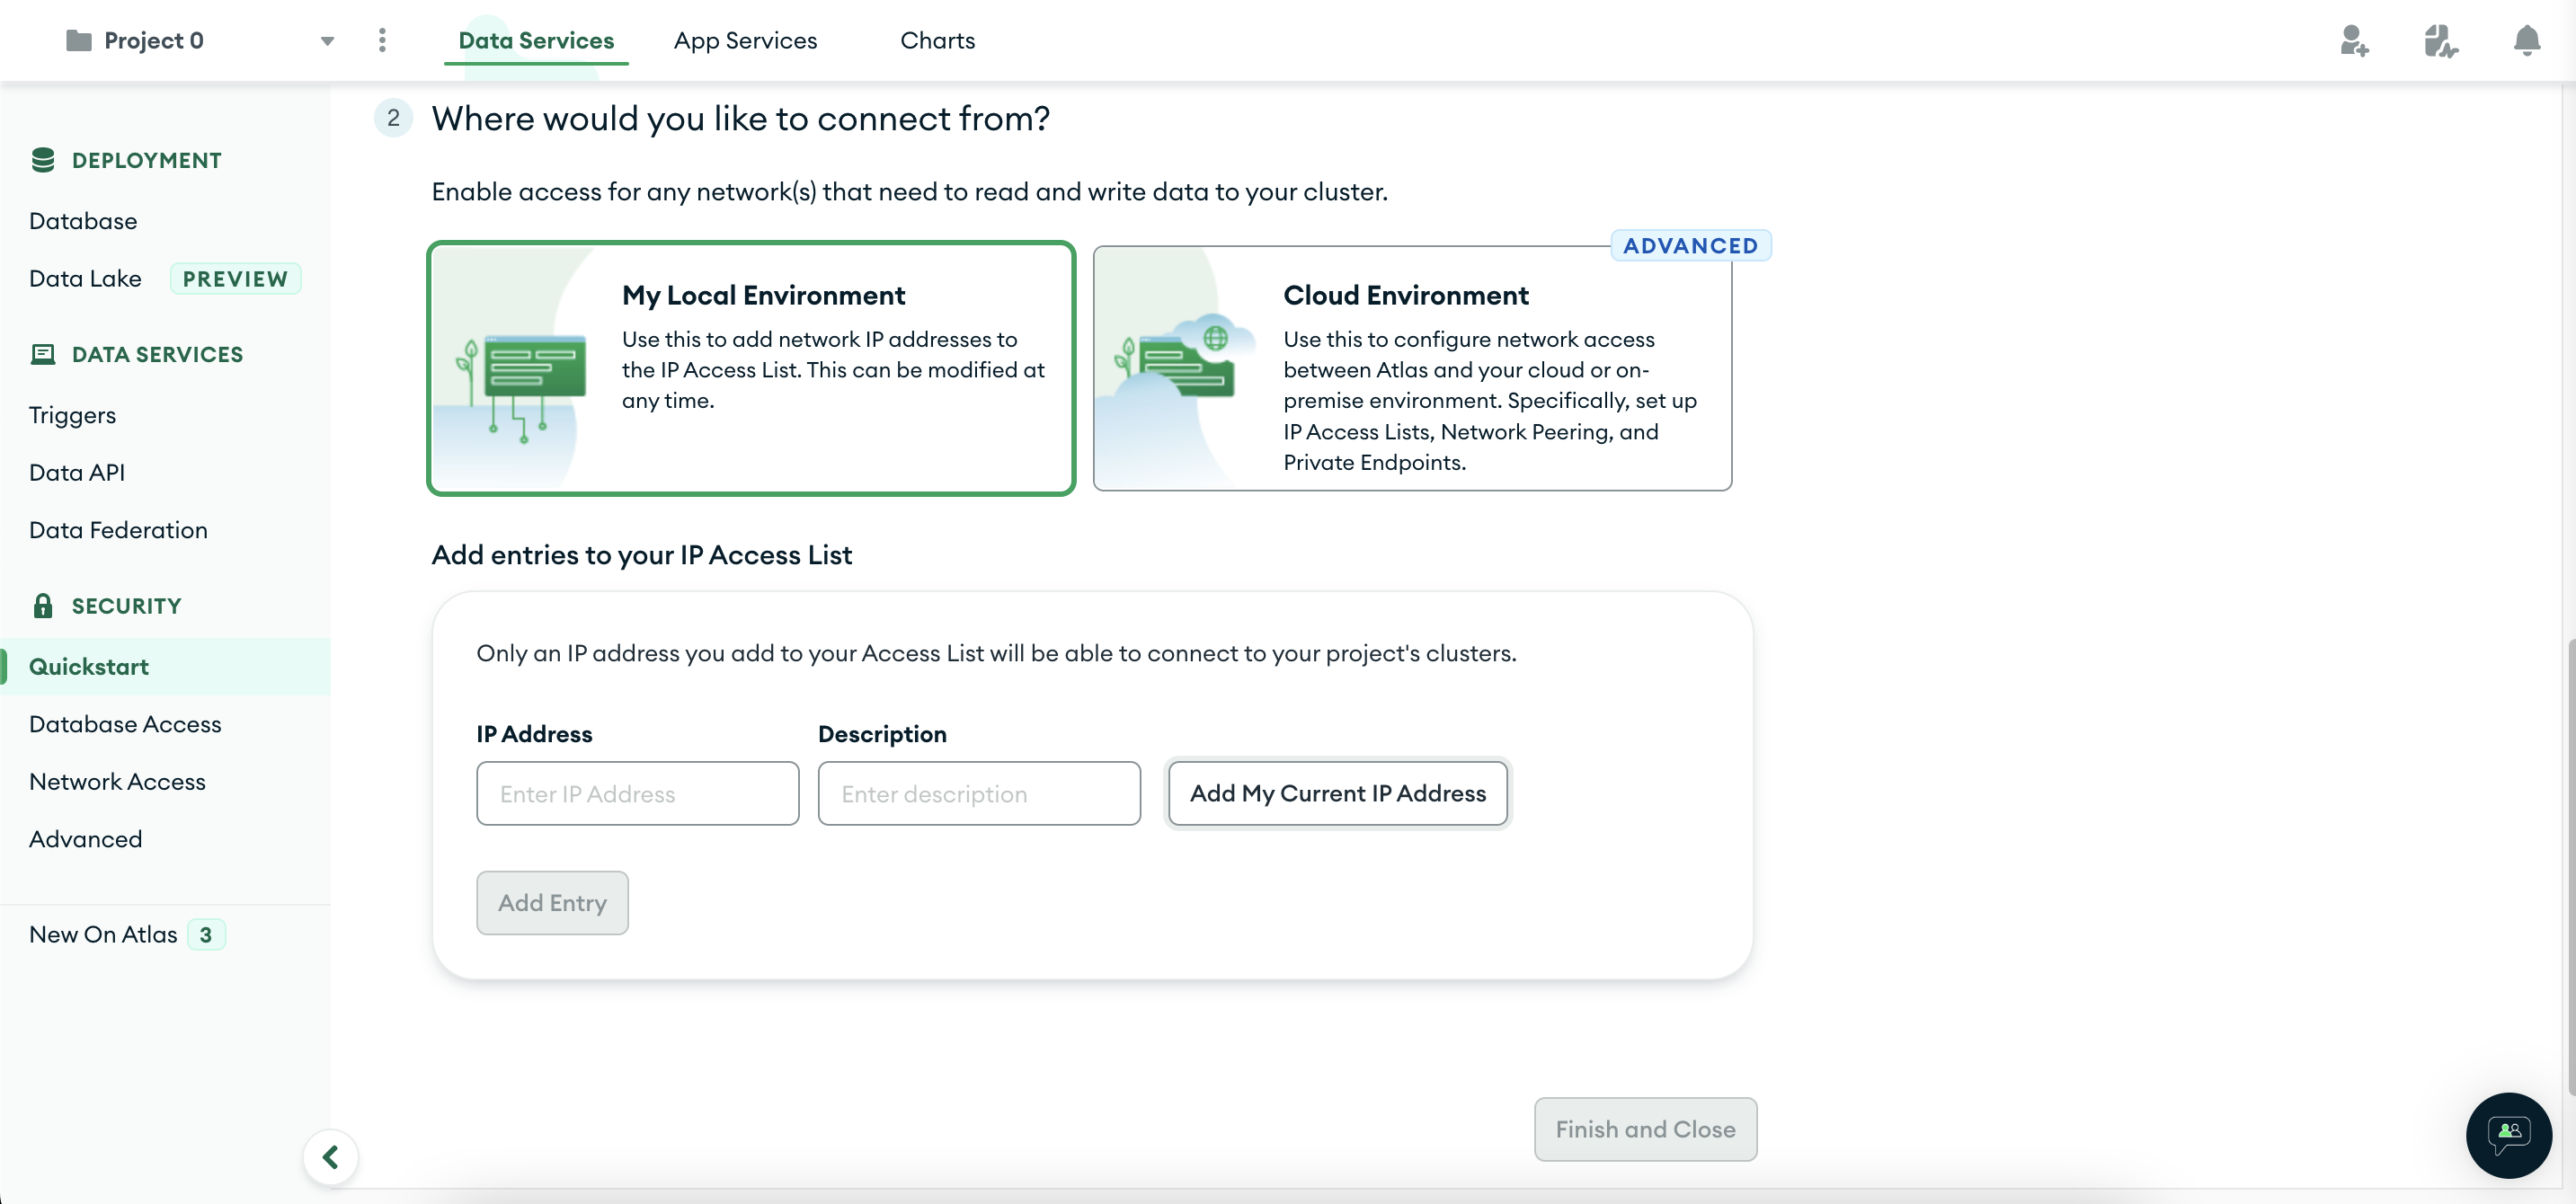
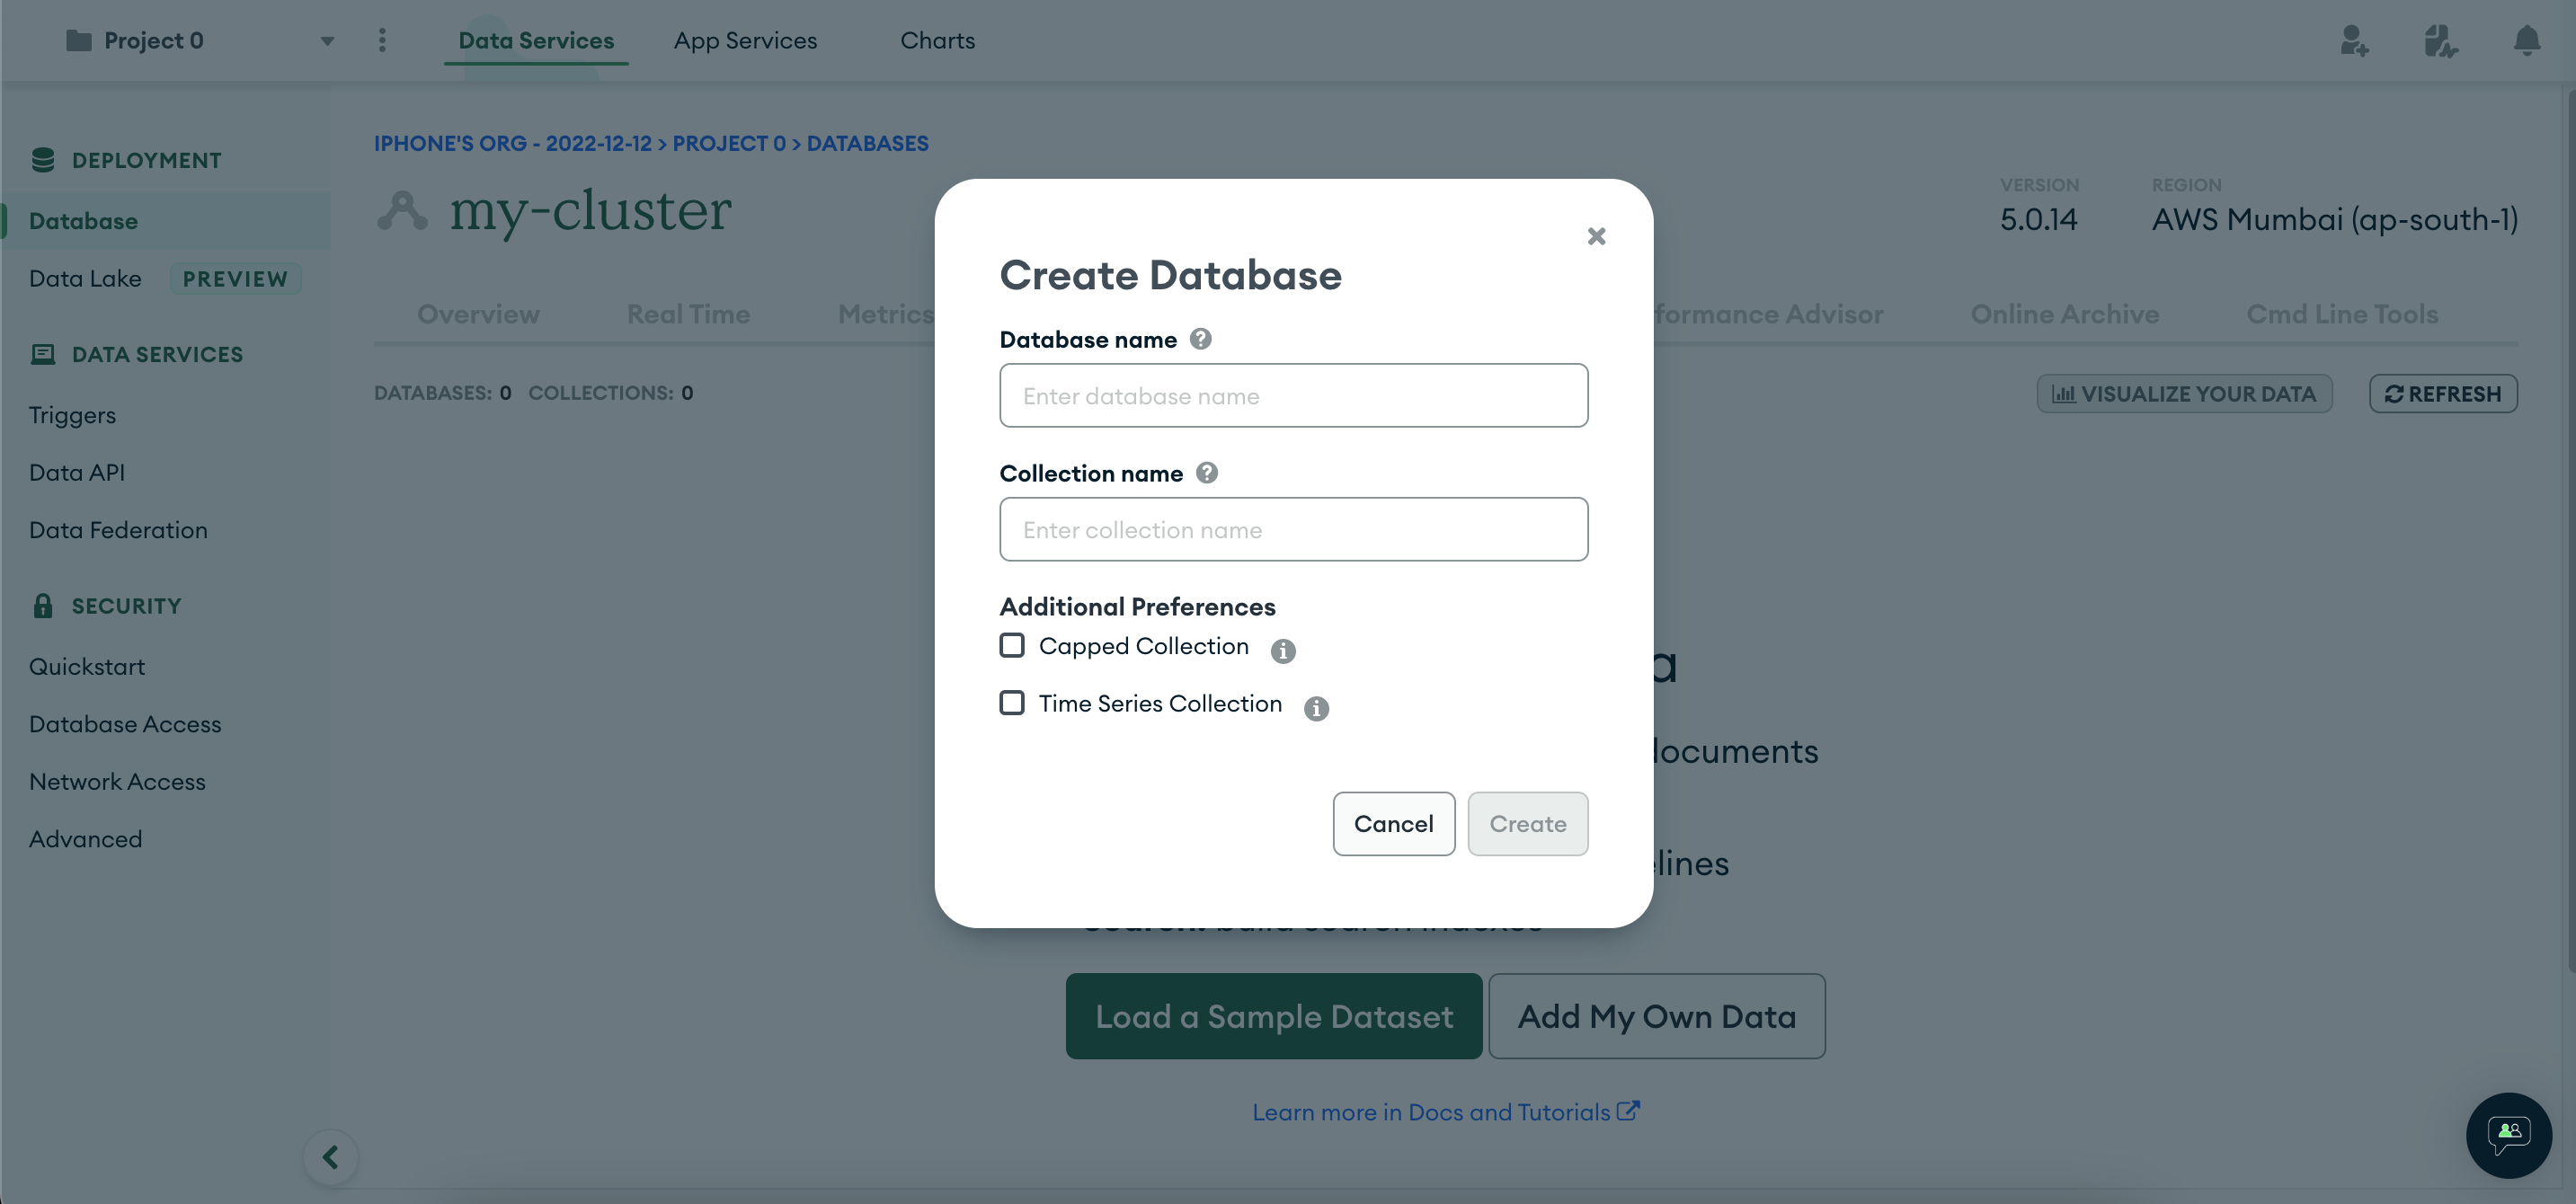
After completing the above steps you come to your cluster dashboard. From there you can browse your databases and collections. Of course, right now we don't have any of that. When you click on the `Collections` tab just below the cluster name, you can see options to load sample data or add your own data.
Click on Add My Own Data, it will ask you to create a database (pick a suitable name) and name your first collection. For my game, I named my first collection games (ironic, isn't it :-)). I left the rest of the two checkboxes unchecked (their default state).
Now there is only one step remaining, and that is to create an API Key for interacting with the newly created project. Click on the Access Manager menu at the top, and then click Project Access just above your project name (Project 0 in this case)

Click on the API Key tab, and create an API Key by giving the appropriate description and the project permissions. Do remember to note down the private key, as you can't retrieve it later on. Additionally, you can also restrict access to your local IP address.

The Local Setup
To interact with the project from our local machine, we need to install realm-cli. Run the following in your terminal
npm install -g mongodb-realm-cli
Now we need to log in to the CLI using the API Key we created in the last step of the previous section.
realm-cli login --api-key="<public_api_key>" --private-api-key="<private_api_key>"
Now we are ready with our setup and it is time to start coding. Create a new react project using
yarn create react-app my-app
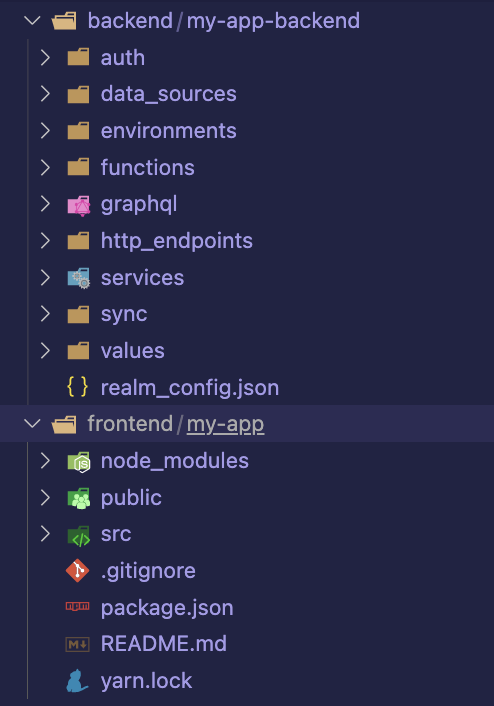
In my case, I moved all of the files to an inner folder called frontend. Then I created a backend folder inside the root directory and created a new MongoDB backend application using
realm-cli app create --environment development --cluster <my_cluster_name>
Now my project folder structure looks something like the below image (I used my-app-backend as my app name while creating the backend):
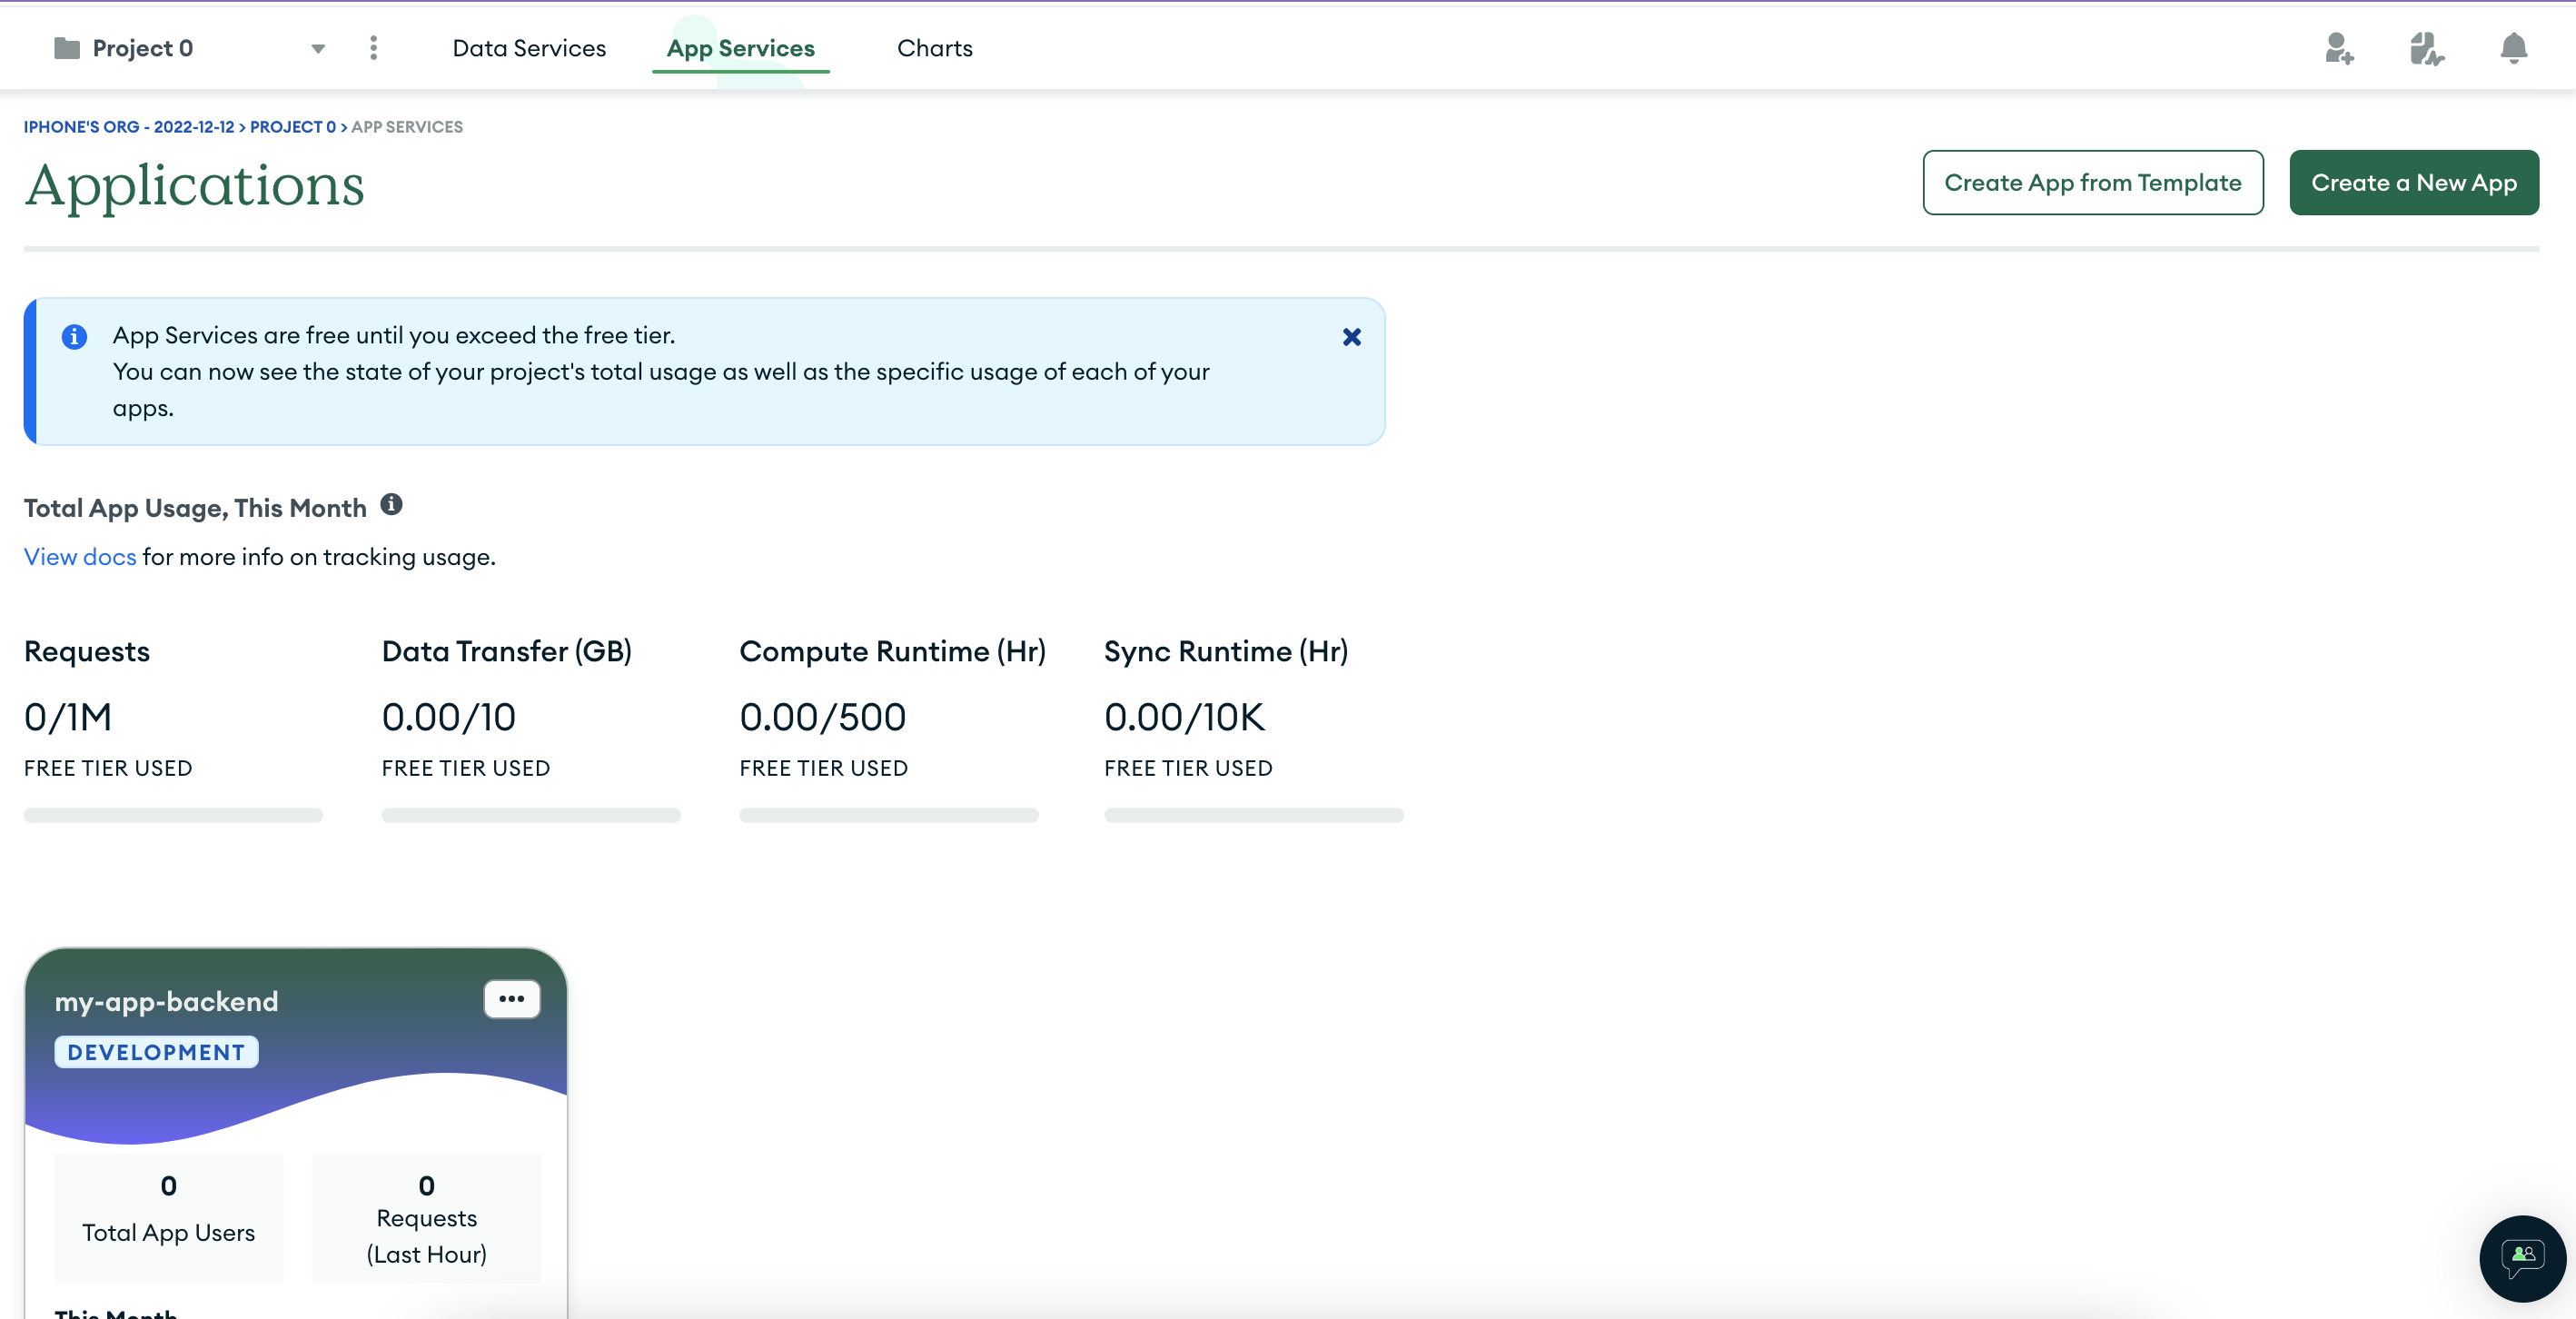
If we see our app services project in the MongoDB Atlas UI it will look something like this (we could have created the project from the UI itself, and then pulled it down using the CLI).
Creating an HTTPS Endpoint
After the local project creation, the first task at hand was to be able to create new games and store them in the DB. I needed a backend worker to execute my already tested local game generation code. This backend worker needed to support 2 approaches
- Ability to be called ad-hoc (so that I can readily create new games in case of emergencies)
- Ability to be called automatically through some trigger (so that I need not call it ad-hoc :-))
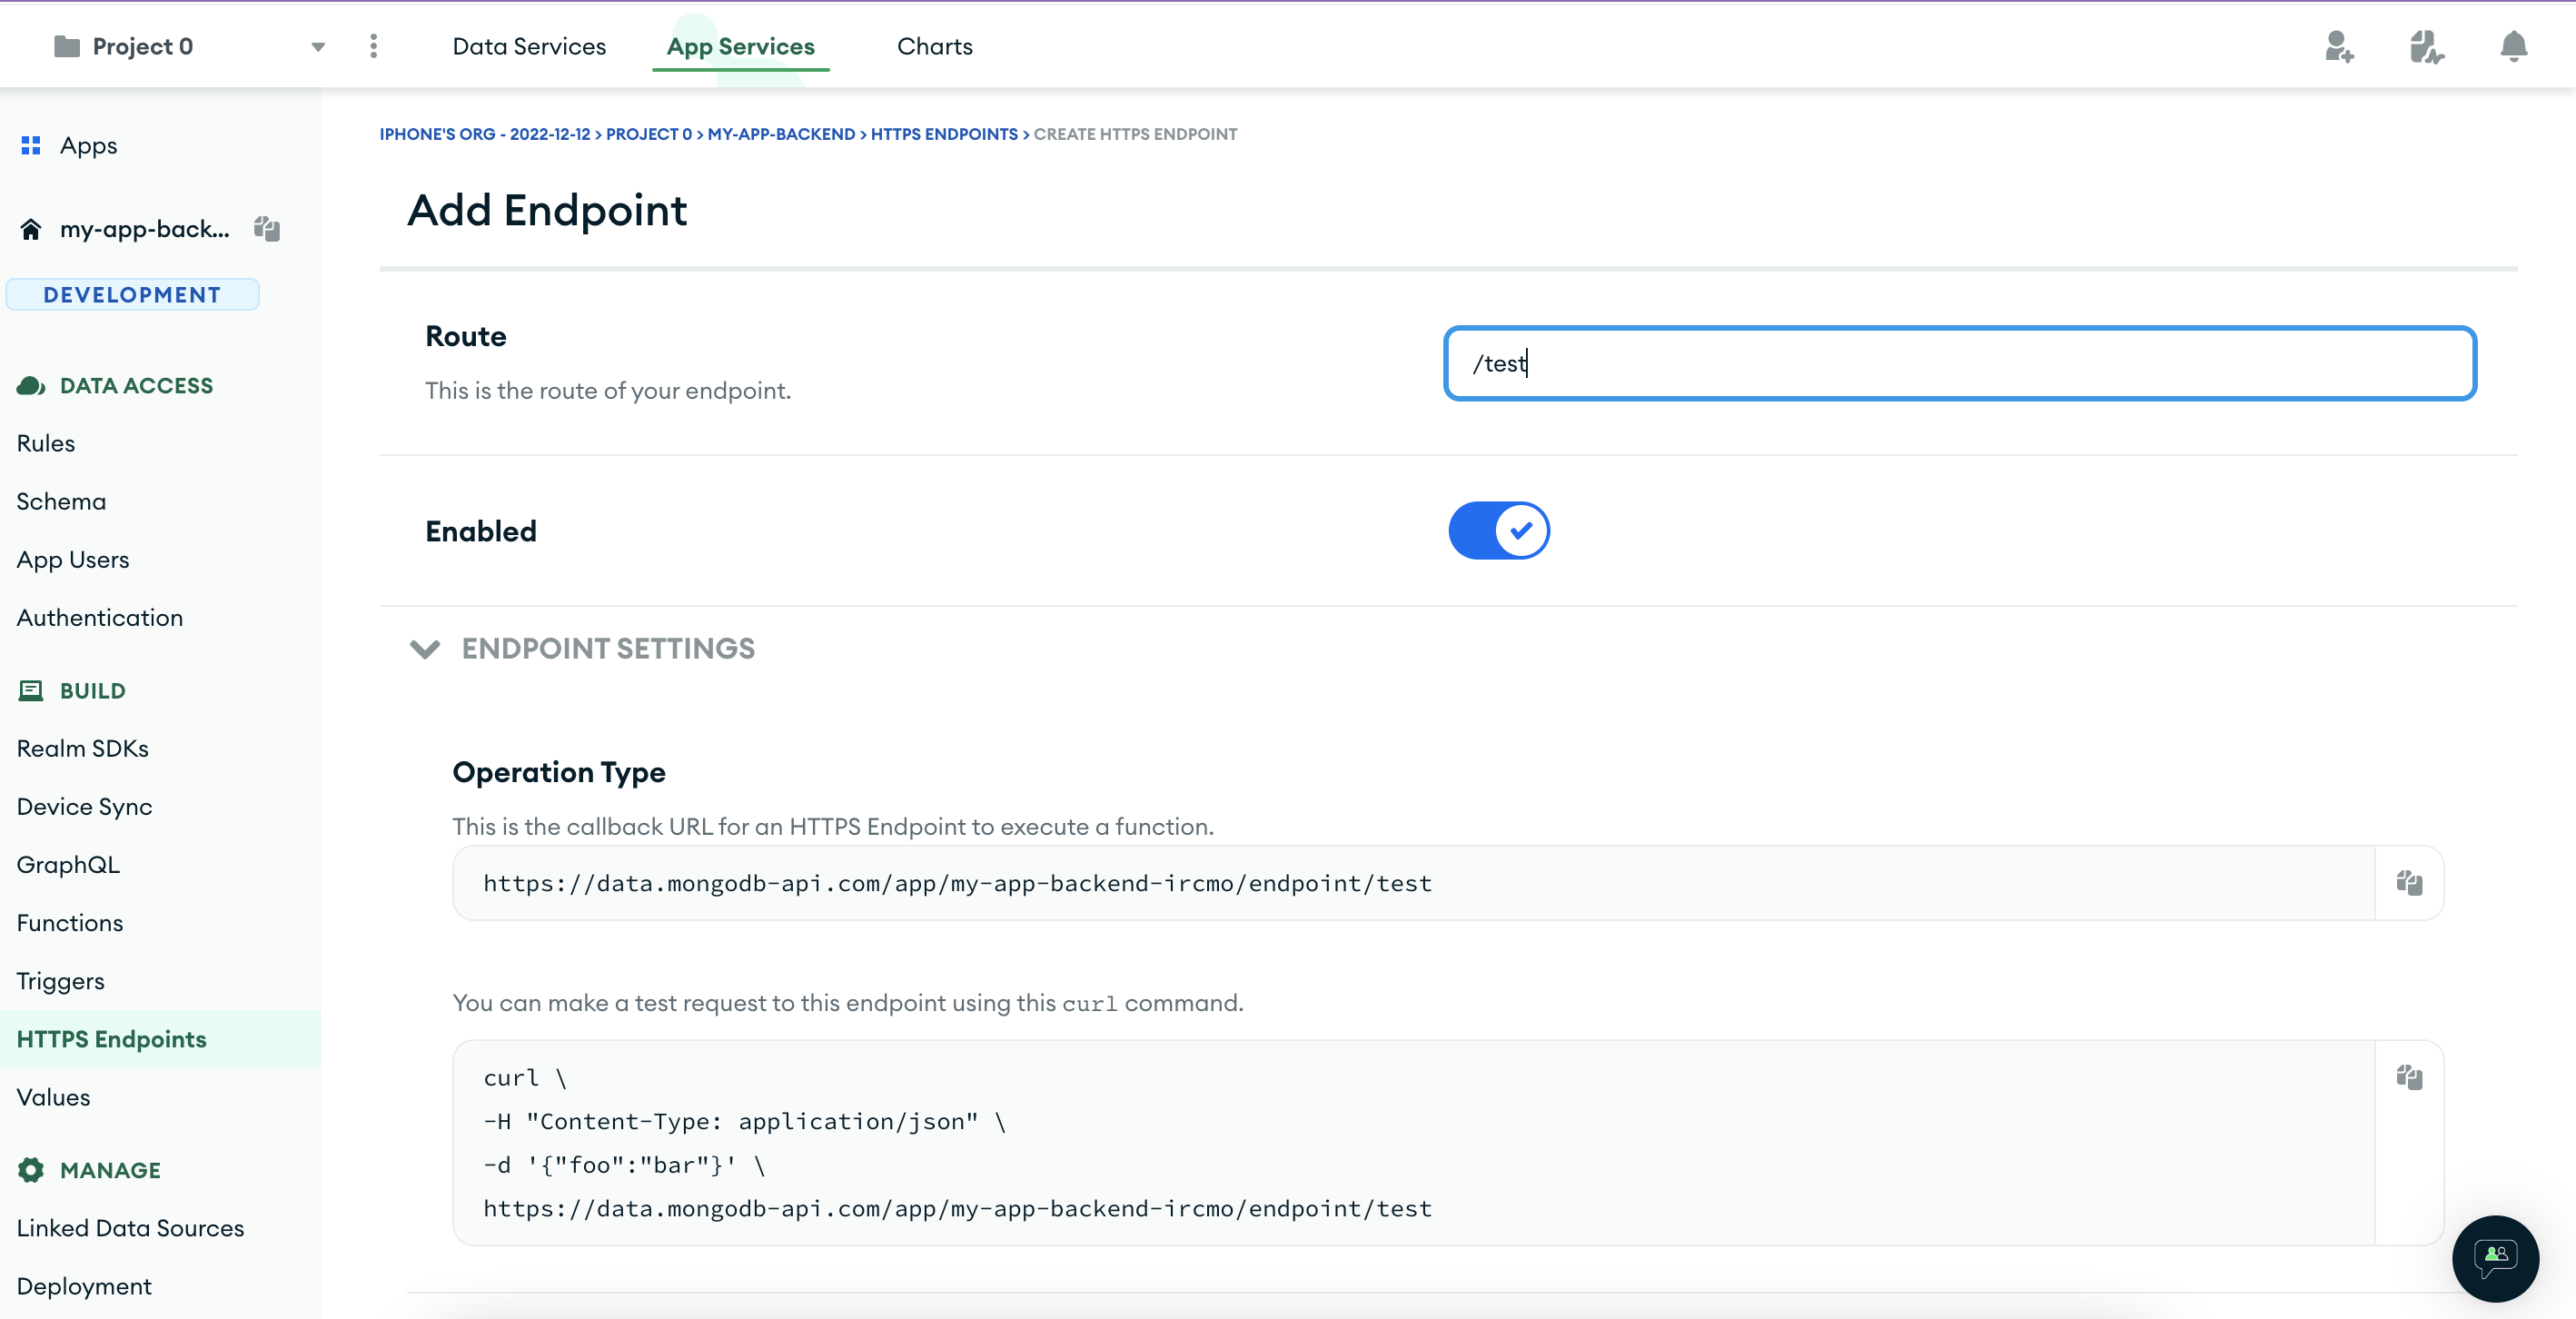
HTTPS Endpoints backed by functions fit the bill perfectly. I couldn't find a way to create an endpoint interactively using the realm-cli, so created the same using the app services UI (Go inside your application in the App Services tab, and pick HTTPS Endpoints from the left sidebar menu).
While creating an endpoint you can configure the Authentication for the function backing this endpoint (which is by default Application Auth). Since I will be calling this endpoint ad-hoc (using Postman and such), I had to change the authentication to System. This is not possible to do while creating the endpoint. We can do it afterwards by going to the backing function settings, and changing the authentication to System.

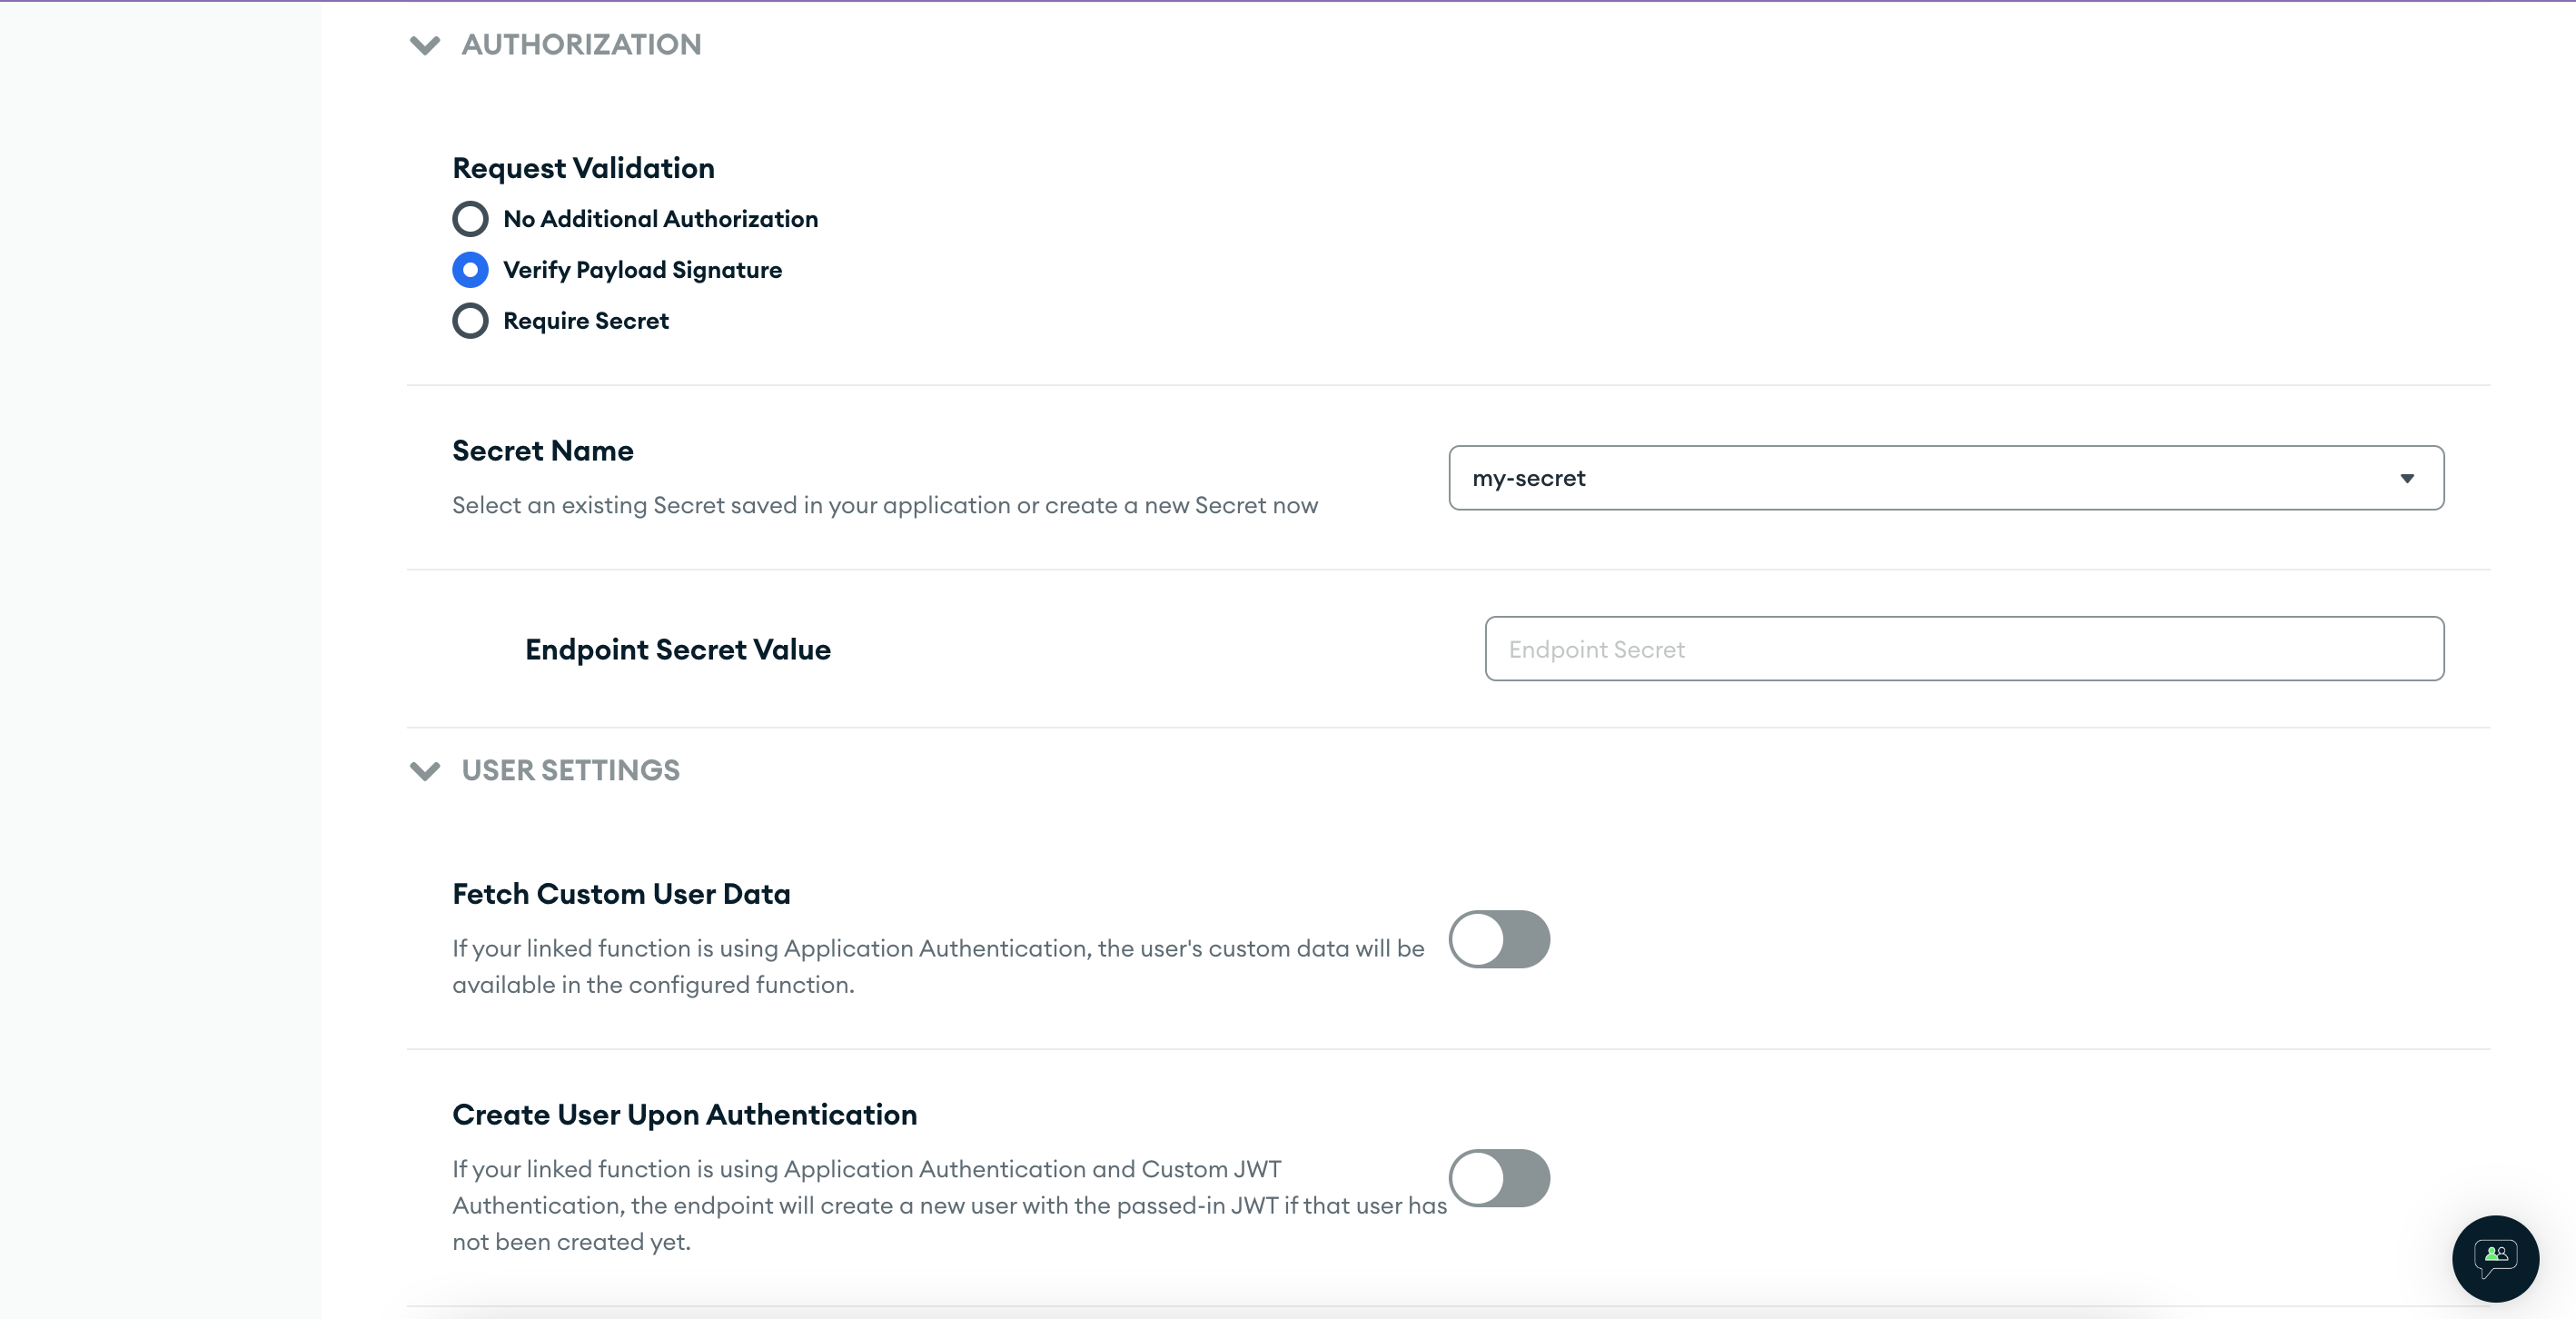
To give our endpoint a bit of protection, I changed the endpoint authorization to Verify Payload Signature. By doing so, if we want to make a successful call to our endpoint we need to sign our payload with a secret (which we create in the app services UI itself). Since we didn't have any function till now, I also created a new function during the process and accepted the default generated code.
Before testing the function we need to change the function setting and allow it to run as System. We can also make the function private if we don't want to call it from the client. For logging the function arguments etc., we can also enable the corresponding setting from the same page.

Don't forget to "Review & Deploy" your changes.
Now we're ready to test this endpoint. Launch postman, configure the endpoint URL (You can get it from the HTTPS Endpoint setting we created earlier), select the correct method (POST in my case), add some dummy body, and BAM! Send.
We should get an error
{
    "error": "expected to find Endpoint-Signature in header",
    "error_code": "InvalidParameter",
    "link": "https://realm.mongodb.com/groups/6385ddf6b41c43346bccf9ff/..."
}
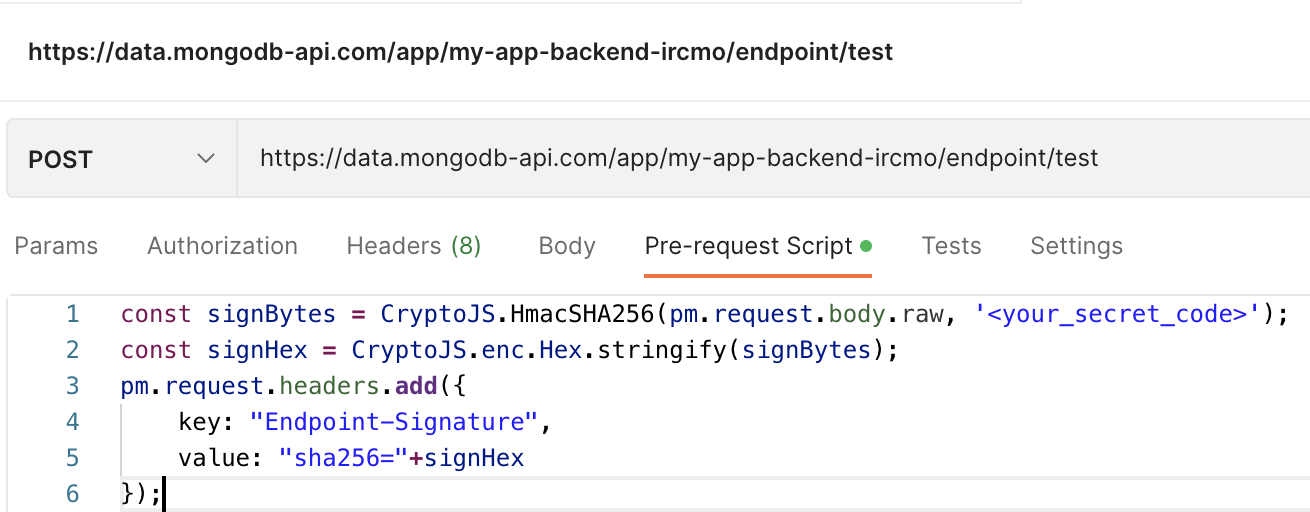
This is expected because we had configured some auth mechanism earlier, so we need to sign our payload using the secret key we had created, and pass this in a header with the request. In postman, we can do so by adding the following code in the Pre-request Script tab
const signBytes = CryptoJS.HmacSHA256(pm.request.body.raw, '<your_secret_code>');
const signHex = CryptoJS.enc.Hex.stringify(signBytes);
pm.request.headers.add({
    key: "Endpoint-Signature",
    value: "sha256="+signHex
});
If we hit our backend again, we should get the correct response "Hello World" (if you didn't change anything in the default function code).
I struggled with this for some time, the reason being the App services UI itself. While creating the endpoint it shows how to call your endpoint using curl. If you look closely at the image below, it shows the header name as "X-Hook-Signature".
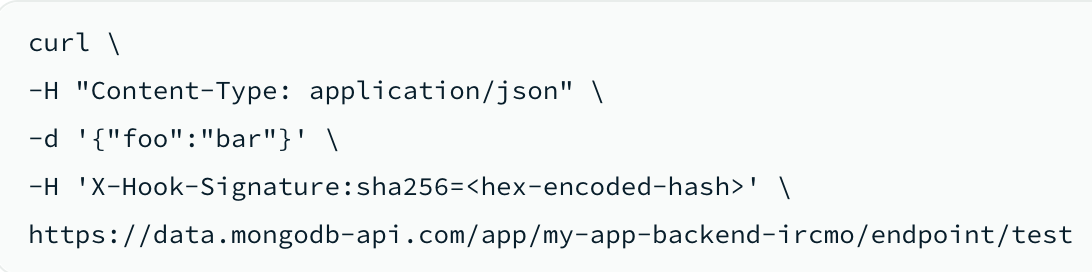
After doing some Google searches, and also looking at the error messages in Postman (Why would I look there when the UI itself says X-Hook-Signature), I was able to figure out the issue. I also needed some time to figure out the "sha256=" prefix for the header value. But all's well that ends well :-)
Since our endpoint is working, we can replace the default function code with the below code, which generates new games, find out their solution and saves them to the games collection in our database.
We can do the change either in the functions UI in the browser, or we can pull down the changes to our local project (go to backend -> my-app-backend folder in your terminal, and do realm-cli pull. This will pull the remote changes to your local setup). Then go to the functions folder inside the backend project, and update the code of the appropriate function file.
const ROWS = 6;
const COLS = 6;

// Generate a random number between min (included) & max (excluded)
const randomInt = (min, max) => {
  return Math.floor(Math.random() * (max - min)) + min;
};

const getCoinsWithWalls = (start, end, count) => {
  const coinColIndices = [];
  while (coinColIndices.length < count) {
    const index = randomInt(start, end);
    if (!coinColIndices.includes(index)) {
      coinColIndices.push(index);
    }
  }

  return coinColIndices;
};

const addJob = (jobs, src, currJob) => {
  jobs.push({
    coins: JSON.parse(JSON.stringify(currJob.coins)),
    src,
    dst: currJob.dst,
    pastMoves: JSON.parse(JSON.stringify(currJob.pastMoves)),
    total: currJob.total,
  });
};

const handleJob = (jobs, job) => {
  const row = job.src[0];
  const col = job.src[1];
  const srcNode = job.coins[row][col];

  srcNode.finished = true;
  if (row === job.dst[0] && col === job.dst[1]) {
    job.total += srcNode.value;
    job.pastMoves.push(`${job.dst[0]}${job.dst[1]}`);
    return true;
  }

  const neighbors = {
    prevNode: col > 0 ? job.coins[row][col - 1] : null,
    nextNode: col < COLS - 1 ? job.coins[row][col + 1] : null,
    topNode: row > 0 ? job.coins[row - 1][col] : null,
    bottomNode: row < ROWS - 1 ? job.coins[row + 1][col] : null,
  };

  job.total += srcNode.value;
  job.pastMoves.push(srcNode.id);

  for (const key in neighbors) {
    const neighbor = neighbors[key];
    if (neighbor && !neighbor.finished) {
      if (key === 'prevNode' && neighbor.wall !== 2 && srcNode.wall !== 4) {
        addJob(jobs, [row, col - 1], job);
      }

      if (key === 'nextNode' && neighbor.wall !== 4 && srcNode.wall !== 2) {
        addJob(jobs, [row, col + 1], job);
      }

      if (key === 'topNode' && neighbor.wall !== 3 && srcNode.wall !== 1) {
        addJob(jobs, [row - 1, col], job);
      }

      if (key === 'bottomNode' && neighbor.wall !== 1 && srcNode.wall !== 3) {
        addJob(jobs, [row + 1, col], job);
      }
    }
  }

  return false;
};

const findBestRoute = (coins, start, end) => {
  const src = [parseInt(start[0]), parseInt(start[1])];
  const dst = [parseInt(end[0]), parseInt(end[1])];

  const jobs = [{ coins, src, dst, pastMoves: [], total: 0 }];
  const results = [];

  while (jobs.length) {
    const job = jobs.shift();
    if (handleJob(jobs, job)) {
      results.push({
        total: job.total,
        moves: job.pastMoves.length,
        path: job.pastMoves,
      });
    }
  }

  if (results.length) {
    results.sort((result1, result2) => {
      return result2.total - result1.total;
    });

    return results[0];
  } else {
    console.log(`No valid path found`);
  }
};

exports = async function (req) {
  let reqBody = null;
  if (req) {
    if (req.body) {
      console.log(`got a req body: ${req.body.text()}`);
      reqBody = JSON.parse(req.body.text());
    } else {
      console.log(`got a req without req body: ${JSON.stringify(req)}`);
    }
  }

  const coins = [];
  for (let row = 0; row < ROWS; row++) {
    coins.push([]);

    const blockages = getCoinsWithWalls(0, COLS, 2);
    for (let col = 0; col < COLS; col++) {
      const coin = {
        id: `${row}${col}`,
        value: randomInt(1, 7),
        wall: 0,
      };

      if (blockages.includes(col)) {
        coin.wall = randomInt(1, 5);
      }

      coins[row].push(coin);
    }
  }

  const start = `${randomInt(2, 4)}${randomInt(2, 4)}`;
  let end = randomInt(1, 5);
  if (end === 1) {
    end = '00';
  } else if (end === 2) {
    end = `0${COLS - 1}`;
  } else if (end === 3) {
    end = `${ROWS - 1}0`;
  } else {
    end = `${ROWS - 1}${COLS - 1}`;
  }

  const date = new Date();
  const gameEntry = {
    coins,
    start,
    end,
    active: false,
    createdAt: date,
    updatedAt: date,
  };

  const startTime = Date.now();
  const bestMove = findBestRoute(JSON.parse(JSON.stringify(coins)), start, end);
  console.log(
    `Total time taken for finding bestRoute: ${Date.now() - startTime} ms`
  );

  if (bestMove) {
    console.log(`best path: ${JSON.stringify(bestMove)}`);
    gameEntry.maxScore = bestMove.total;
    gameEntry.maxScoreMoves = bestMove.moves;
    gameEntry.hints = bestMove.path;

    const mongoDb = context.services.get('cluster-service-name').db('db-name');
    const gamesCollection = mongoDb.collection('games');
    const appCollection = mongoDb.collection('app');
    const config = await appCollection.findOne({ type: 'config' });

    console.log('fetch config data:', JSON.stringify(config));
    console.log('lastPlayableGame:', config.lastPlayableGame);

    if (config) {
      if (config.lastPlayableGame) {
        const lastPlayableDate = config.lastPlayableGame.playableAt;
        lastPlayableDate.setUTCDate(lastPlayableDate.getDate() + 1);
        gameEntry.playableAt = lastPlayableDate;
        gameEntry.gameNo = config.lastPlayableGame.gameNo + 1;
        if (reqBody) {
          if (reqBody.active) {
            gameEntry.active = true;
          }

          if (reqBody.current) {
            gameEntry.current = true;
          }
        }
      } else {
        const playableDate = new Date();
        playableDate.setUTCHours(0, 0, 0, 0);
        gameEntry.playableAt = playableDate;
        gameEntry.gameNo = 1;
        gameEntry.current = true;
        gameEntry.active = true;
      }
    }

    let result = await gamesCollection.insertOne(gameEntry);
    console.log(
      `Successfully inserted game with _id: ${JSON.stringify(result)}`
    );

    result = await appCollection.updateOne(
      { type: 'config' },
      {
        $set: {
          lastPlayableGame: {
            playableAt: gameEntry.playableAt,
            gameNo: gameEntry.gameNo,
            _id: result.insertedId,
          },
        },
      }
    );

    console.log('result of update operation: ', JSON.stringify(result));
  }

  return gameEntry;
};
Behind the scenes, I also created another collection called "app" the purpose of which is to store the app-specific settings and information. Since the newly created game will be played sometime in future, and there will be some extra games stored in the games collection, I am utilizing the app collection to make note of the last created game.
Also notice that we are saving the new game only if it has a solution (there might be cases where the game has no solution, as everything is getting generated randomly).
If you did the above changes in your local setup, then you need to run realm-cli push in your terminal before you can call your endpoint.
Now, if you call your endpoint from postman, you should get back the game object as a reply. And also, there should be a new document present in your games collection of the database.
Some gotchas with App Services Functions
In the above function also, I struggled for quite some time due to 2 issues.
- Functions documentation says that it supports
cryptomodule partially. I was usingcrypto.randomIntto do my random number generation. But the function was failing giving unhelpful error messages (TypeError: Value is not an object: undefined). After a lot of trial and error, ultimately I found out that therandomIntmethod is unavailable in the app services crypto, so I created a new function usingMath.randomto generate random numbers. It would be great to have some meaningful error messages in such cases. - I was using a
Setto keep track of generated walls (blockages). But on checkingif (blockages.has(col))I was gettingfalsefor all columns except0. Again this needed some testing and figuring out. Finally replacedSetwith alist(as is visible in the code above). Testing with a "set" in my local node setup works perfectly fine, so maybe it has something to do with how app services functions have been implemented behind the scenes, or altogether there is some other issue I can't say.
Update 1: So I couldn't stop thinking about the issue, and raised it in the official MongoDB Developer Community Forum. Heard back from them with the below response:Thank you for raising this: we could reproduce the behaviour, and indeed it looks like
Set.has(…)isn’t returning the expected results.We’re opening an internal ticket about the matter, and will keep this post updated.
Update 2 (Final Update): 14 Dec 2022: Received a new reply from the mongo team that they've identified the bug, and it will be solved in due course (no timeframe). This concludes the mystery around the issue :-)The Team responsible of the underlying function engine has confirmed that the error is due to mishandling of integer values. Set.has(…) should still work for other types, though.
(To clarify: the problem is that the addition of two integers is returning a float, that Set.has() doesn’t compare properly)
Do notice that we're doing addition while generating a random numberMath.floor(Math.random() * (max - min)) + min;
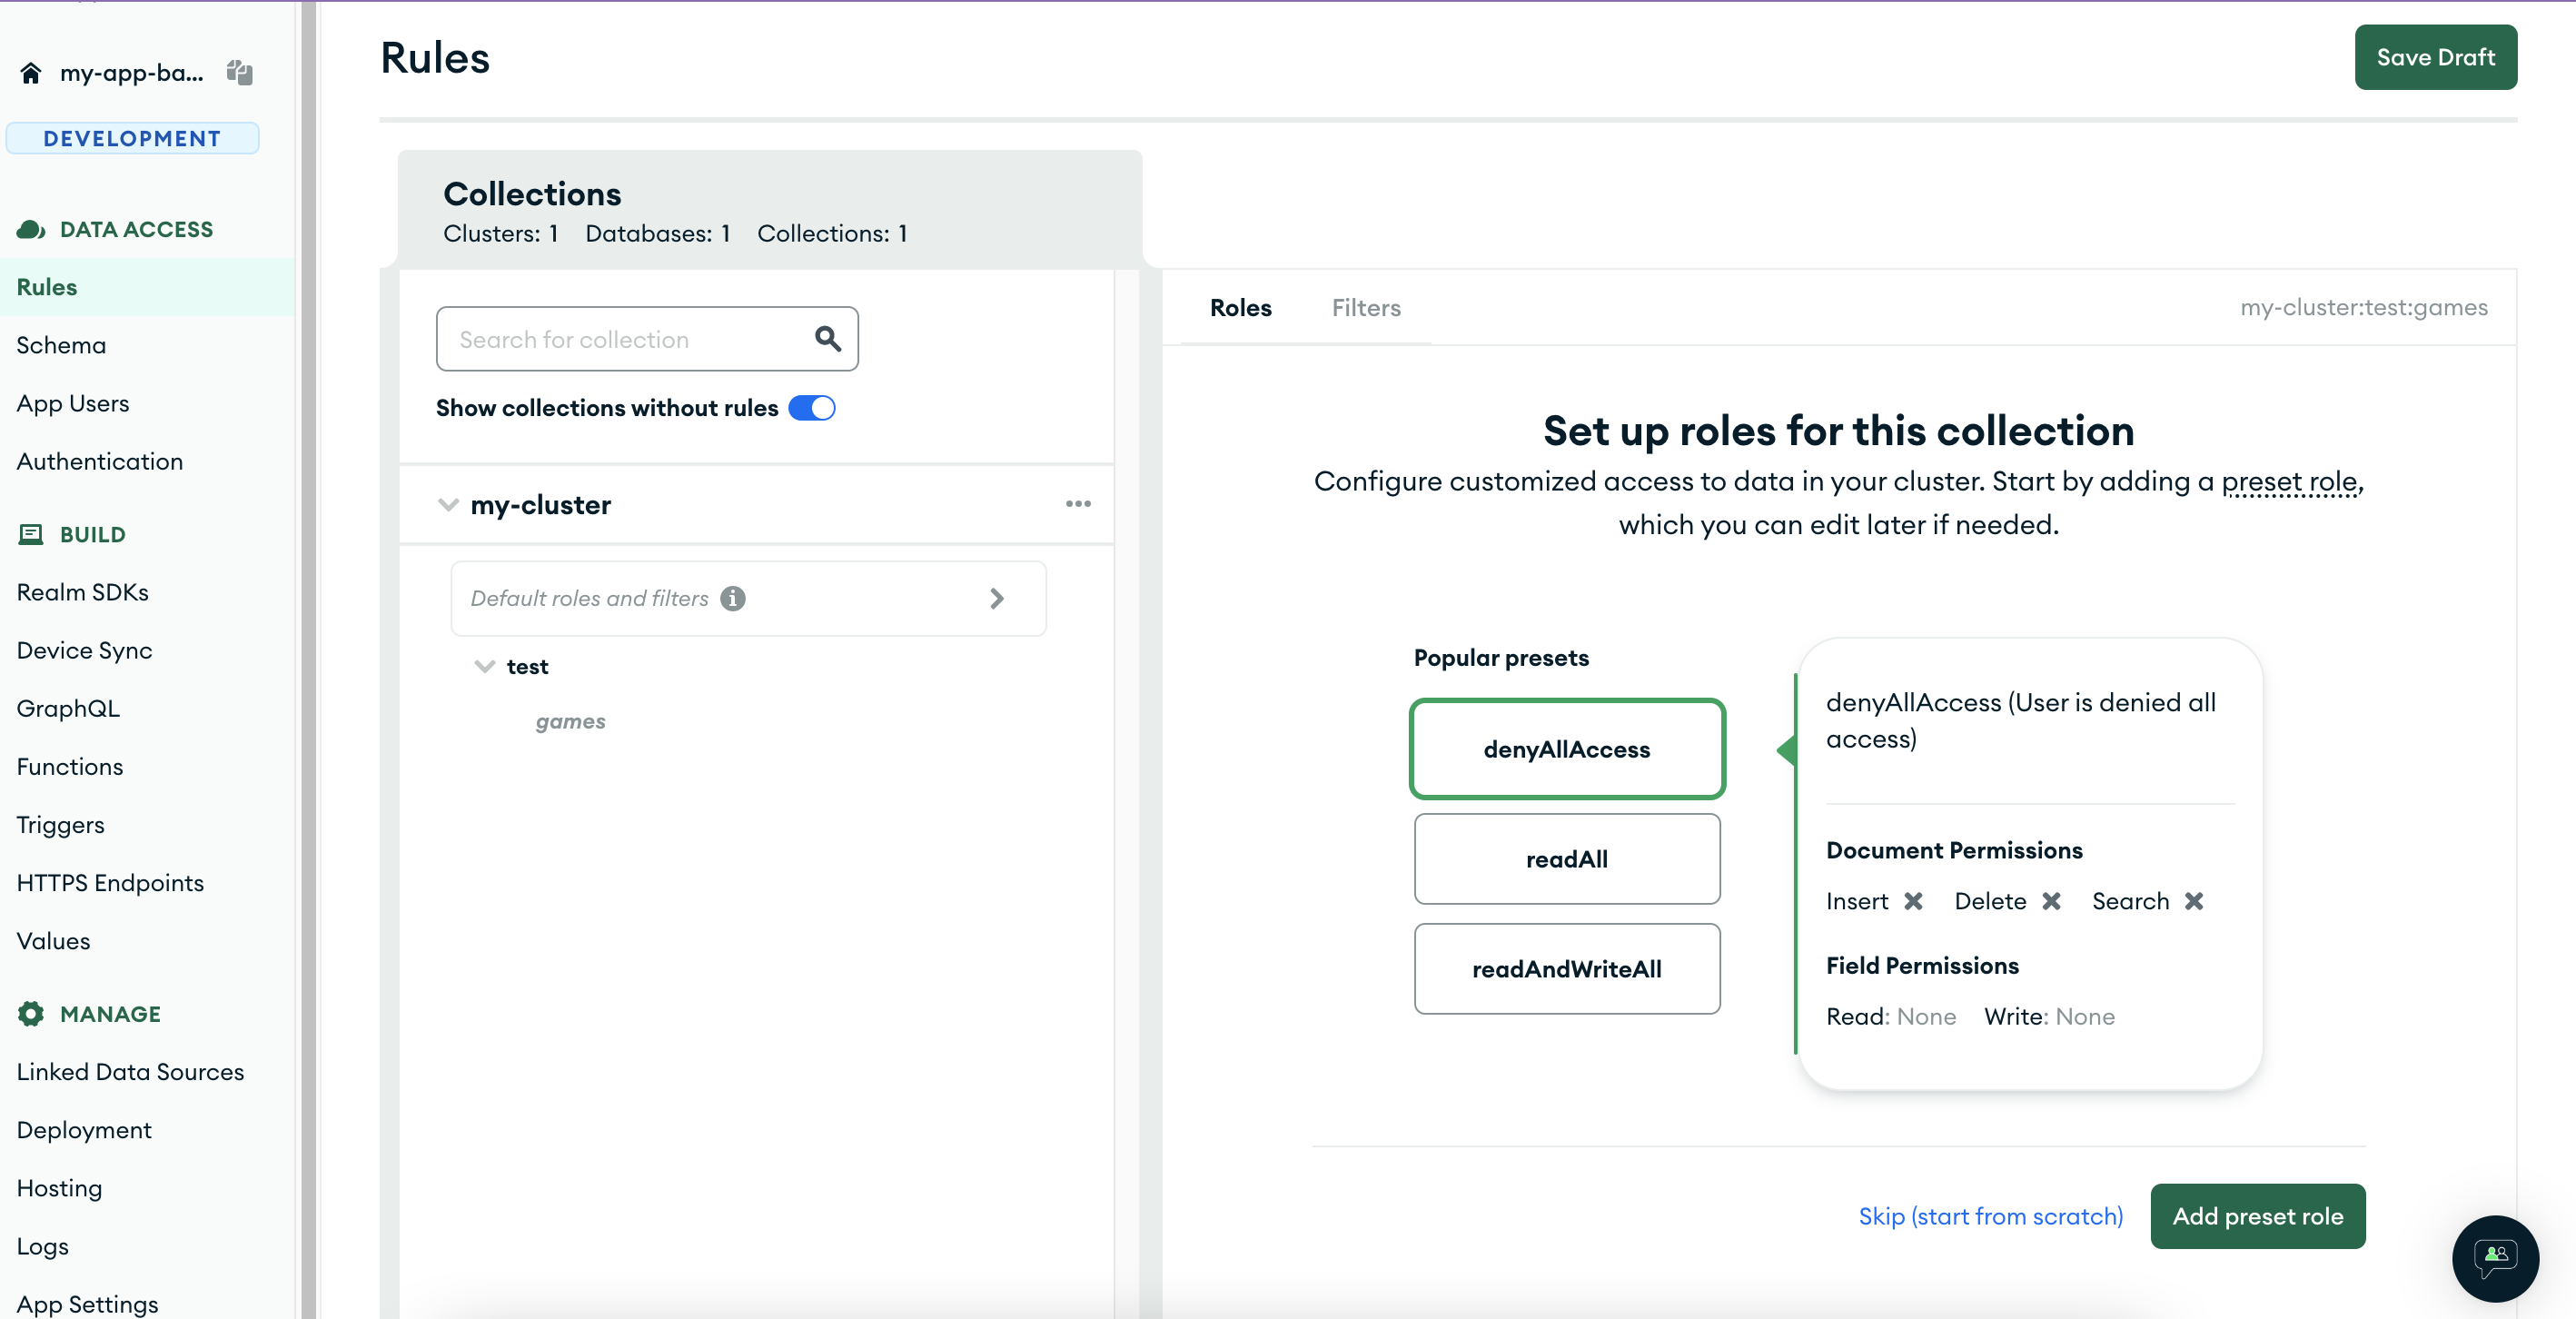
Data Access Rules
To get data using the realm Web SDK (which I added to the react app), we need to configure the data access rules for each of the collections we create. We can do so easily using the App Services UI (or the JSON files in the local setup, but that takes some time to get familiar with).
We can set these rules from App Services UI easily. There are some preset handy rules which we can use, or we can create our own rules from scratch.
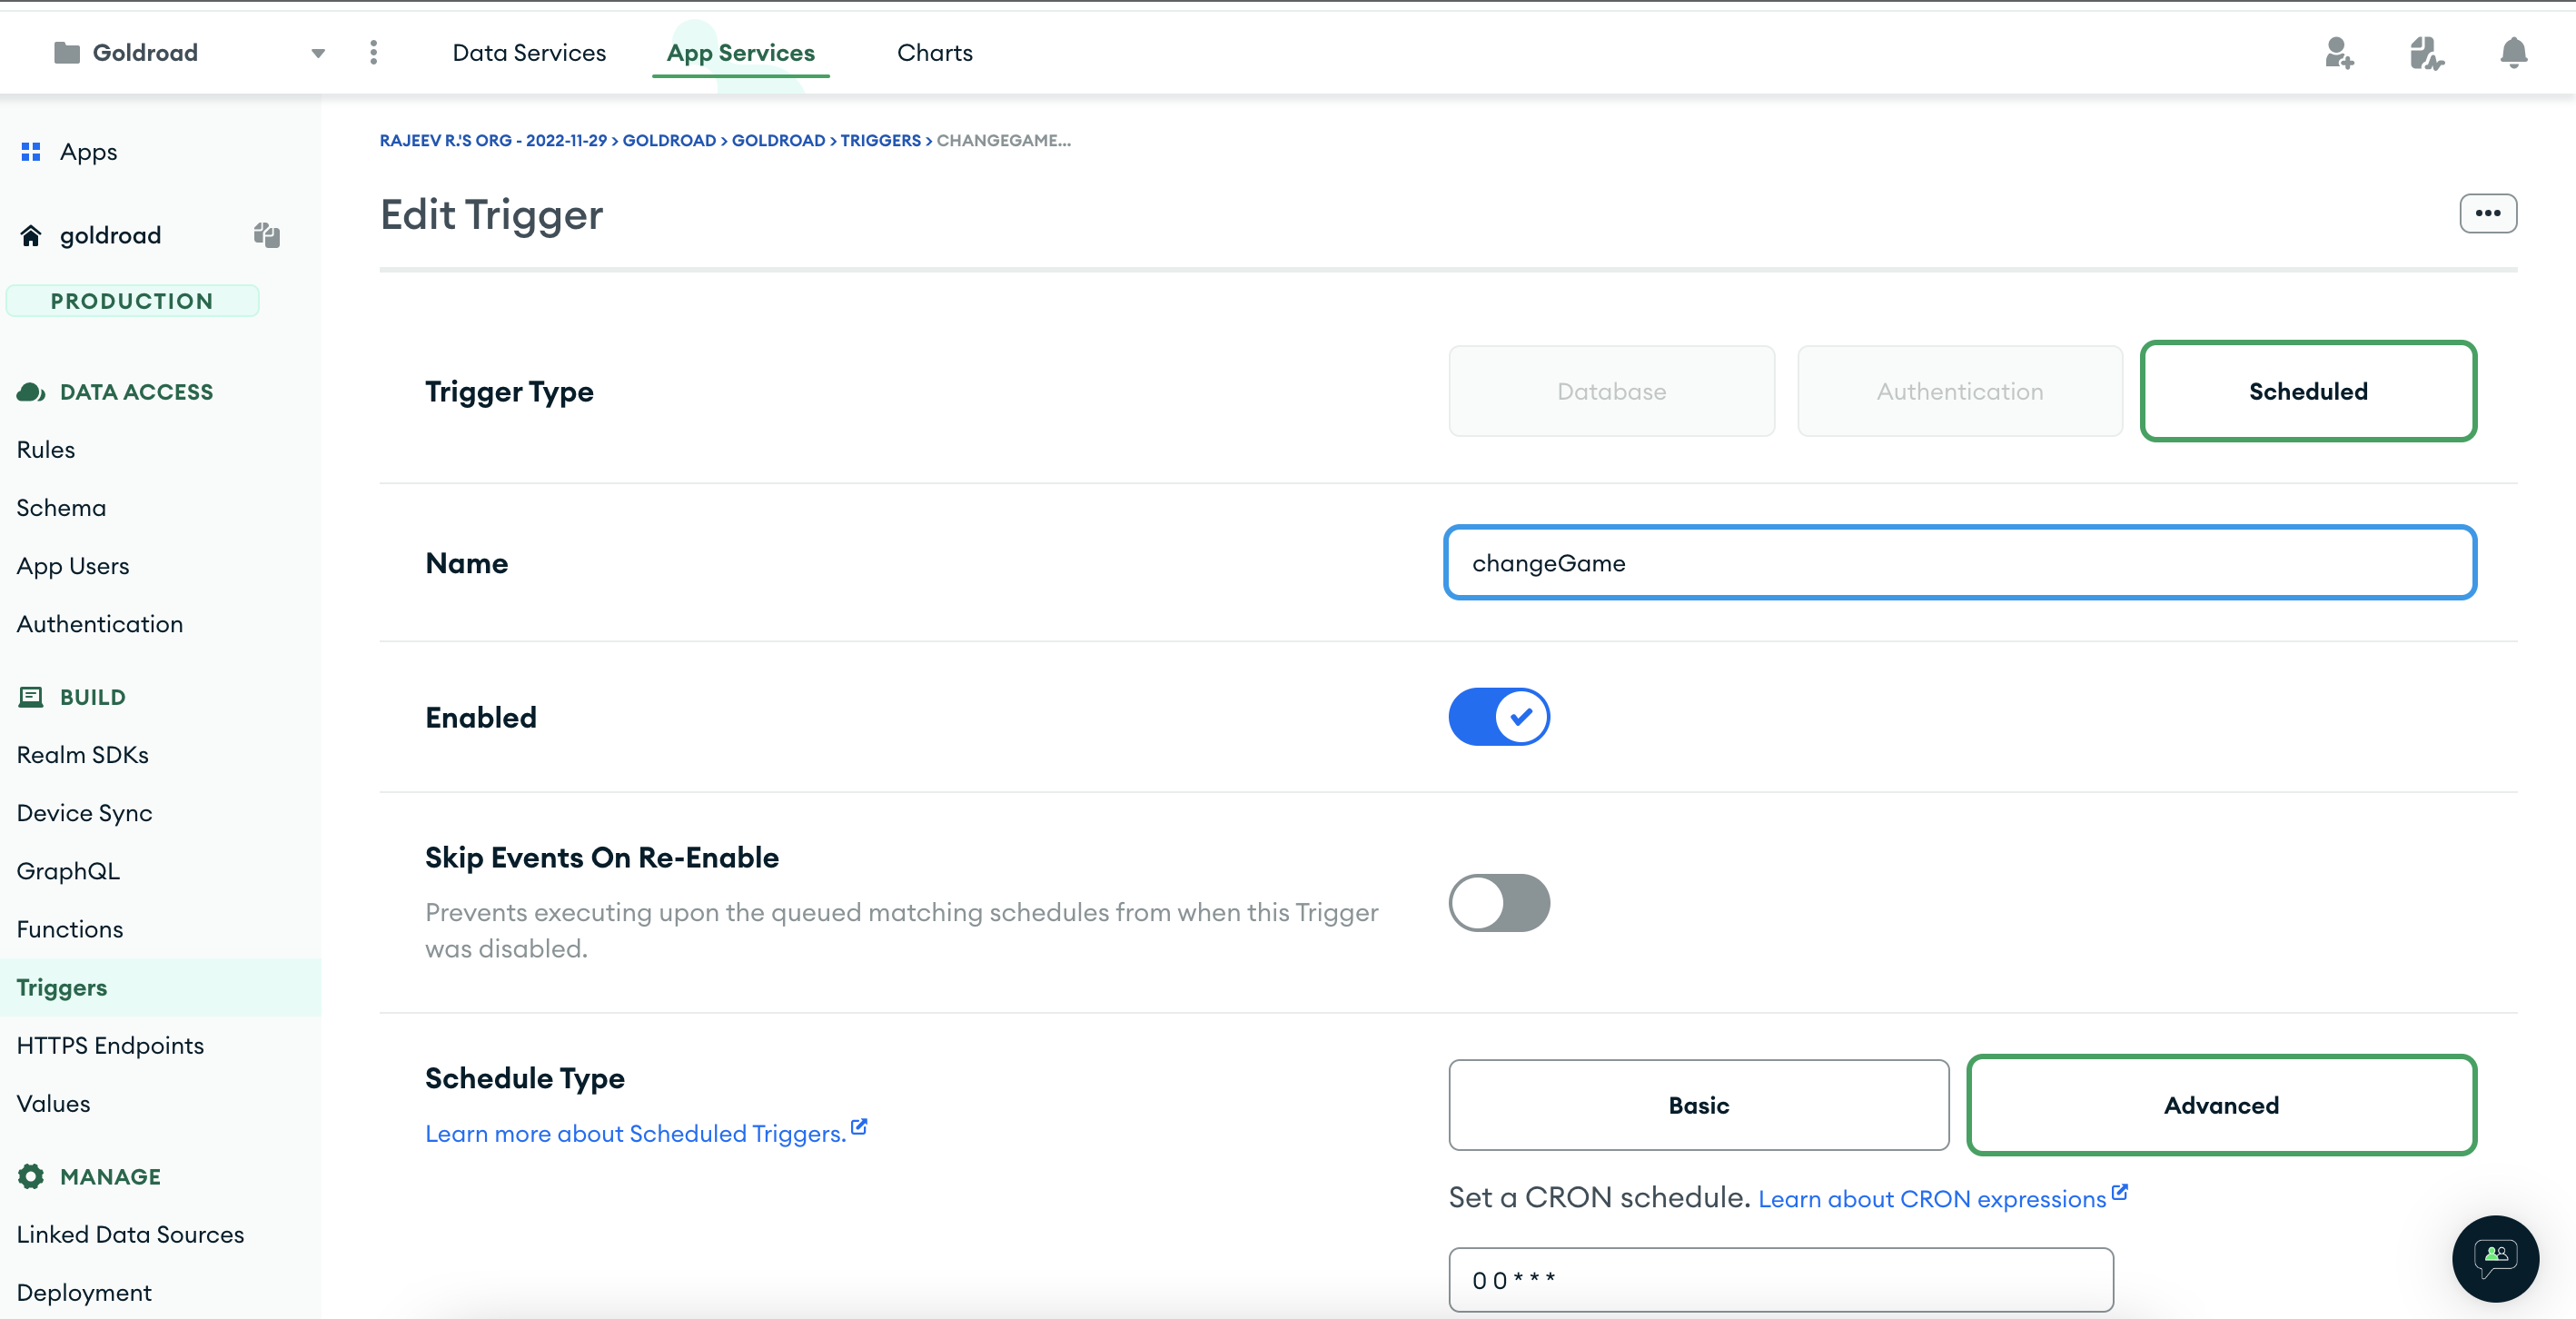
Scheduled Triggers and Backing Function
Since our puzzles should change every day, we need a trigger to do so automatically. App services provide many types of triggers, for my purpose I needed a simple CRON schedule which runs every day at 12:00 AM UTC. Used the advanced schedule type from the UI, and set the schedule to 0 0 * * * and let it call another function to change the game.
Below is the code of the function which makes the current game non-current, and makes the next game in line (recognized by the value of gameNo field of the document).
exports = async function () {
  const mongoDb = context.services.get('cluster-service-nam').db('db-name');
  const gamesCollection = mongoDb.collection('games');
  const currGame = await gamesCollection.findOne({ current: true });
  if (currGame) {
    console.log('got the current game: ', JSON.stringify(currGame));
    const date = new Date();
    const nextGameDate = new Date();
    nextGameDate.setUTCHours(0, 0, 0, 0);
    nextGameDate.setUTCDate(nextGameDate.getDate() + 1);
    await gamesCollection.bulkWrite(
      [
        {
          updateOne: {
            filter: { gameNo: currGame.gameNo + 1 },
            update: {
              $set: {
                current: true,
                active: true,
                updatedAt: date,
                playedAt: date,
                nextGameAt: nextGameDate,
              },
            },
          },
        },
        {
          updateOne: {
            filter: { _id: currGame._id },
            update: { $set: { current: false, updatedAt: date } },
          },
        },
      ],
      { ordered: true }
    );

    console.log('after the bulkWrite Op');
  } else {
    console.log('Error! No current game found.');
  }
};
Database Trigger and Backing Function
Since we're consuming the stored game documents every day automatically (using the implementation above), we also need to find a way to generate games the same way. This can be done using database triggers. Whenever we mark one of the games as the current game, we can listen for the database trigger and generate a new game by calling our old function (which we created in the beginning).

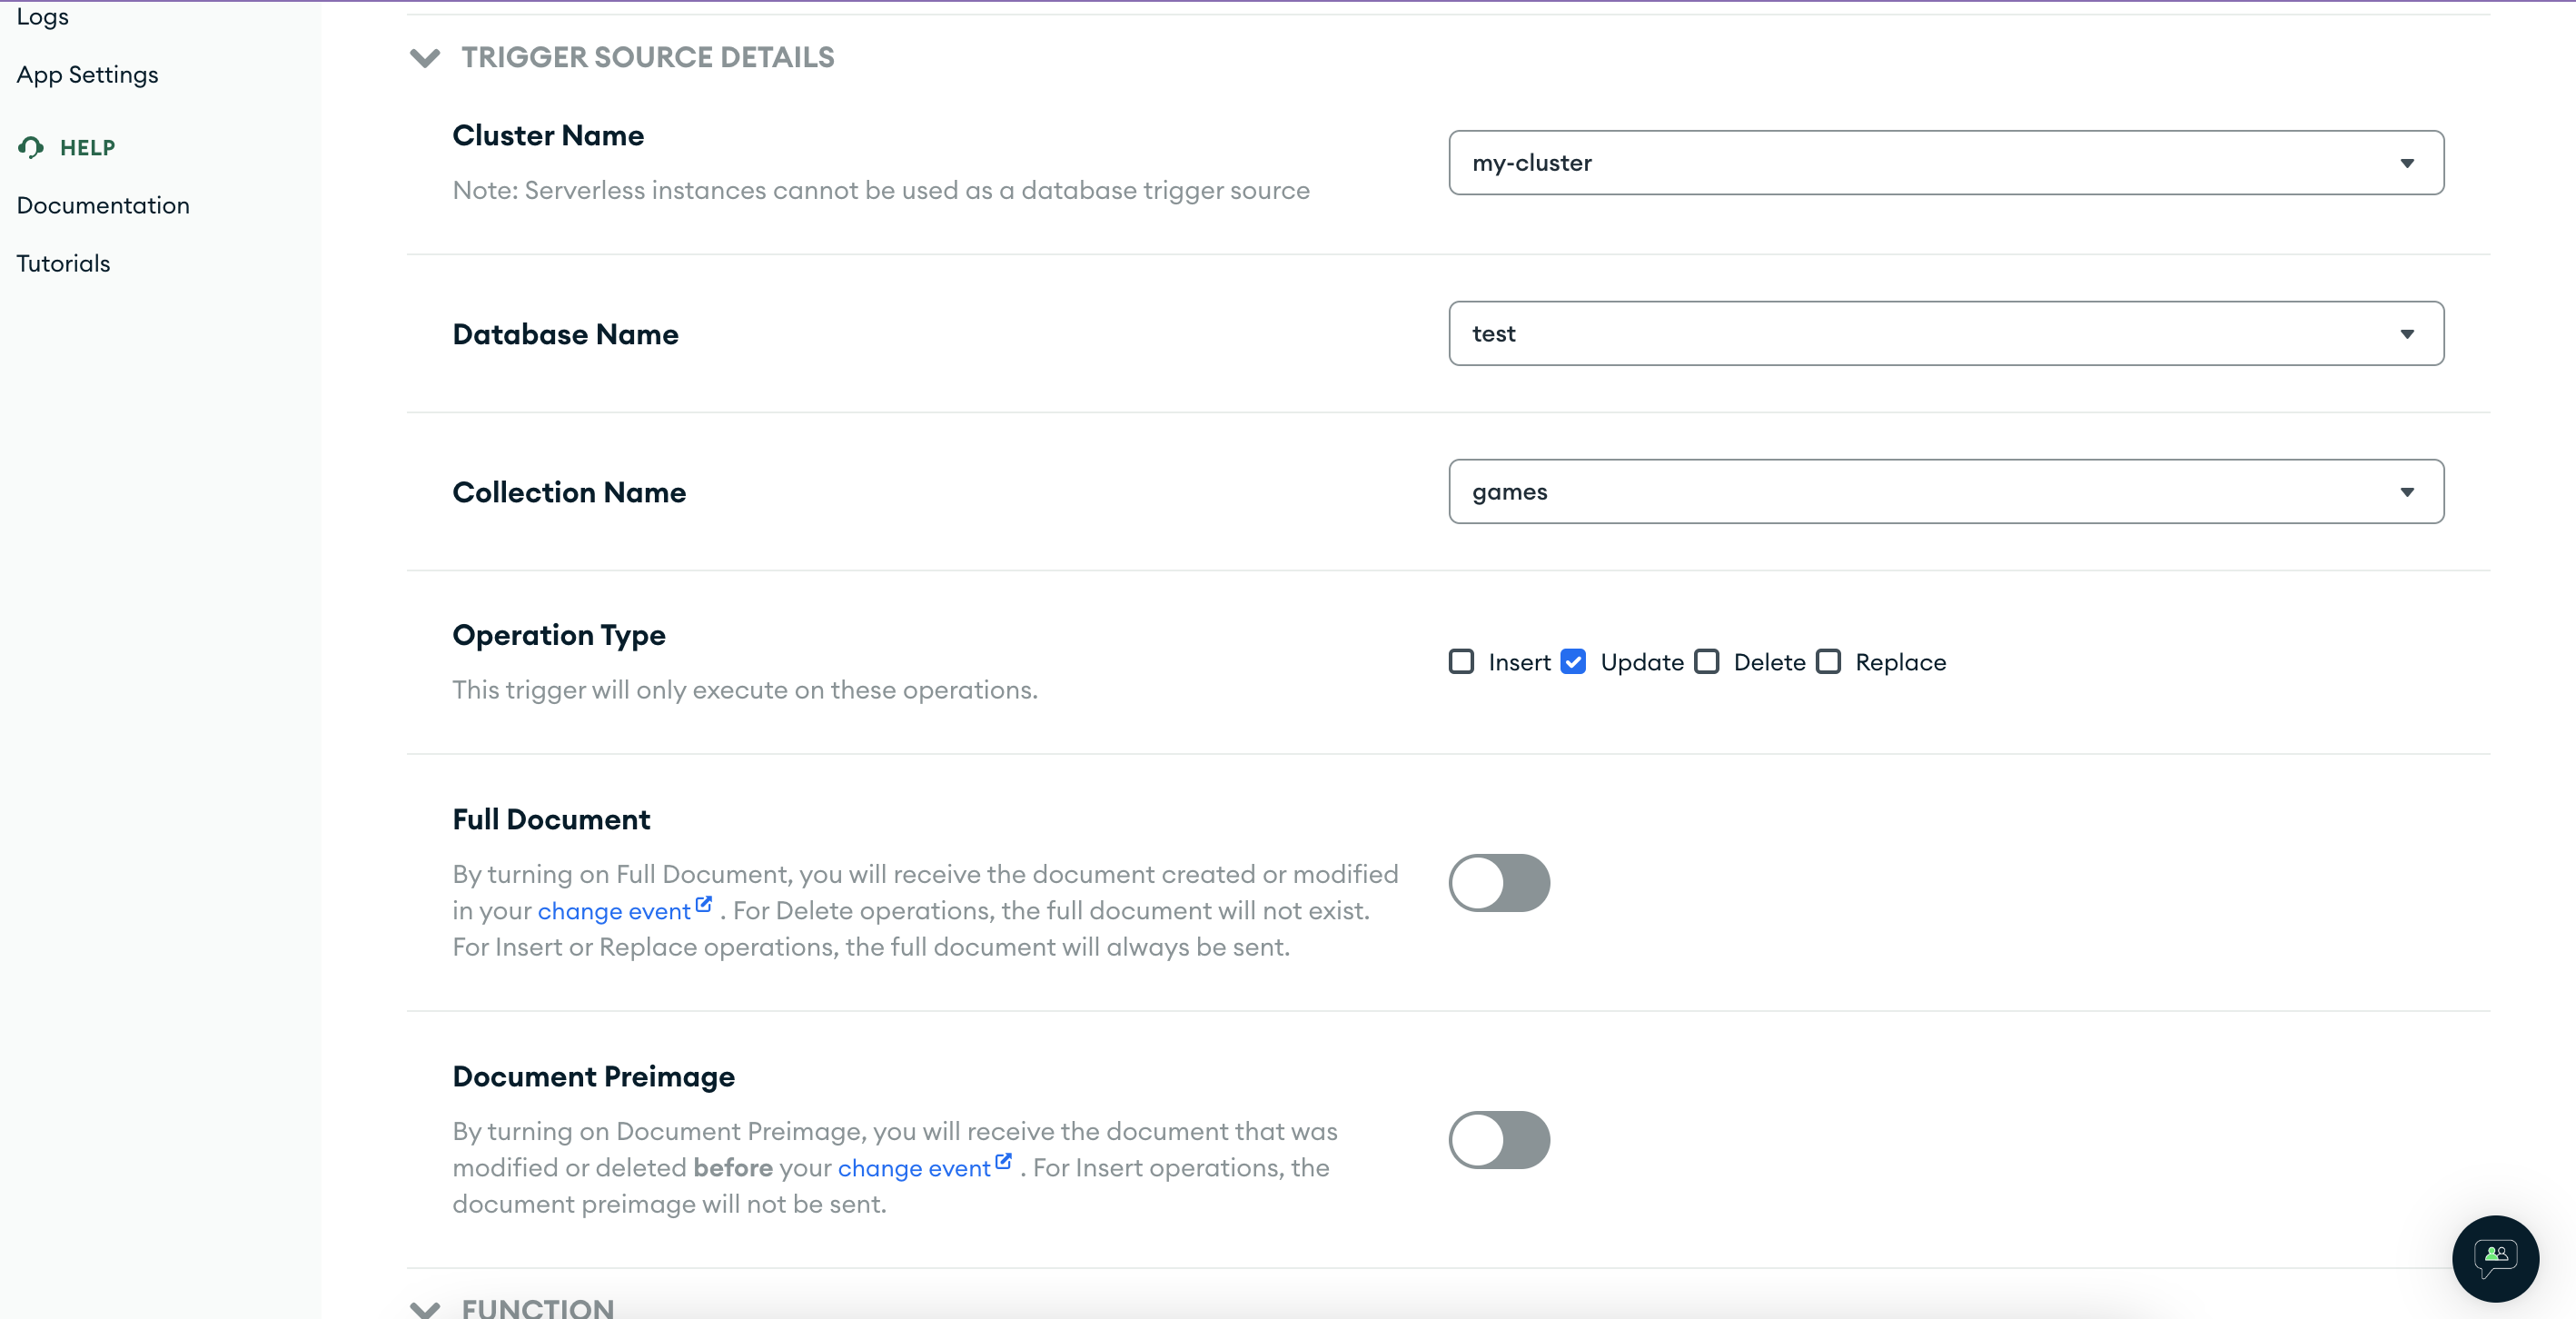
Selected Operation Type as Update. Since on game refresh, 2 documents are updated (one the current game, and the other the next game), so used a match expression (Advanced Optional setting) to only trigger the function for the next game document. We're updating the playedAt field as well on game refresh so I used that in the match expression.
{"updateDescription.updatedFields.playedAt":{"$exists":true}}
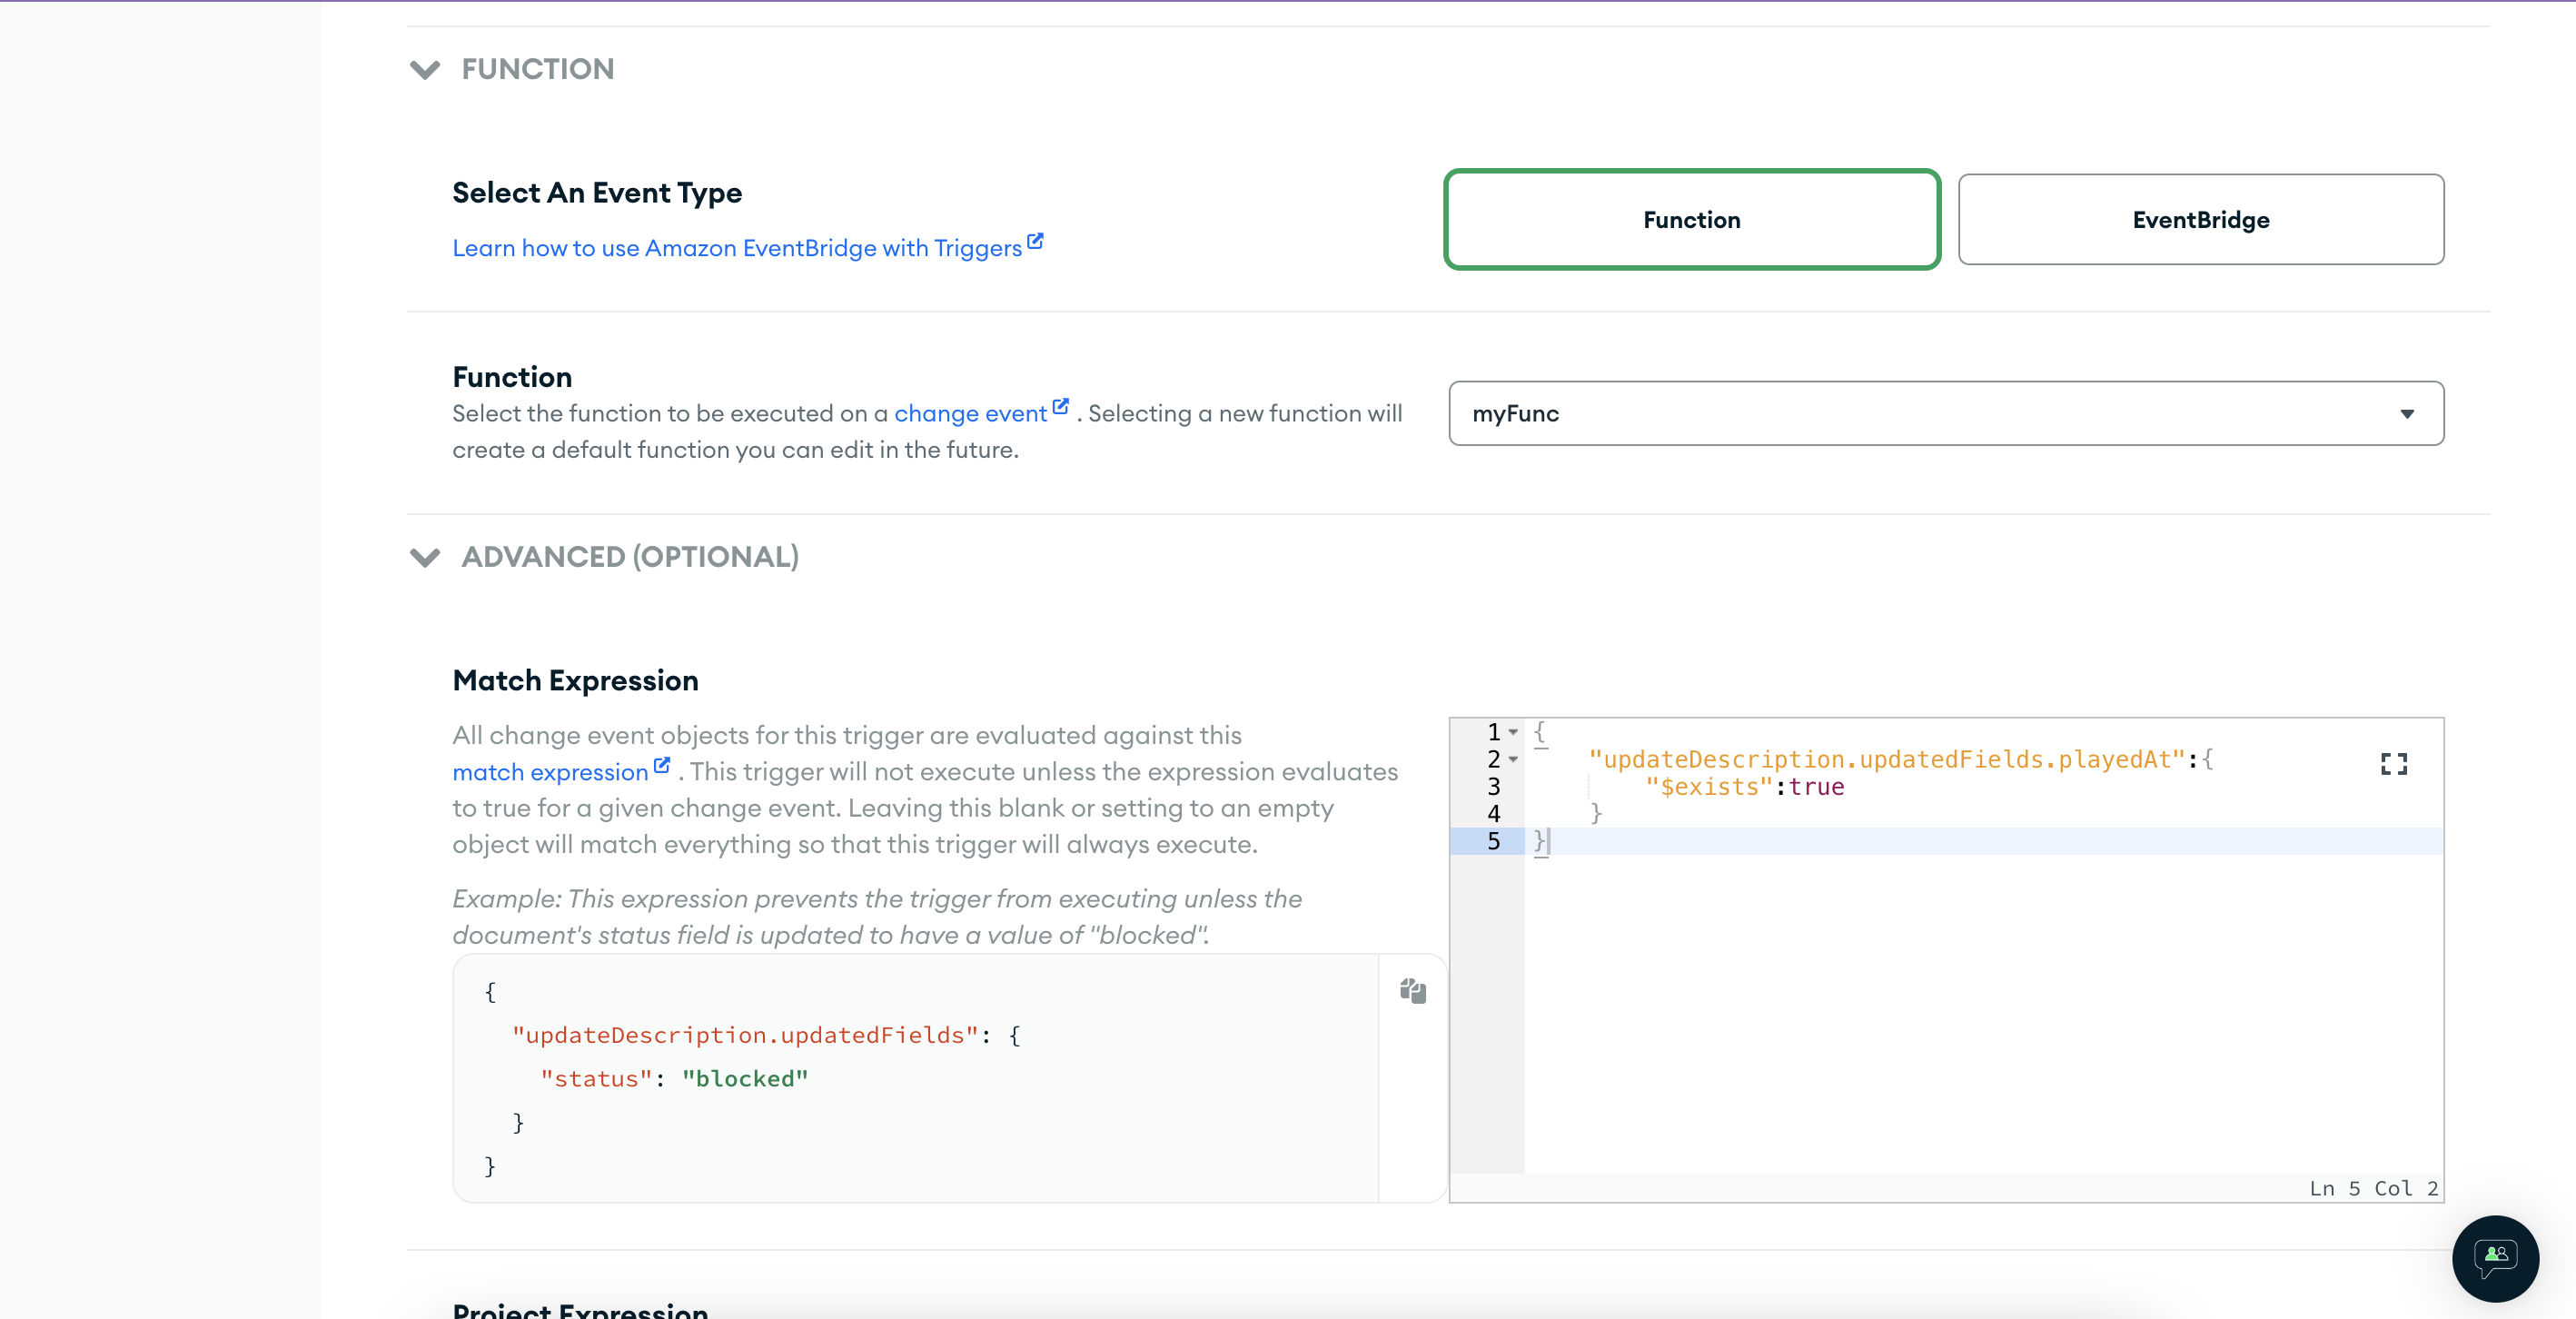
Somehow the match expression with a boolean field (current) was not working.
{"updateDescription.updatedFields":{"current":true}}
I didn't try with the dot notation, maybe that would've worked.
{"updateDescription.updatedFields.current": true}
We could have created a new game in the scheduled trigger itself (where we refresh our daily puzzle), but there is an upper limit of 150 seconds in the app services on any function run time. So database trigger made more sense as it will provide some extra buffer time to my game generation function.
Anonymous Authentication and Auth Trigger
We also want to store the users' play history. So enabled anonymous auth the same from the UI. Also added an auth trigger so that we can save the newly created users to the DB.
Auth Trigger function code which gets trigged on new user creation.
exports = async function (authEvent) {
  const { user, time } = authEvent;

  const mongoDb = context.services.get('cluster-service-name').db('db-name');
  const usersCollection = mongoDb.collection('users');
  const userData = { _id: user.id, ...user, createdAt: time, updatedAt: time };
  userData.data = {
    currStreak: 0,
    longestStreak: 0,
    isCurrLongestStreak: false,
    solves: 0,
    played: 0,
  };

  delete userData.id;
  const res = await usersCollection.insertOne(userData);
  console.log('result of user insert op: ', JSON.stringify(res));
};
Didn't use any other type of auth provider as I don't want the players to worry about login at this point.
Frontend Hosting with Google Cloud Run
The frontend is a basic React app which uses the Realm-SDK to interact with the backend which we just created. You can go through the code in the shared GitHub repo.
I wanted to try out App Services hosting also, but apparently, that is only available for paid accounts. Google Cloud to the rescue. Utilized Google Cloud Run to host the application frontend.
To do this we need to create a Dockerfile with the below content in the frontend root folder (wherever the frontend package.json is)
FROM node:lts-alpine as react-build
WORKDIR /app
COPY . ./
RUN yarn
RUN yarn build

# server environment
FROM nginx:alpine
COPY nginx.conf /etc/nginx/conf.d/configfile.template

COPY --from=react-build /app/build /usr/share/nginx/html

ENV PORT 8080
ENV HOST 0.0.0.0
EXPOSE 8080
CMD sh -c "envsubst '\$PORT' < /etc/nginx/conf.d/configfile.template > /etc/nginx/conf.d/default.conf && nginx -g 'daemon off;'"
We also need to create an nginx.conf file in the frontend root folder
server {
     listen       $PORT;
     server_name  localhost;

     location / {
         root   /usr/share/nginx/html;
         index  index.html index.htm;
         try_files $uri /index.html;
     }

     gzip on;
     gzip_vary on;
     gzip_min_length 10240;
     gzip_proxied expired no-cache no-store private auth;
     gzip_types text/plain text/css text/xml text/javascript application/x-javascript application/xml;
     gzip_disable "MSIE [1-6]\.";
}
Now we can build the project in a docker container using the below command (Do remember to create a Google Cloud project, and enable Cloud Run API, Google Container Registry API & Cloud Build API for that project)
gcloud builds submit --tag gcr.io/<google_project_id>/app
Once the build is successful, we can deploy the application by running
gcloud run deploy --image gcr.io/<project_id>/app --platform managed
And voila, we can visit our frontend by going to the service URL as mentioned in the console.
Further enhancements
- Frontend code for the gameplay needs some refactoring
- Game stats and analytics needs to be added
- The current user's game history is getting stored in DB (needs further testing) but it is not getting displayed anywhere. Need to create another app route for the same
- Caching has not been used anywhere. Maybe we can utilize Firebase hosting for application caching, as well as for caching the current game data
- For user gameplay-related interactions with the DB, need to use change streams/watch for real-time updates.
- Notify the user if a new game is available while they're using the app
GitHub link
Conclusion
Overall it was a very good experience building the game with MongoDB Atlas & App Services. We can have improved docs, but I am happy to have utilized this time and gotten familiar with Atlas & App Services.
Hope you enjoyed reading the article and will also enjoy playing the game.