
Create a personal expense tracker using MongoDB Atlas App Services & Triggers

Introduction
Did you know that Atlas App Services is a fully managed cloud service offering from MongoDB that we can use as a backend for our apps? This article provides a step-by-step guide on how to use MongoDB Atlas App Services and its various triggers for creating an app. The app is a basic personal expense tracker, and we will be using the React library to code it from scratch.
What is a trigger?
Before moving ahead, let's answer this question first. What is a trigger? I'm sure all of us are familiar with the most common usage of this word, but it is much more than that. "A trigger is a cause or an event that precedes or starts an action". It is like "if-this-then-that" but at a different layer and with a broader scope. Triggers play a crucial role in the smooth functioning of any serverless application development, we must have a good grasp of them.
So which triggers and actions we're talking about here considering application development in general and our app in particular? Well, some of the examples can be
- If someone signs up for our app, then we can send them a welcome email, and/or create a user entry in our database.
- If a user does something inside the app, say creates a new transaction then we can update their balance for quick retrieval
- If there is an action that happens on a regular schedule, then maybe we can automate it instead of updating it manually, and so on...
There can be many more examples, but these 3 are sufficient to understand the triggers which App services offer. The first one is called the "Auth Trigger" as we're doing something because of the auth event. The second one is a database trigger, as when a new entry is added to the database we do something else asynchronously. And the last one is a scheduled trigger because it happens on a regular schedule. Now let's dive into the app we're going to build.
The Frontend
As we're building a personal expense tracker, at the bare minimum it needs to have the following features
- Ability to create an account so that we can associate the transactions with a particular user. To keep it simple we'll be using anonymous login to achieve it
- Ability to add manual entries for any credit or debit
- A basic dashboard where we can get a holistic view of our finances for the month, and also see the individual transactions
- On change of month reset the credits/debits and possibly do other related chores
Now that the scope of the work is defined, let's start building it
Setting up the React App
Let's quickly set up a React project using the following set of commands in your terminal window. I'm using "yarn" as my package manager, you can use commands specific to your preferred package manager.
# Create the project dir & client subdir and immediately cd into it.
# "mkdir -p" creates the non existant parent dir.
mkdir -p my-expenses-tracker/client && cd $_

# Create a React app in the current dir (client)
yarn create react-app .

# Run the app and start the dev server
yarn start
Open another terminal window, navigate to the client folder and run the following commands.
# Add react-router-dom and react-icons to the project
yarn add react-router-dom react-icons

# Create routes & components folders inside src dir
mkdir src/routes src/components

# Create the initial pages & components
touch src/routes/Dashboard.js src/routes/AddExpense.js src/components/Navbar.js

# Open the project in VS Code
cd .. && code .
Creating the routes
We'll be adding two routes to the app: 1. the dashboard page, and 2. the new transaction page. Replace the content of the App.js file with the following:
import { BrowserRouter, Routes, Route, Outlet } from 'react-router-dom';

import { Dashboard } from './routes/Dashboard';
import { NewTransaction } from './routes/NewTransaction';
import { Navbar } from './components/Navbar';
import './App.css';

const Layout = () => {
  return (
    <div className='app'>
      <Navbar />
      <Outlet />
    </div>
  );
};

function App() {
  return (
    <BrowserRouter>
      <Routes>
        <Route path='/' element={<Layout />}>
          <Route index element={<Dashboard />} />
          <Route path='/new' element={<NewTransaction />} />
        </Route>
      </Routes>
    </BrowserRouter>
  );
}

export default App;
The Navbar component
Add the following code into the Navbar.js file that we created earlier. You can get the image assets, as well as the CSS files (index.css & App.css) from the Github repo.
import { NavLink } from 'react-router-dom';
import { FaPlusCircle } from 'react-icons/fa';

export const Navbar = () => {
  return (
    <nav className='navbar '>
      <NavLink className='logo nav-link' to='/'>
        Expense Buddy
      </NavLink>

      <NavLink className='nav-link' to='/new'>
        <FaPlusCircle /> Add New
      </NavLink>
    </nav>
  );
};
Dashboard Page
Add the following code to the Dashboard.js file. We'll come back to this file and modify it to add the backend interaction later on.
import { useState, useEffect } from 'react';
import { useNavigate } from 'react-router-dom';
import { FaPlusCircle } from 'react-icons/fa';

import { formatDateTime, formatCurrency } from '../utils';
import AddImage from '../assets/images/add-notes.svg';

export const Dashboard = () => {
  const [user, setUser] = useState();
  const [transactions, setTransactions] = useState([]);
  const [loading, setLoading] = useState(false);

  const navigate = useNavigate();

  return (
    <div className='container'>
      {loading ? (
        <div className='loader'>Loading...</div>
      ) : transactions.length ? (
        <div className='dashboard'>
          {user && (
            <div className='card summary-card'>
              <h2>This month</h2>

              <div className='details'>
                <div>Current Balance</div>
                <div className='details-value'>
                  {formatCurrency(user.balance)}
                </div>
              </div>

              <div className='card-row'>
                <div className='details money-in'>
                  <div className='details-label'>Total money in</div>
                  <div className='details-value'>
                    {formatCurrency(user.currMonth.in)}
                  </div>
                </div>
                <div className='details money-out'>
                  <div className='details-label'>Total money out</div>
                  <div className='details-value'>
                    {formatCurrency(user.currMonth.out)}
                  </div>
                </div>
              </div>
            </div>
          )}

          <h3 className='transactions-title'>Transactions</h3>

          {transactions.map((transaction) => {
            return (
              <div
                key={transaction._id}
                className={`card transaction-card ${
                  transaction.type === 'IN'
                    ? 'transaction-in'
                    : 'transaction-out'
                }`}
              >
                <div>
                  <div>{transaction.comment}</div>
                  <div className='transaction-date'>
                    {formatDateTime(transaction.createdAt)}
                  </div>
                </div>
                <div className='transaction-value'>
                  {formatCurrency(transaction.amount)}
                </div>
              </div>
            );
          })}
        </div>
      ) : (
        <div className='no-data'>
          <img
            className='no-data-img'
            src={AddImage}
            alt='No transactions found, add one'
          />
          <div className='no-data-text'>No transactions found</div>
          <button
            type='button'
            className='btn btn-primary'
            onClick={() => navigate('/new')}
          >
            <FaPlusCircle /> Add Transaction
          </button>
        </div>
      )}
    </div>
  );
};
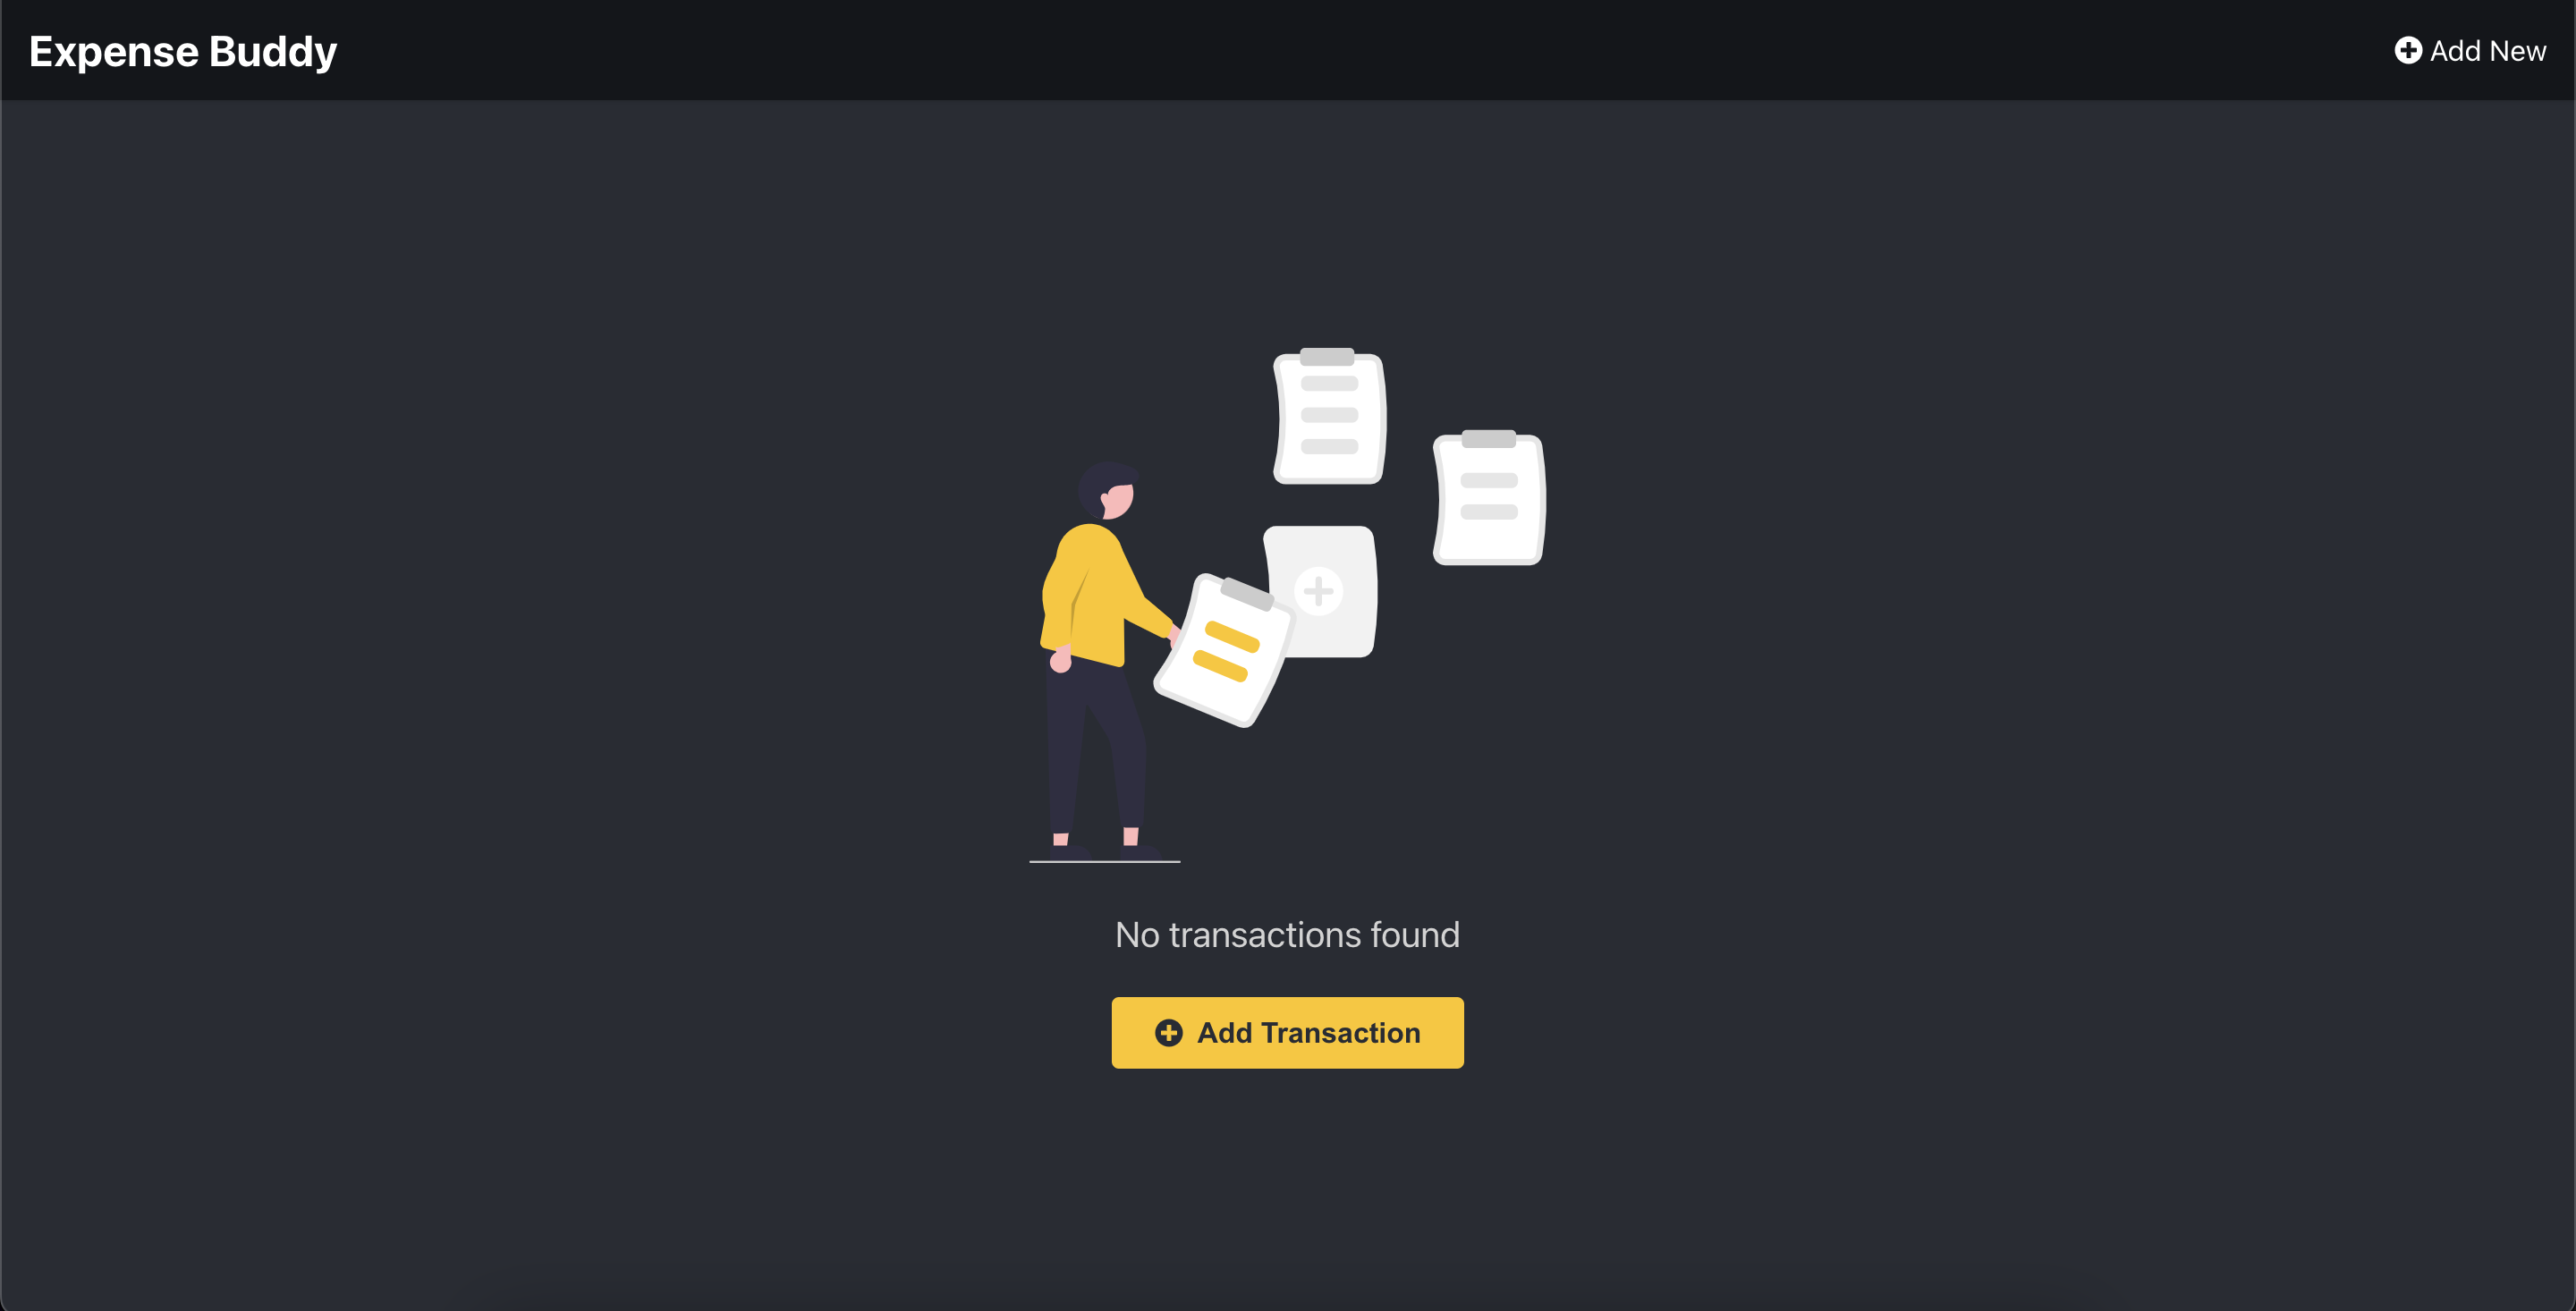
Without anything to show, the page looks like the below screenshot
NewTransaction Page
Here we create a form to submit a new transaction to the database. Right now it is just the barebones file, we'll add the backend interaction later on
import { useState } from 'react';
import { useNavigate } from 'react-router-dom';

const INITIAL_STATE = {
  comment: '',
  amount: '',
  type: '',
};

const TRANSACTION_TYPES = {
  SELECT: 'Select a type',
  IN: 'Add',
  OUT: 'Deduct',
};

export const NewTransaction = () => {
  const [formState, setFormState] = useState(INITIAL_STATE);
  const [loading, setLoading] = useState(false);
  const [message, setMessage] = useState(null);

  const navigate = useNavigate();

  const setInput = (key, value) => {
    setFormState({ ...formState, [key]: value });
  };

  useEffect(() => {
    if (message) {
      const timerId = setTimeout(() => {
        if (message.type === 'success') {
          navigate('/', { replace: true });
        }
        setMessage(null);
      }, 2000);

      return () => clearTimeout(timerId);
    }
  }, [message, navigate]);

  const onSubmit = async (e) => {
    e.preventDefault();

    const amount = parseFloat(formState.amount);
    const comment = formState.comment.trim();

    if (!amount || !comment || !formState.type) {
      alert('Please fill in all fields');
      return;
    }

    try {
      console.log('final transaction data', {
        ...formState,
        createdAt: new Date(),
      });
    } catch (error) {
      console.log('failed to save the transaction');
    }
  };

  return (
    <div className='container'>
      <div className='card transaction-form'>
        <h2>Add transaction details</h2>
        <form onSubmit={onSubmit}>
          <div className='form-group'>
            <label htmlFor='name'>Transaction amount</label>
            <input
              type='number'
              name='amount'
              id='amount'
              placeholder='Enter the amount'
              value={formState.amount}
              onChange={(e) => setInput('amount', e.target.value)}
            />
          </div>
          <div className='form-group'>
            <label htmlFor='comment'>Transaction comment</label>
            <input
              type='text'
              name='comment'
              id='comment'
              placeholder='Transaction comment'
              value={formState.comment}
              onChange={(e) => setInput('comment', e.target.value)}
            />
          </div>
          <div className='form-group'>
            <label htmlFor='transaction-type'>Transaction type</label>
            <select
              name='transaction-type'
              id='transaction-type'
              value={formState.type}
              onChange={(e) => setInput('type', e.target.value)}
            >
              {Object.keys(TRANSACTION_TYPES).map((type) => {
                return (
                  <option key={`type-${type}`} value={type}>
                    {TRANSACTION_TYPES[type]}
                  </option>
                );
              })}
            </select>
          </div>

          {message && (
            <div className={`message-${message.type}`}>{message.text}</div>
          )}

          <div className='card-row'>
            <button
              className='btn btn-outlined'
              disabled={loading}
              type='button'
              onClick={() => setFormState(INITIAL_STATE)}
            >
              Cancel
            </button>
            <button
              className='btn btn-primary'
              disabled={loading}
              type='submit'
            >
              Save
            </button>
          </div>
        </form>
      </div>
    </div>
  );
};
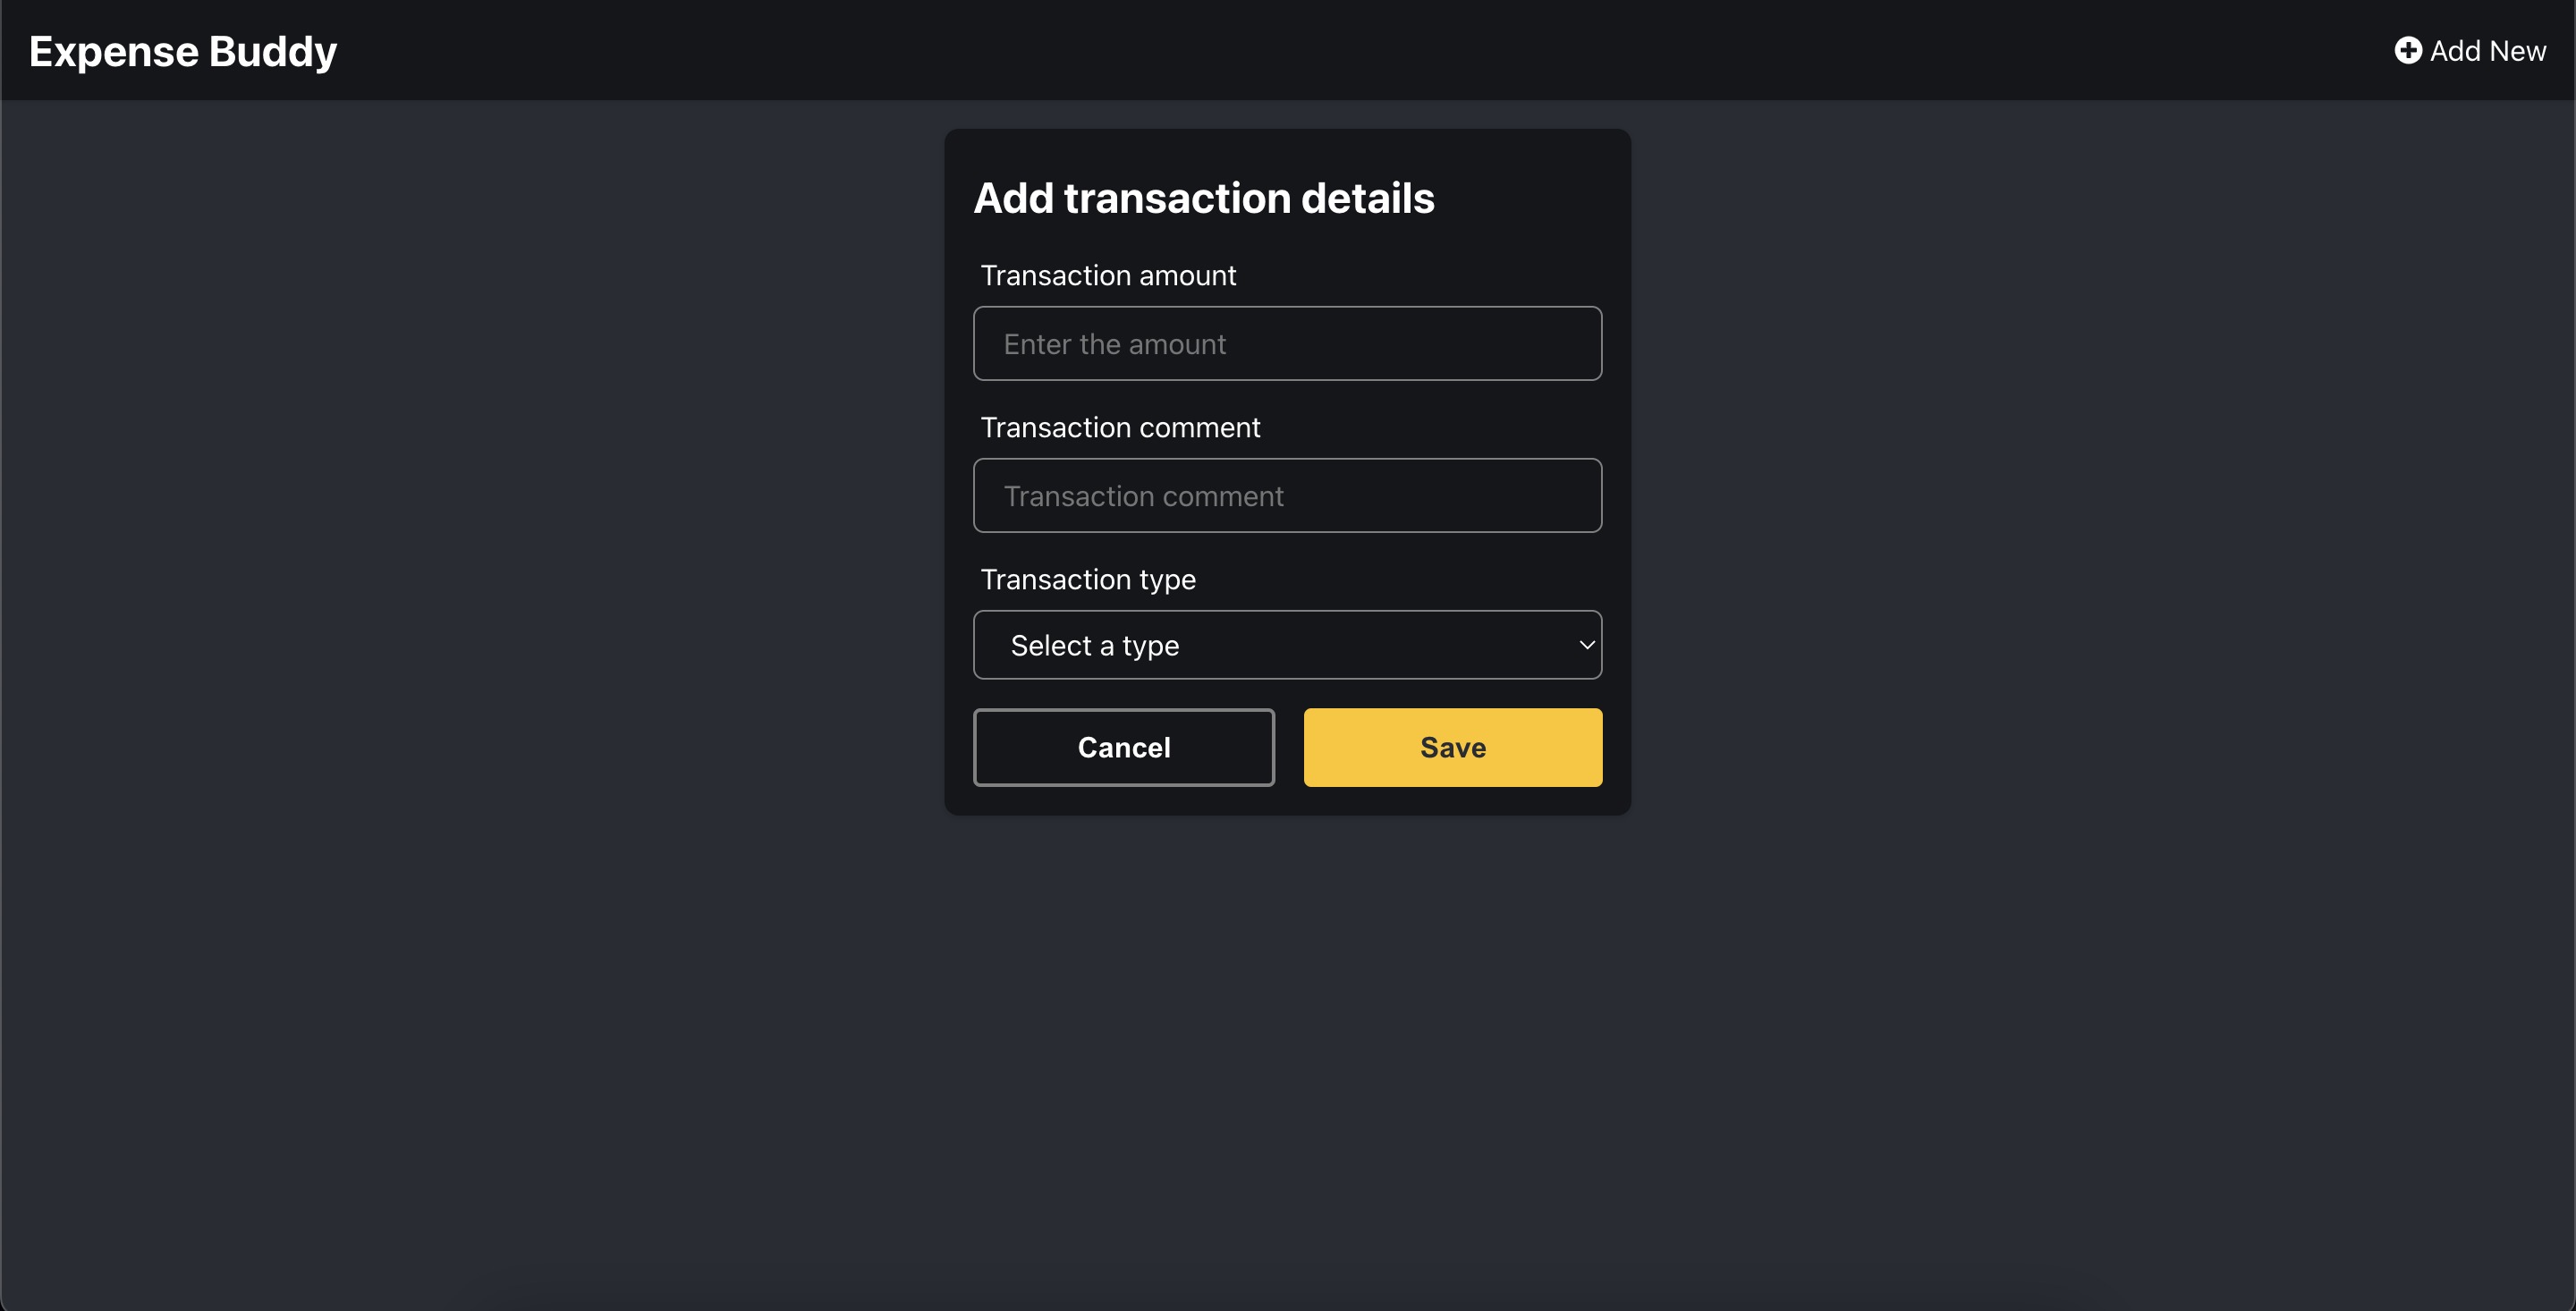
This is how the page looks
Utility functions
Create a new folder called utils in the src directory, and add an index.js file inside it. Then add the following utility functions for formatting dates and currency in it. You can change the currency code to your desired currency, or even make it configurable per user.
let dateTimeFormatter;
let currencyFormatter;

export const formatDateTime = (dateString) => {
  if (!dateString) {
    return '';
  }

  if (!dateTimeFormatter) {
    dateTimeFormatter = new Intl.DateTimeFormat('en-US', {
      year: 'numeric',
      month: 'short',
      day: 'numeric',
      hour: 'numeric',
      minute: 'numeric',
    });
  }

  return dateTimeFormatter.format(new Date(dateString));
};

export const formatCurrency = (amount) => {
  if (!currencyFormatter) {
    currencyFormatter = new Intl.NumberFormat('en-US', {
      style: 'currency',
      currency: 'INR',
      maximumFractionDigits: 2,
    });
  }

  return currencyFormatter.format(amount);
};
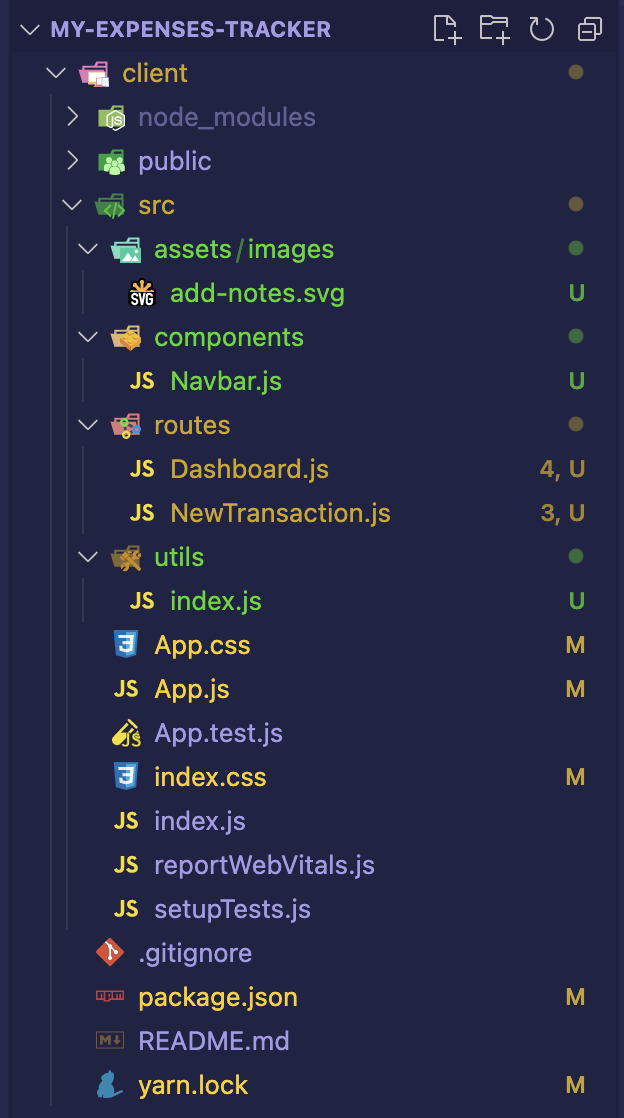
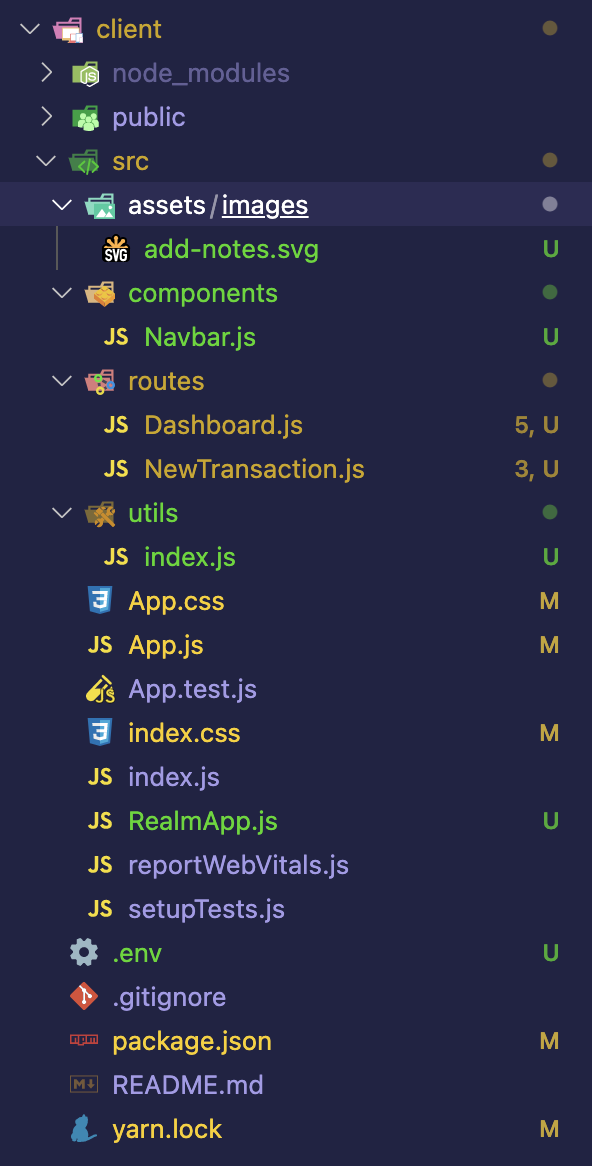
This is my current project folder structure after making the above changes. I've removed the logo.svg file from the project.
The Backend
First of all, we'll create a new cluster on MongoDB Atlas. For our current purposes, an M0 FREE shared cluster is fine. If this is your first time interacting with MongoDB Atlas, you can use this excellent guide to get started (you can follow till the "Configure a Network Connection" section).
Database and collections
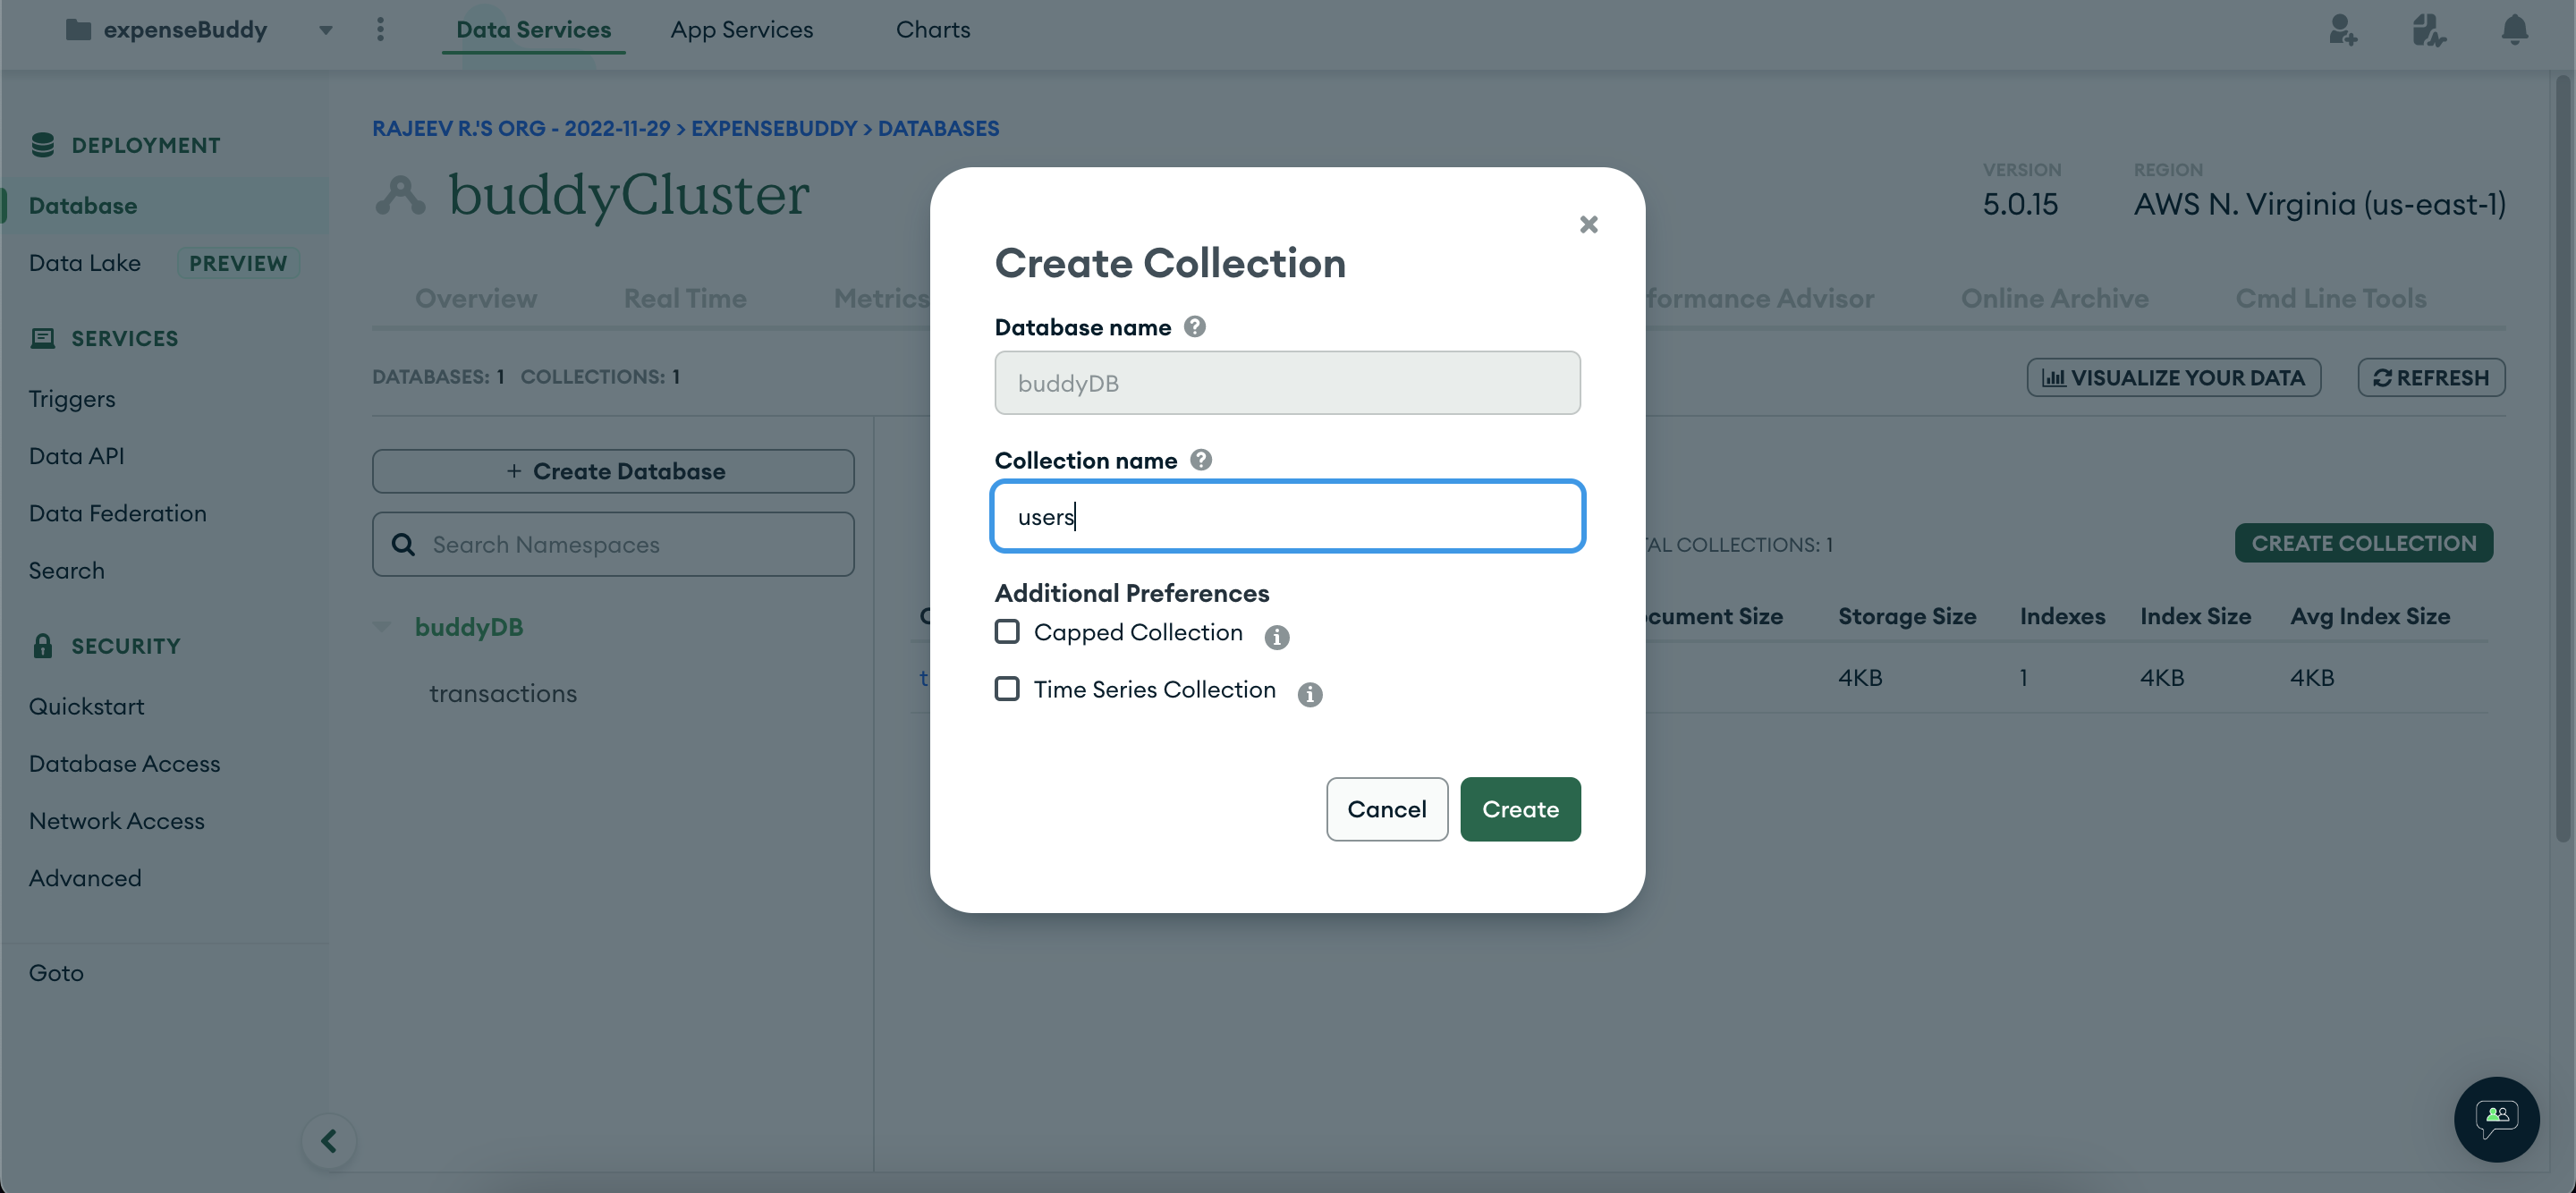
Now let's create a database, and add transactions collection to it.

Add one more collection called "users" to the database
Atlas App Services
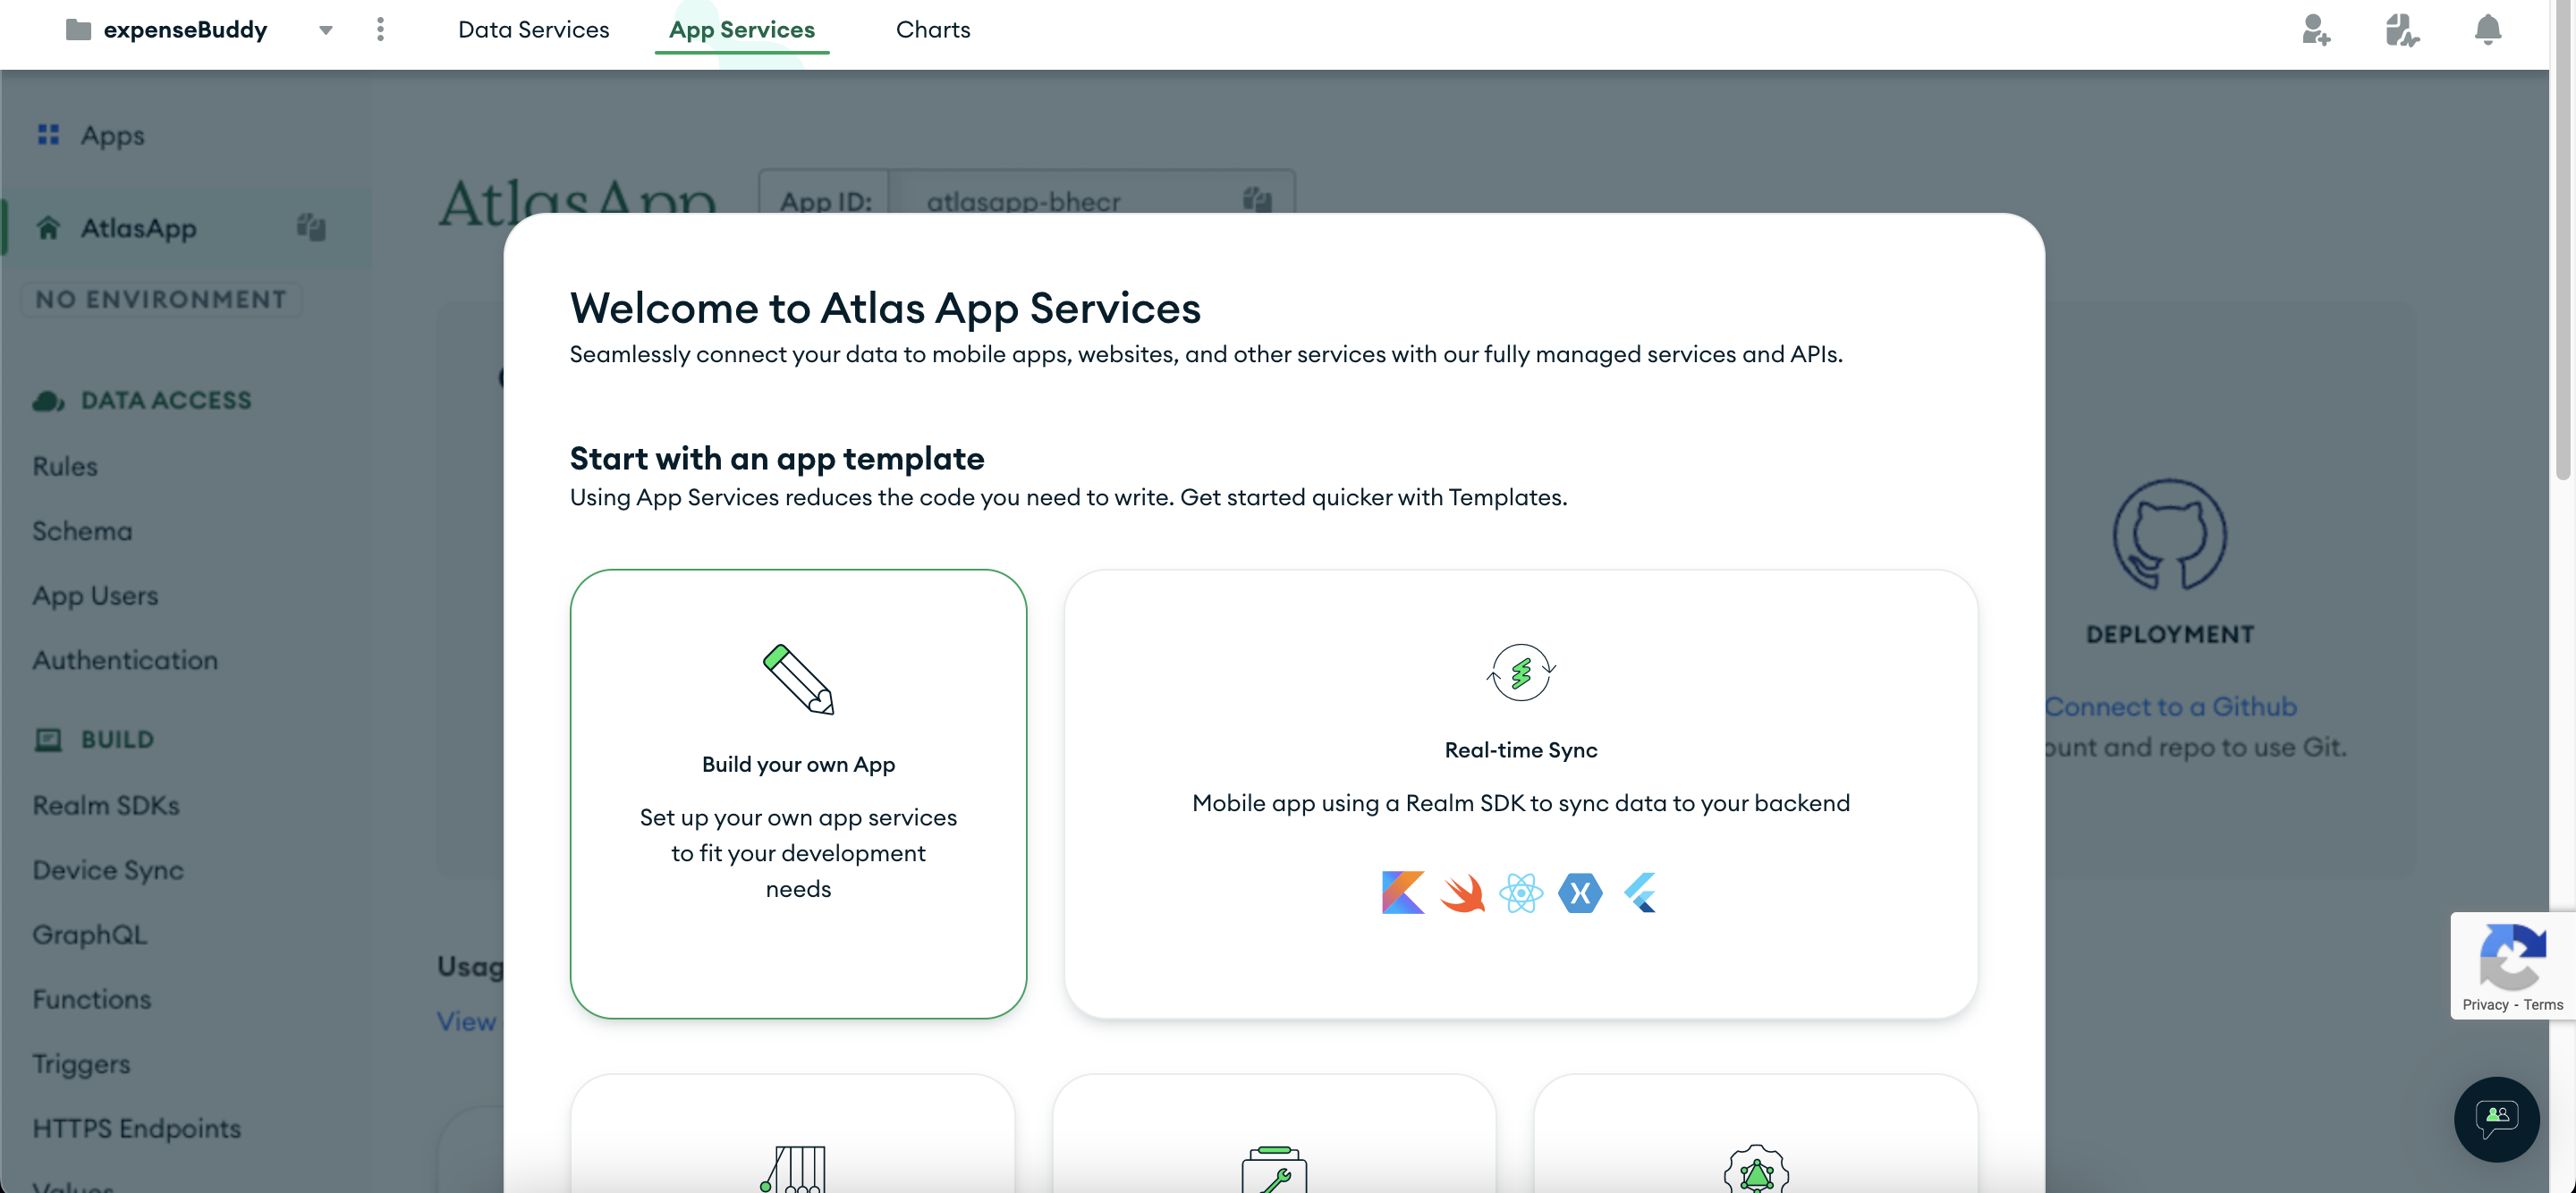
Head over to the App Services tab and create a new Atlas App Services application. Click next in the Start with an app template screen (while "Build your own App" is selected, the default).
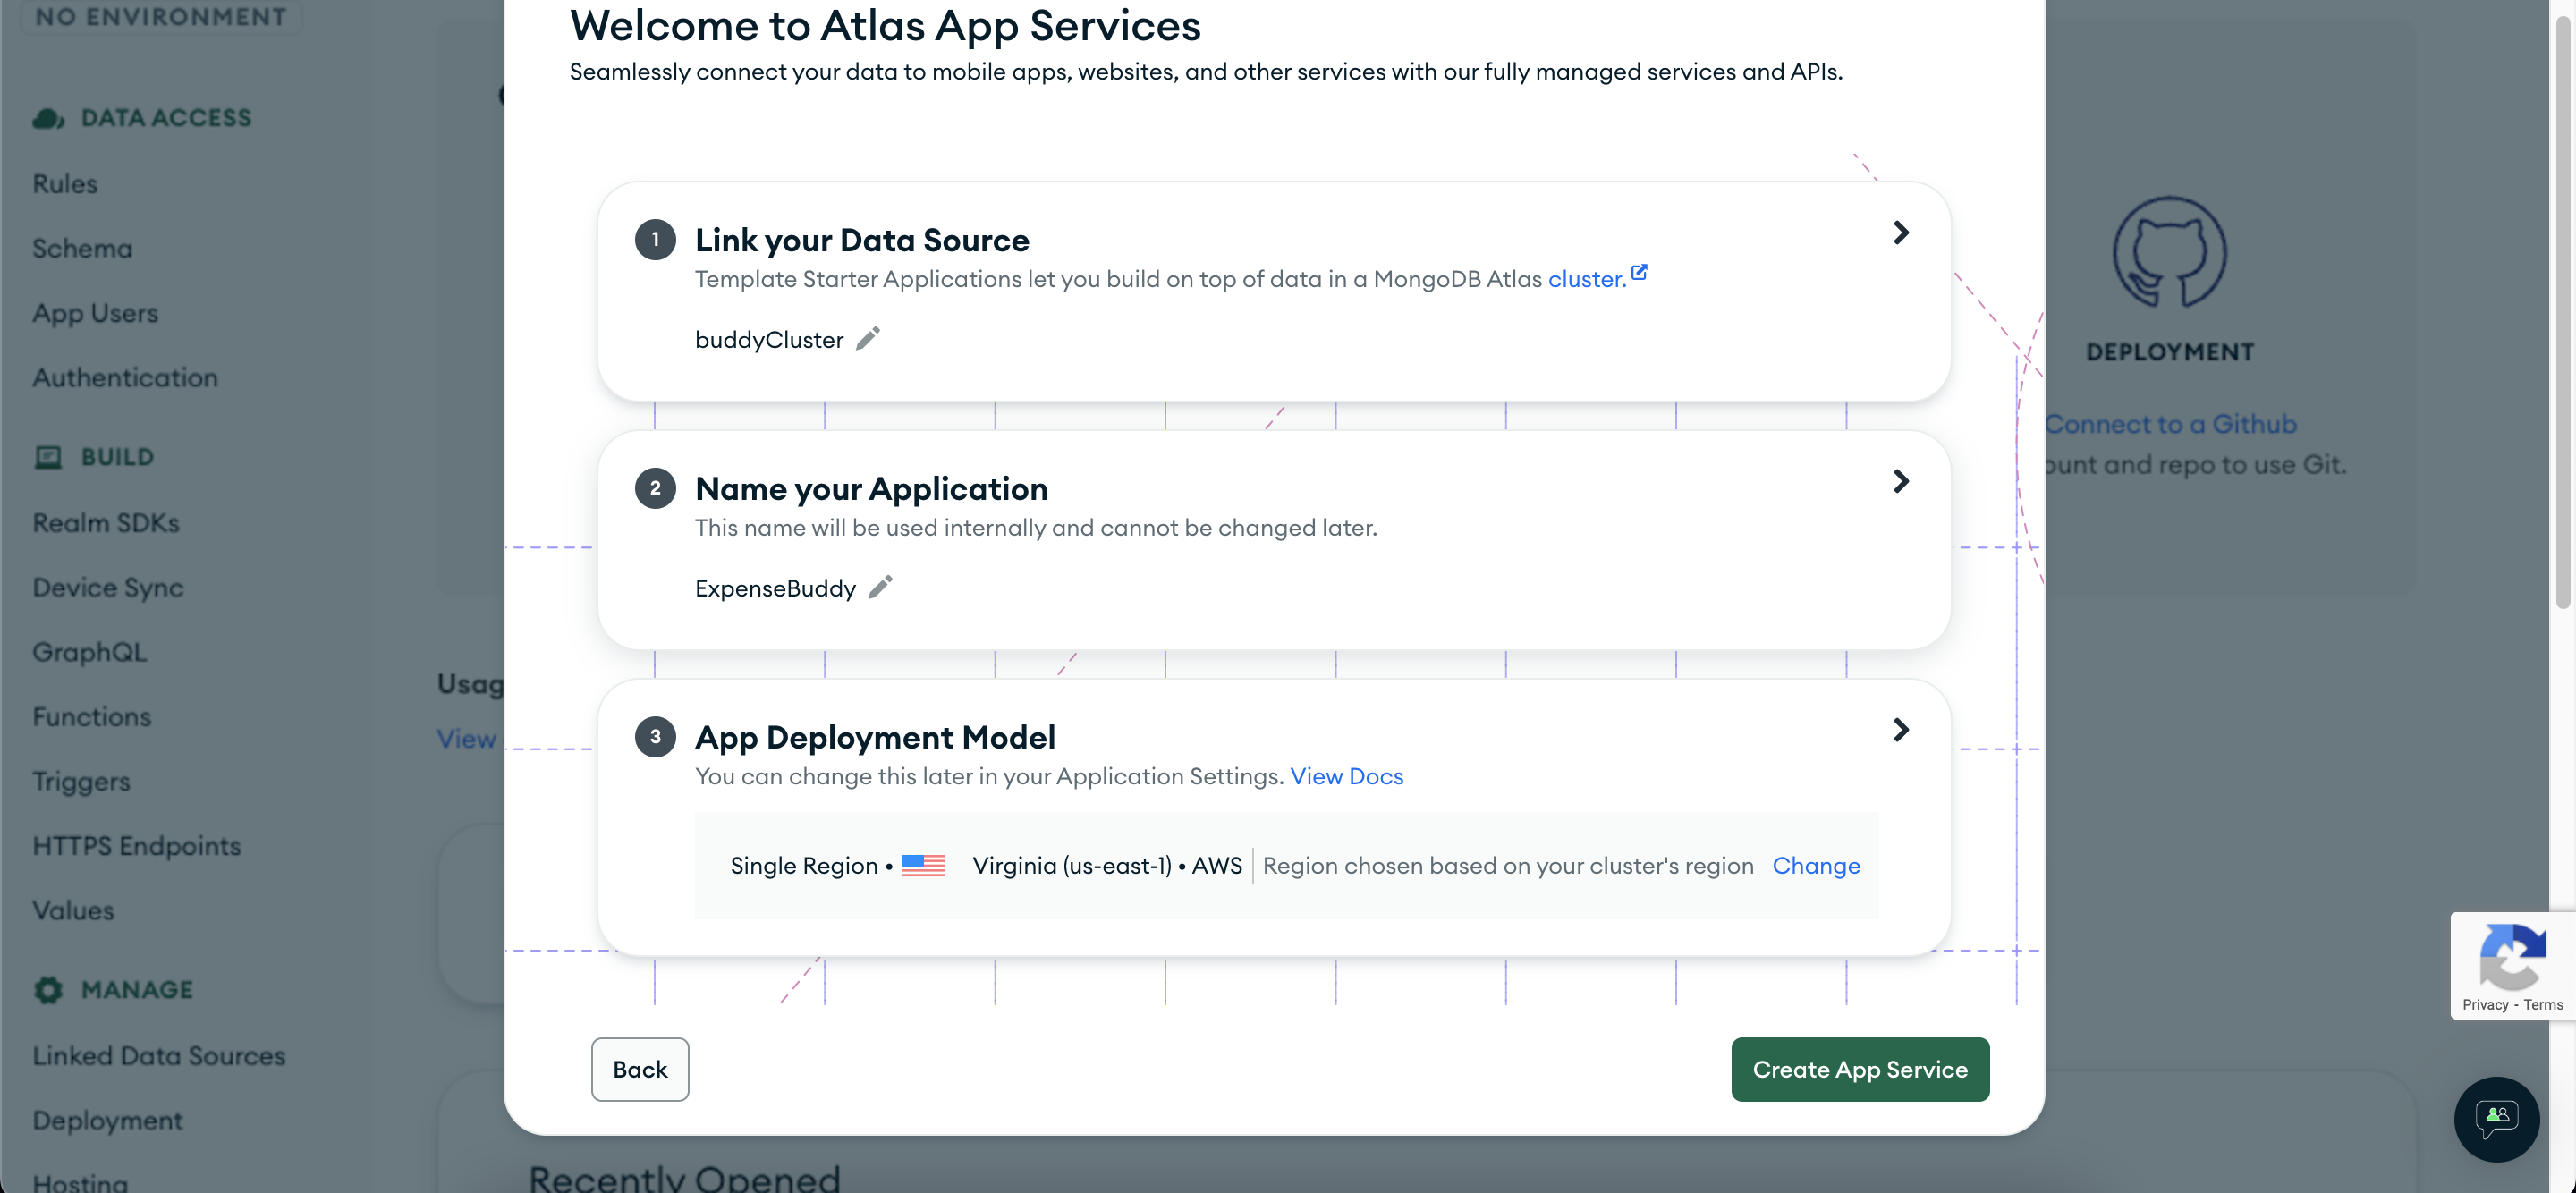
Give a name to your application, and click on the "Create App Service" button.
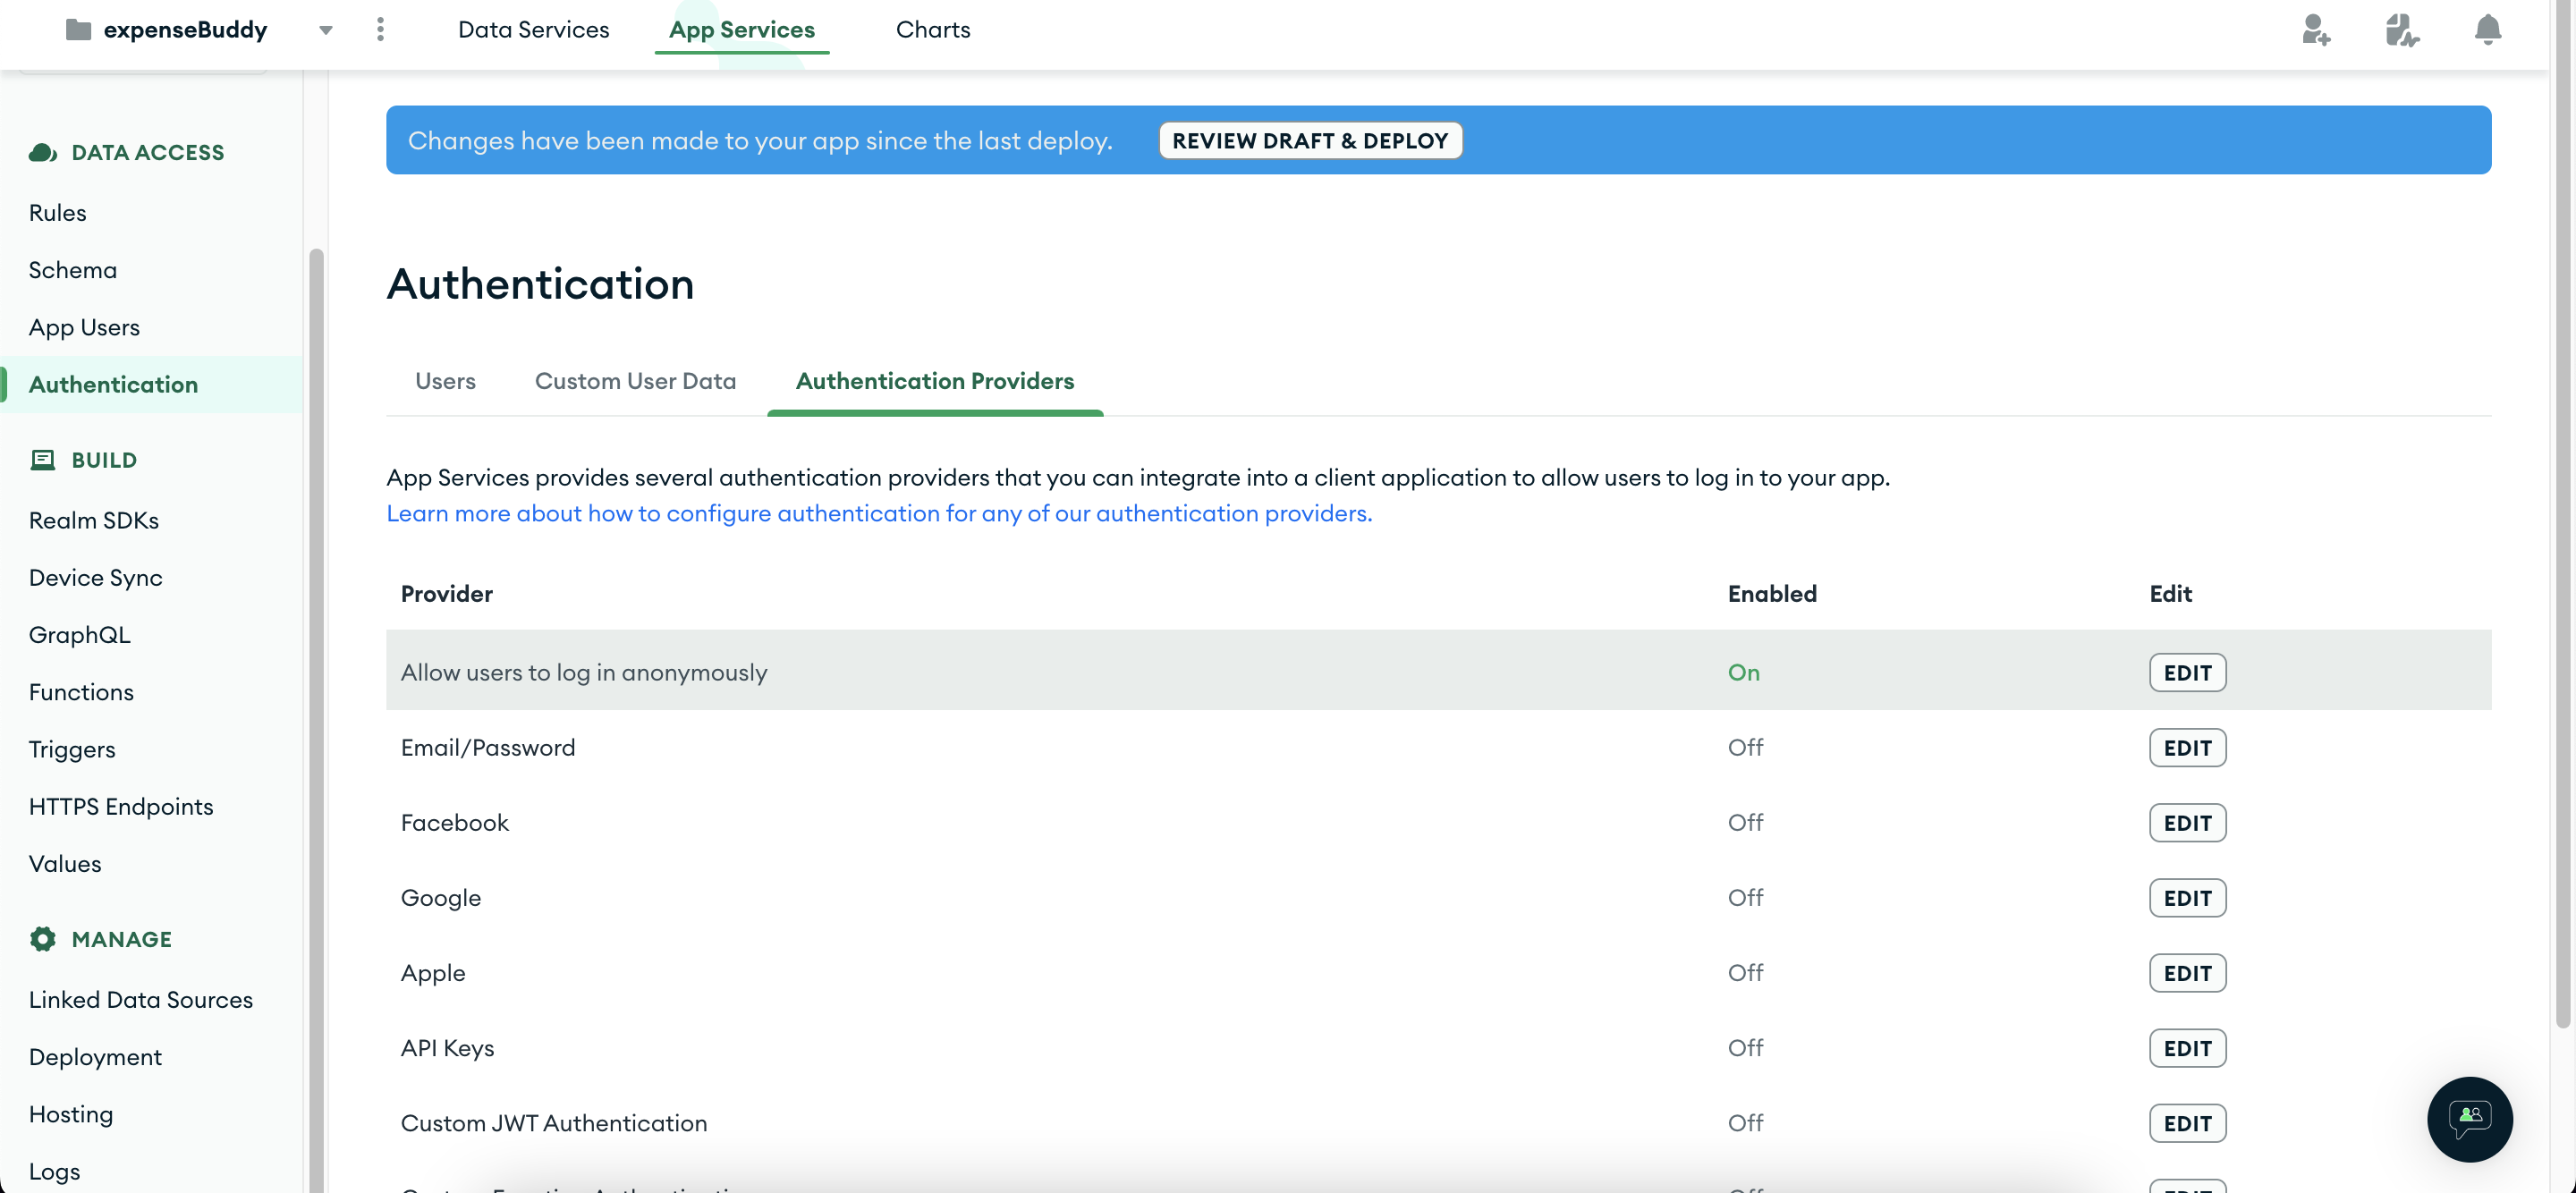
Authentication
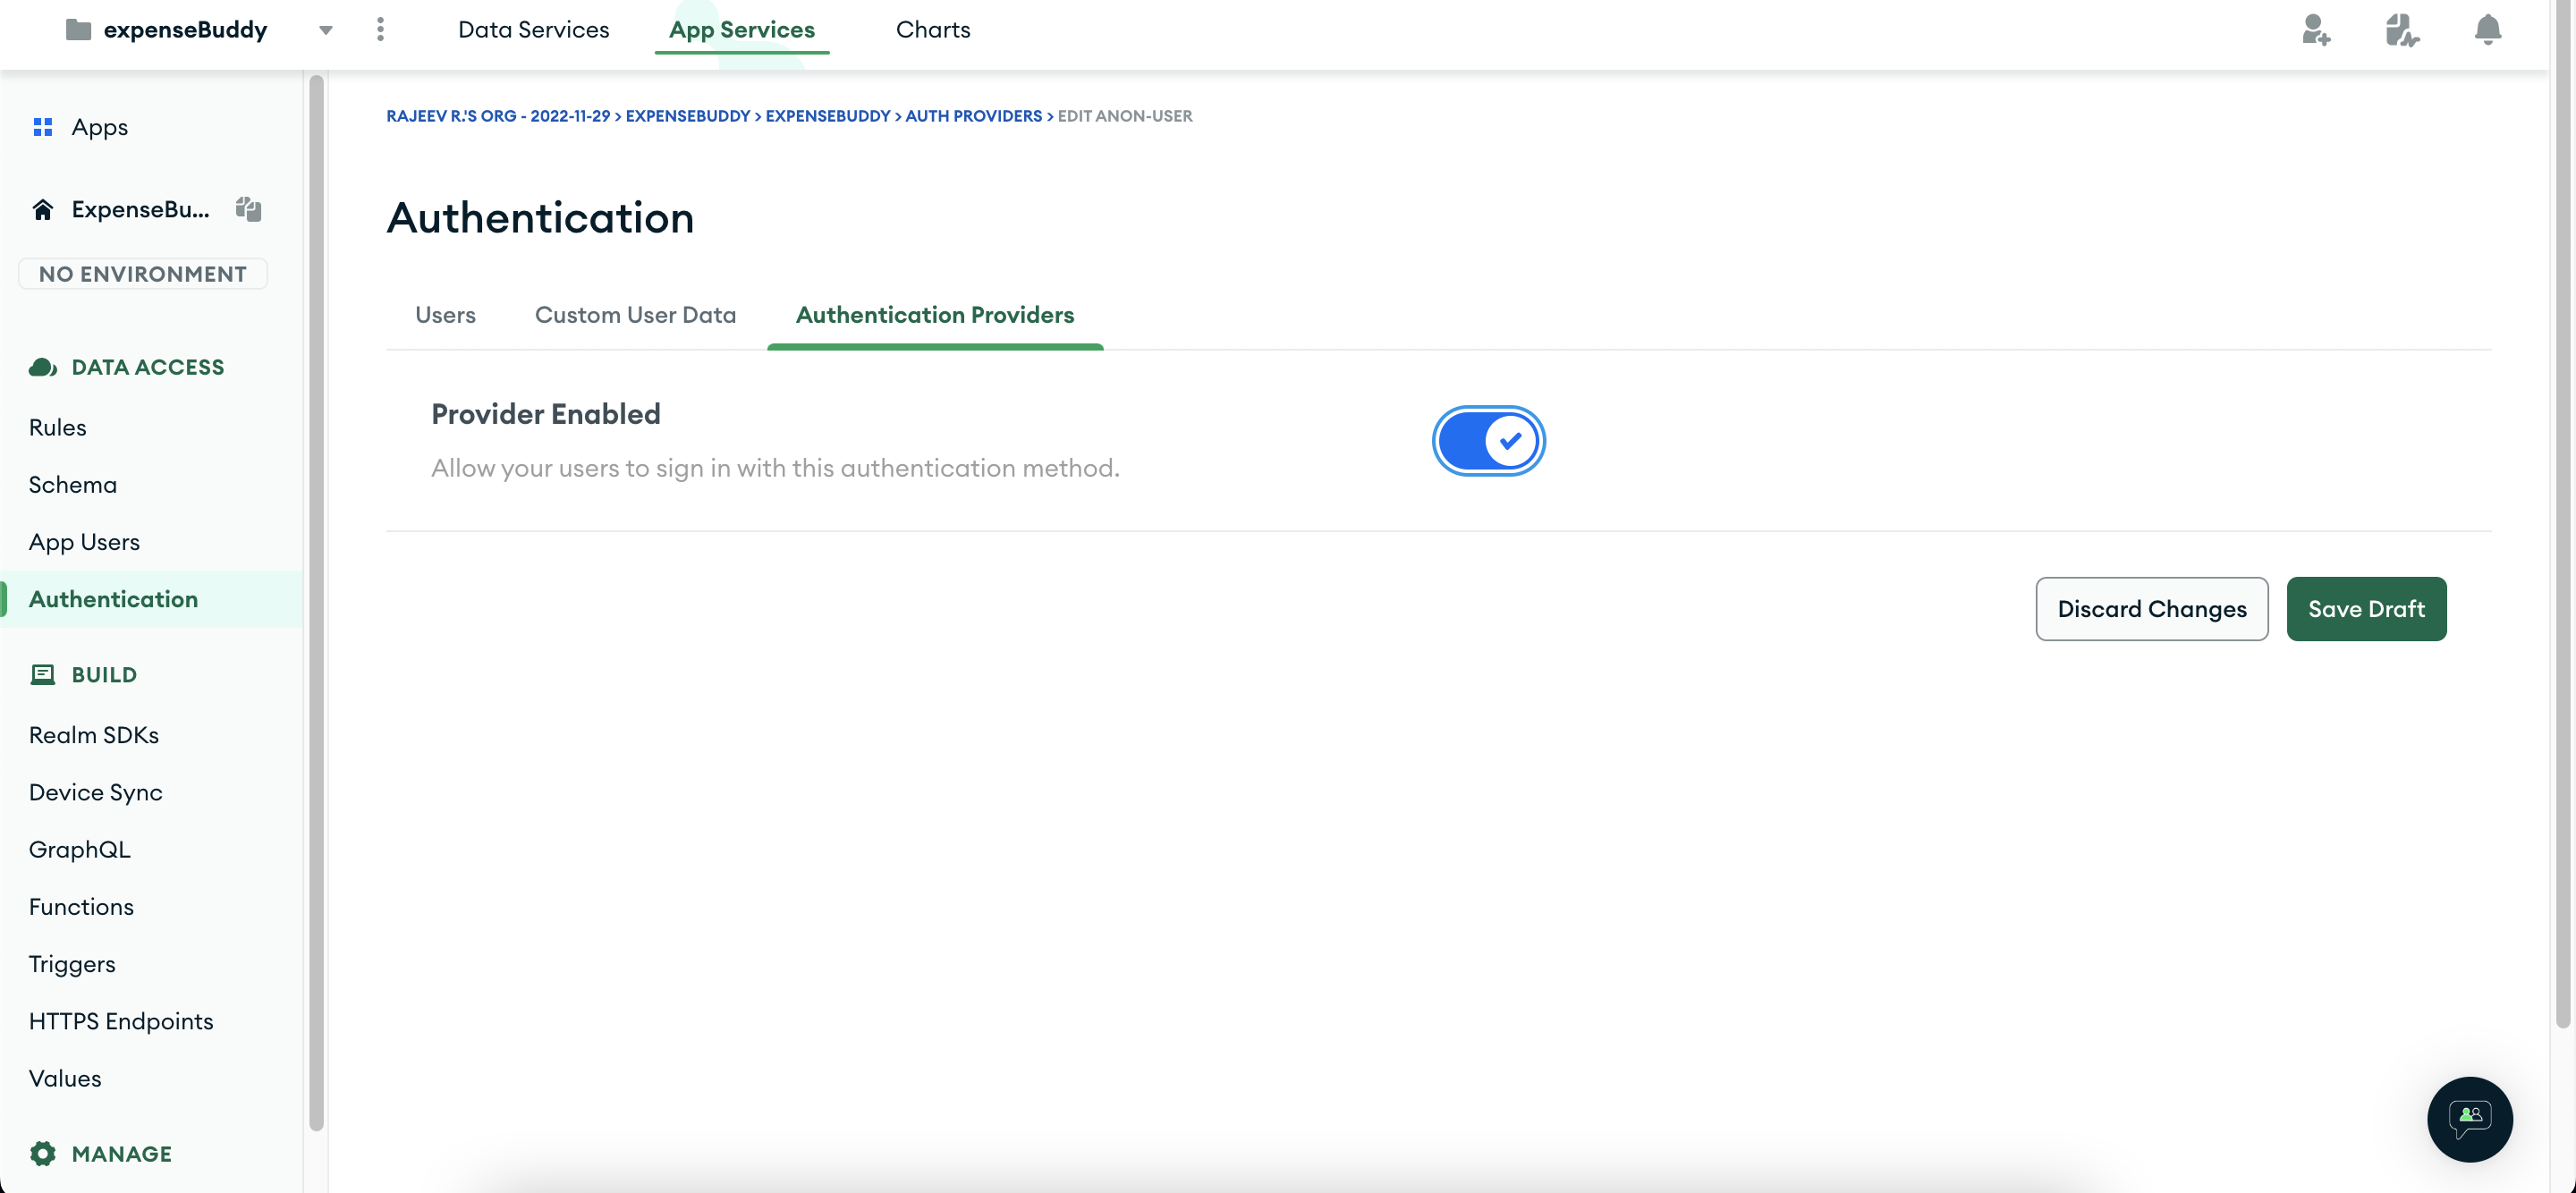
Click on Authentication from the left sidebar and enable anonymous auth and save the draft.
After making any changes in the App Services application, we need to deploy the changes for it to take effect. Click on REVIEW DRAFT & DEPLOY button and deploy the change.
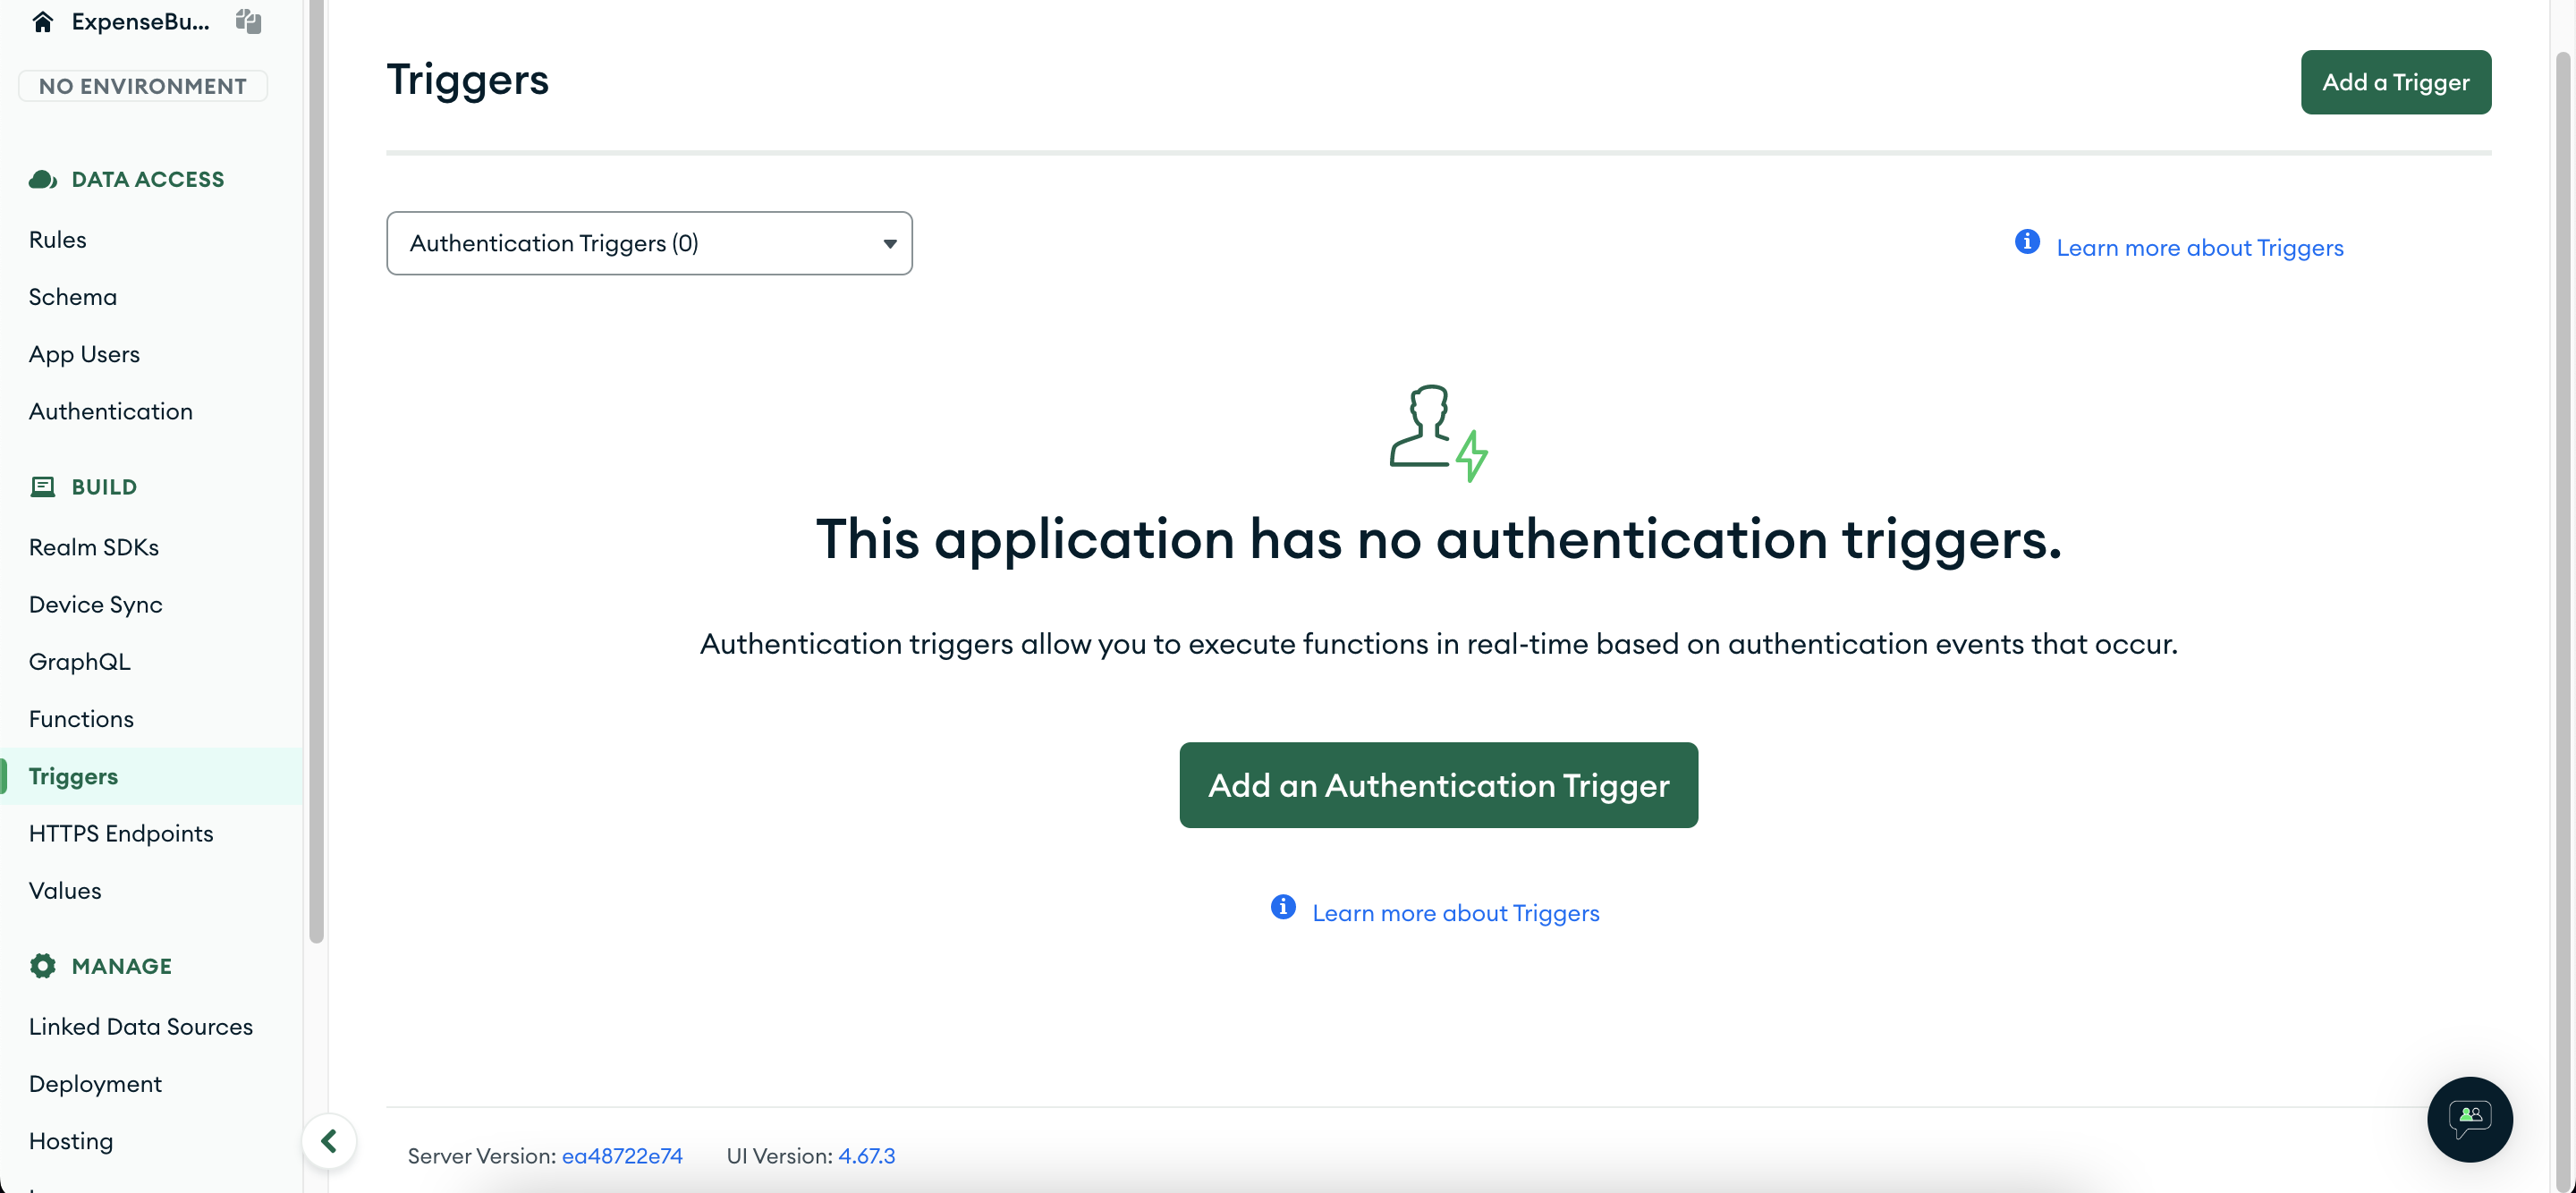
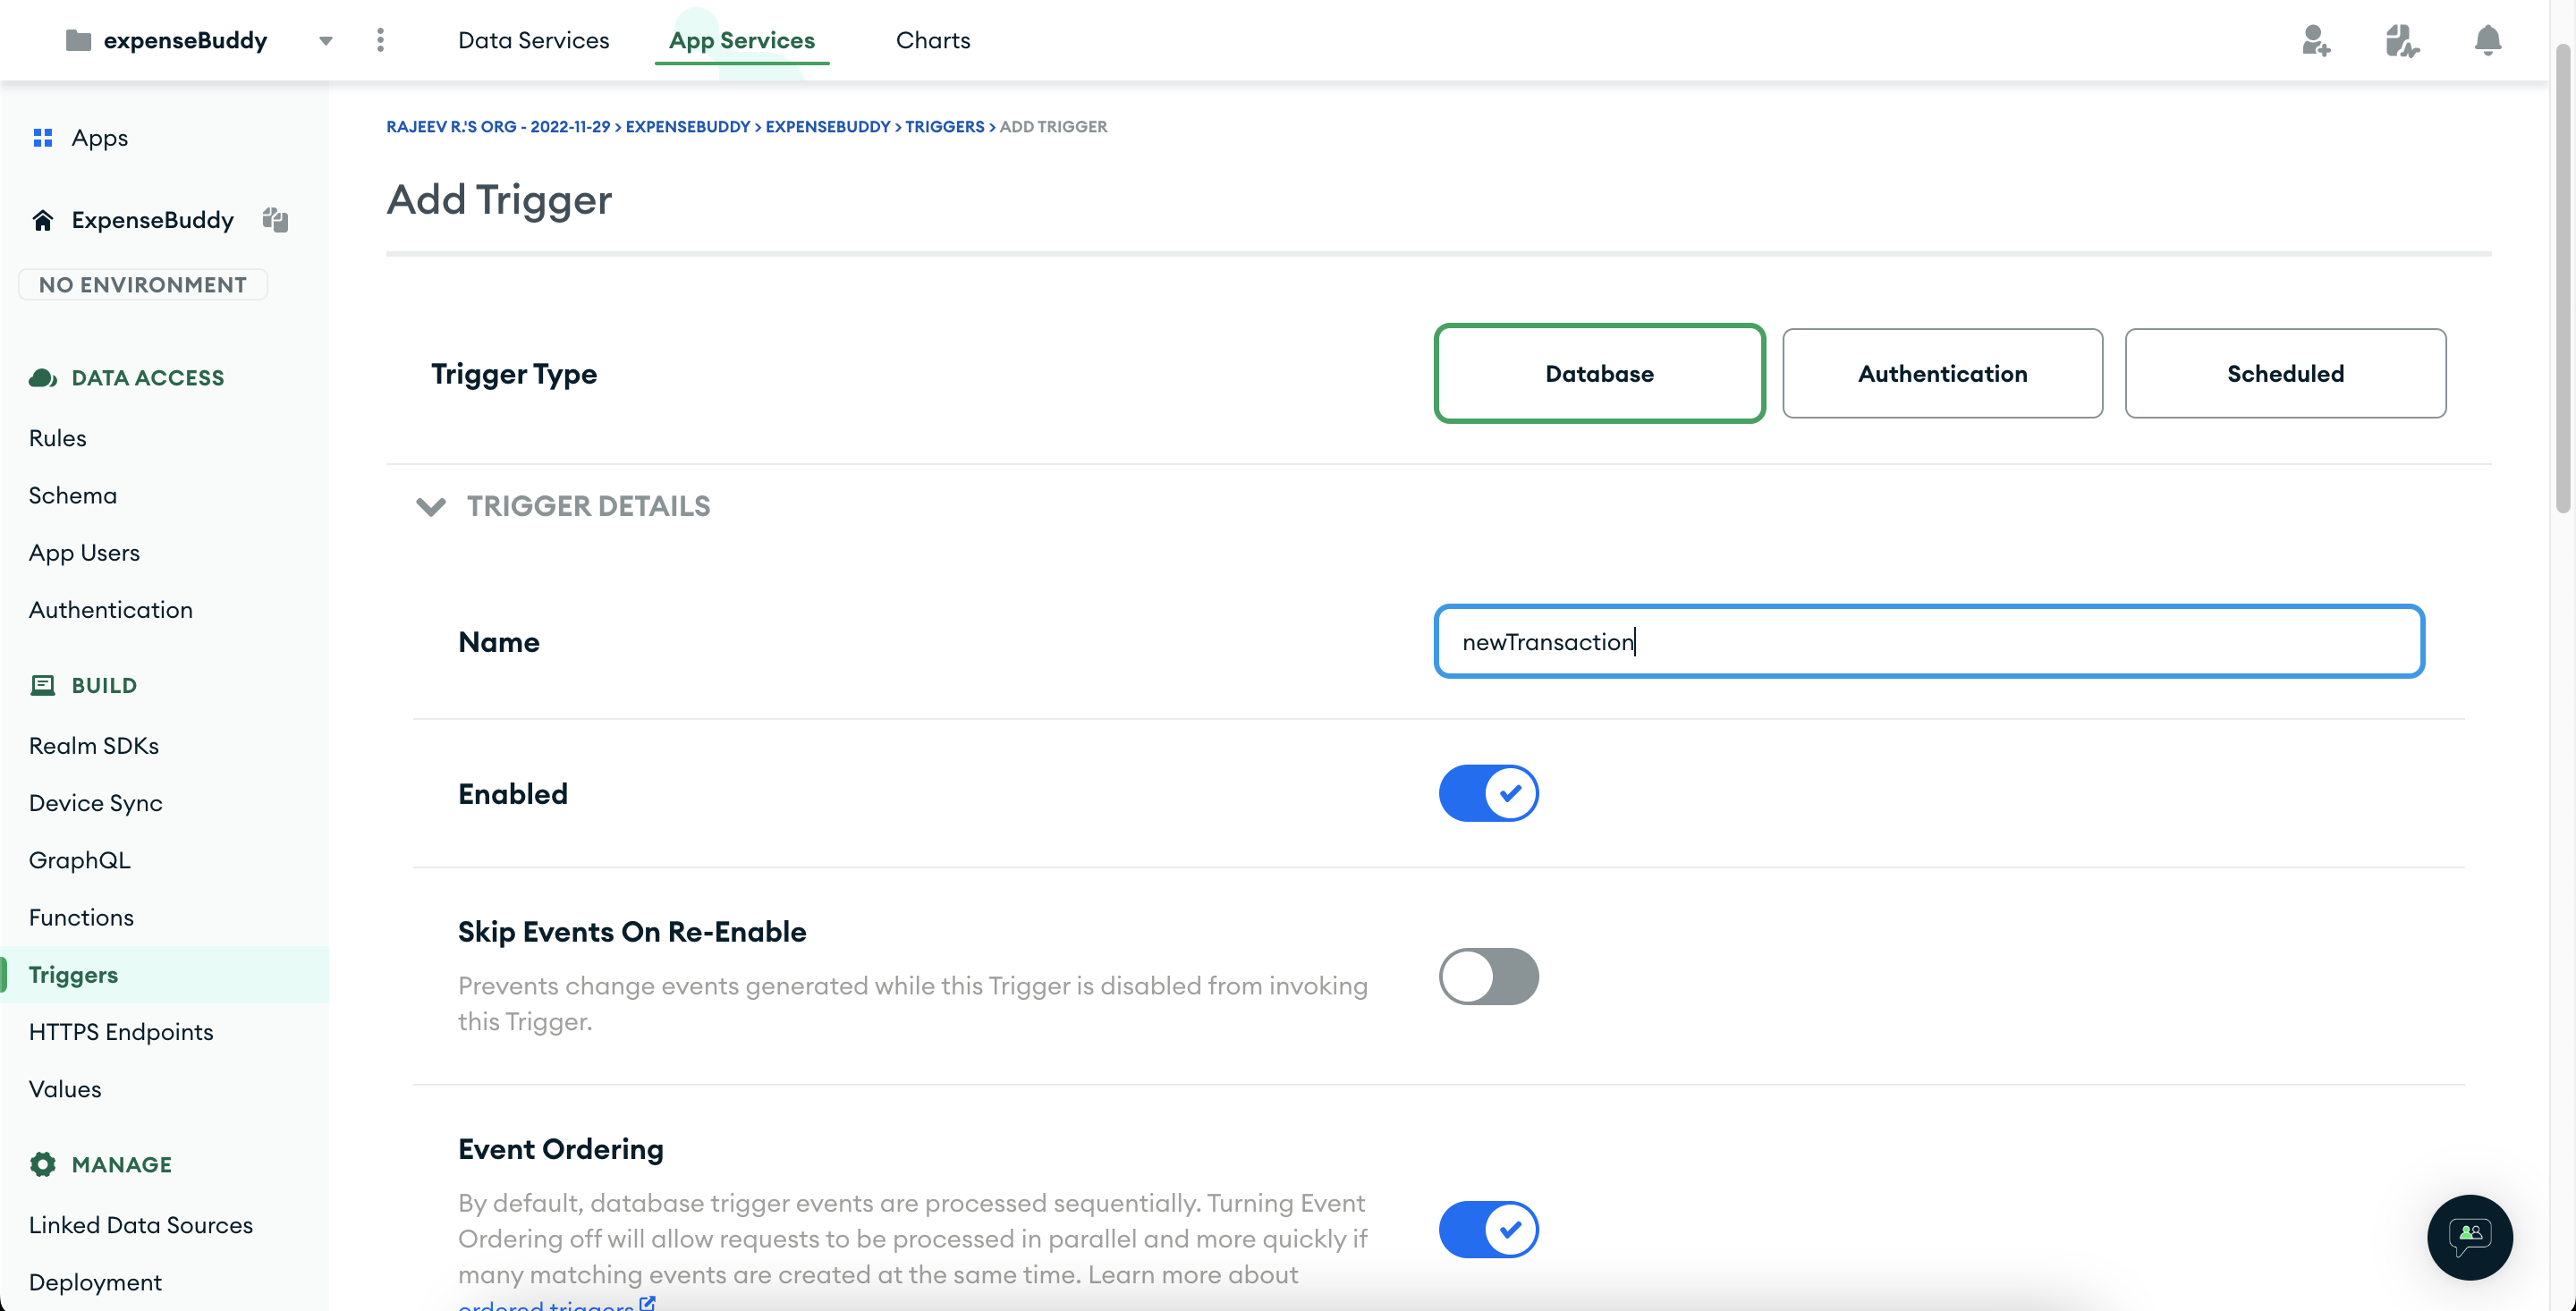
Creating the Auth Trigger
Now we're ready to create our first trigger. Whenever a user signs up for our application (even if anonymously), we will create a corresponding document in the "users" collection in the database.
Click on triggers from the left sidebar, select Authentication Triggers from the dropdown menu on the top left, and click on Add an Authentication Trigger button.
For Action Type, choose Create, from Providers dropdown pick Anonymous, and select function as the Event Type. Doing this allows us to automatically trigger a function whenever a new user signs up for our application.
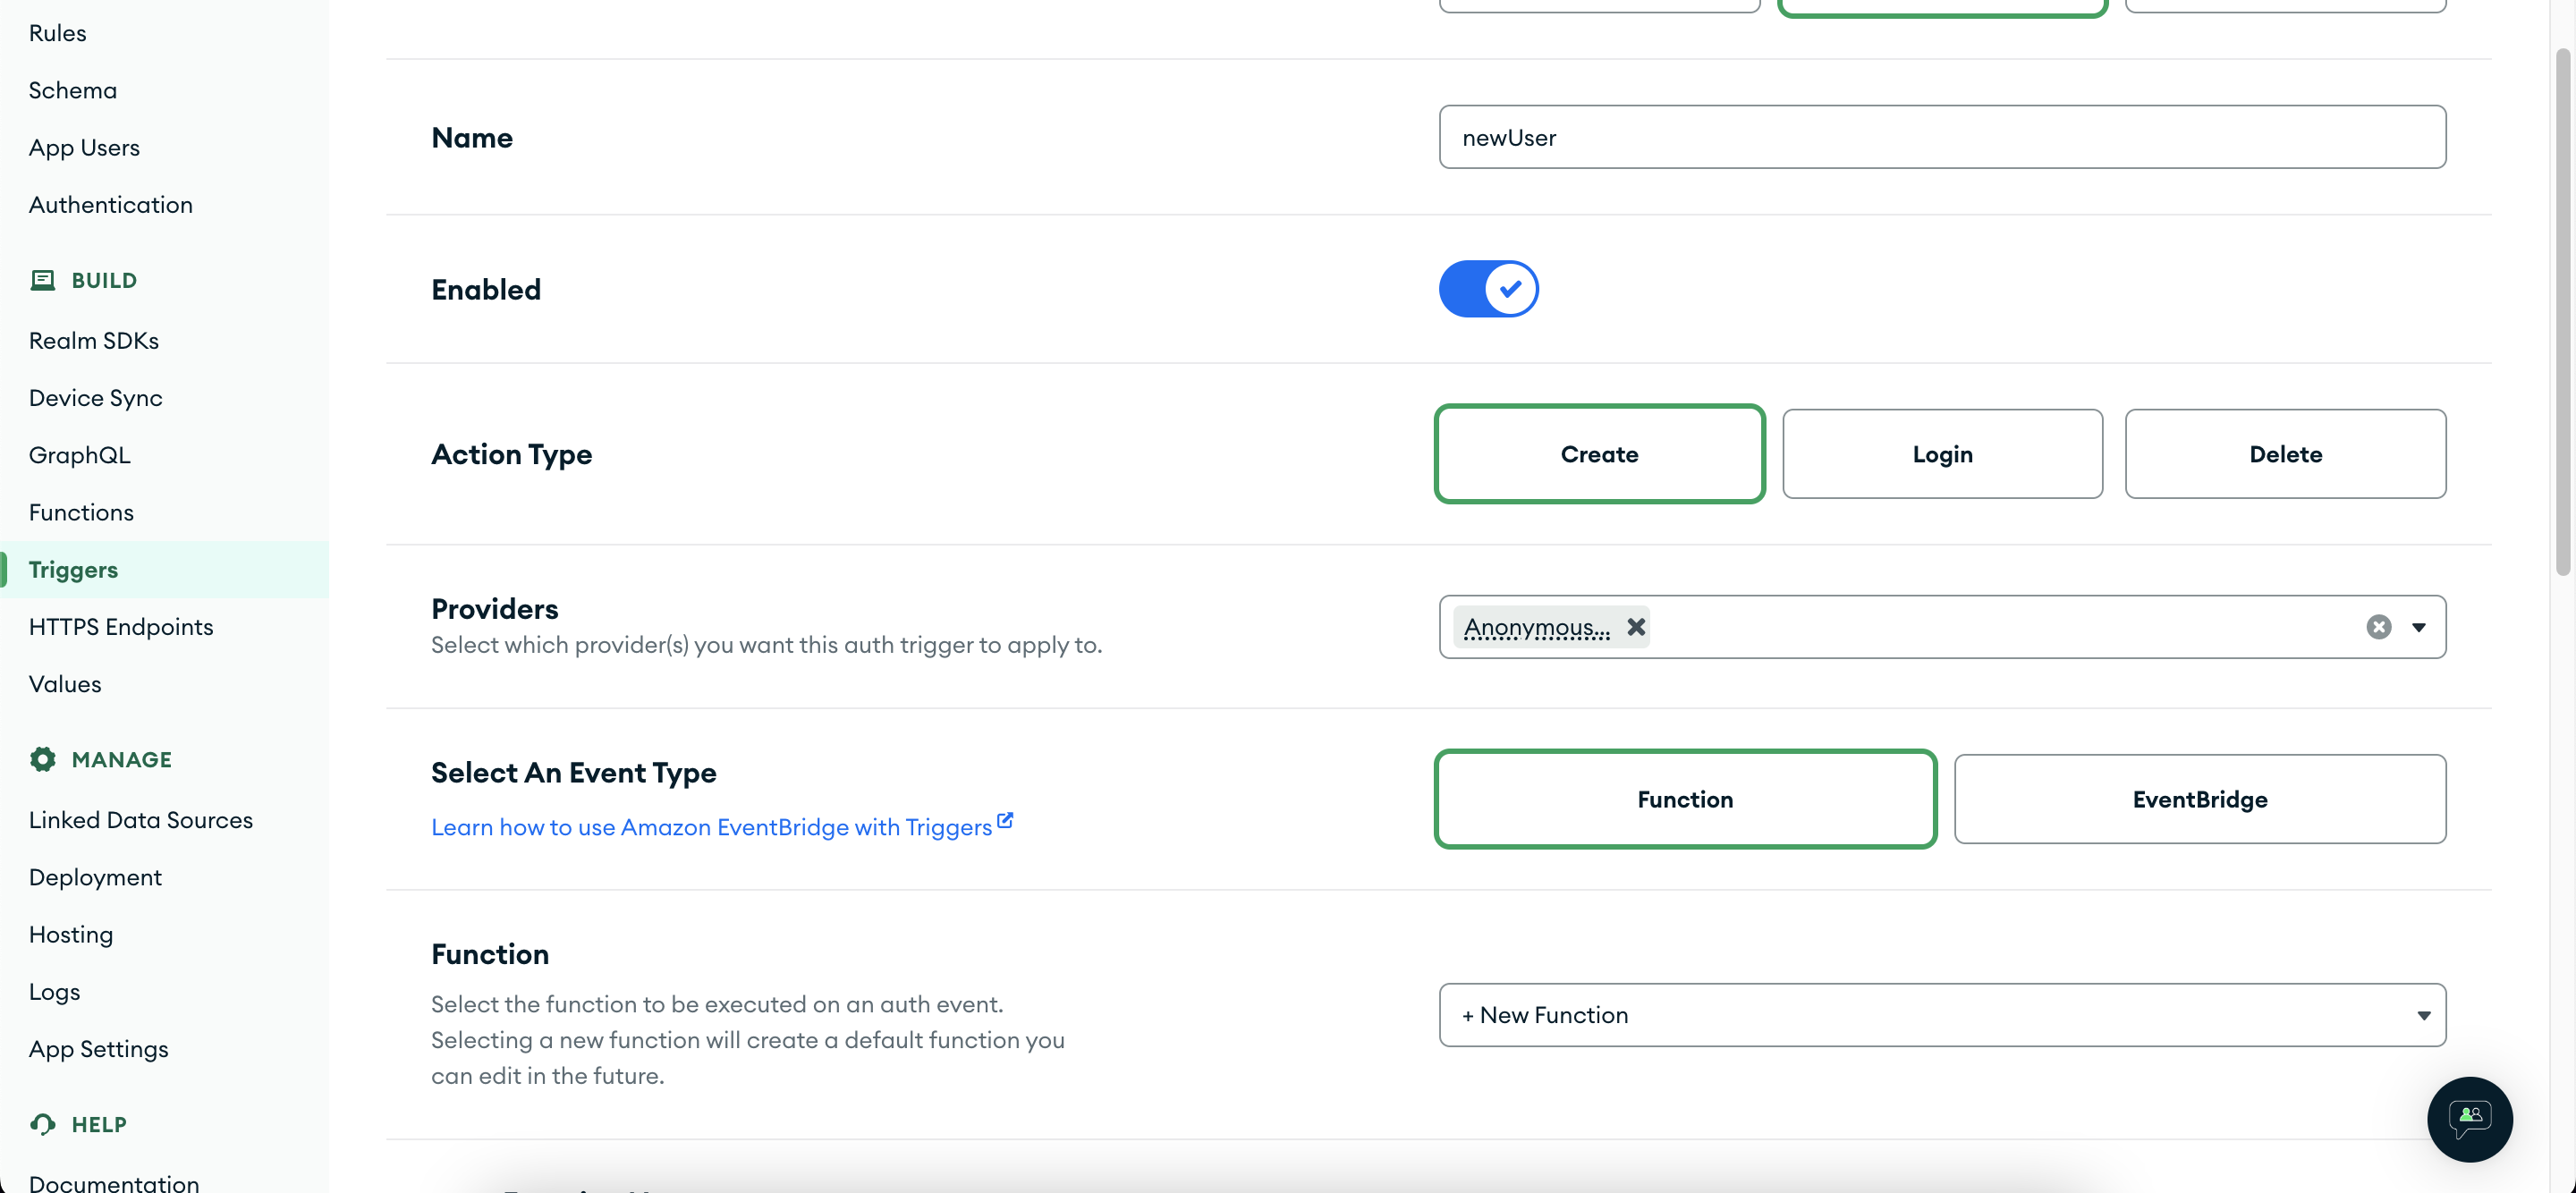
Add the following code in the code panel on the same screen. Don't forget to replace the <db_name> with your database name. What we do here is, from the incoming auth event get the auth user id, and create an entry in the "users" collection with some default values.
exports = async function(authEvent) {
  const { user, time } = authEvent;

  const mongoDb = context.services.get('mongodb-atlas').db('<db_name>');
  const usersCollection = mongoDb.collection('users');

  const userData = {
    _id: BSON.ObjectId(user.id),
    balance: 0,
    currMonth: {
      in: 0,
      out: 0,
    },
    createdAt: time,
    updatedAt: time,
  };

  const res = await usersCollection.insertOne(userData);
  console.log('result of user insert op: ', JSON.stringify(res));
};
Afterwards, deploy your changes for them to take effect. Should you need to make any changes to the function code, you can do so by clicking the Functions menu item from the left sidebar and then click on your function name.
Testing the Auth Trigger
Now we're ready to test the Auth trigger we created in the last section. Before doing that we'll pull the App Services application to our local machine. It is not mandatory to do so, but having the functions' code on the local machine, makes it easier to make changes. Let's install the "realm-cli" and configure it using this guide.
Now pull the application code by firing up a terminal, navigate to the project's root directory and run the following command.
# This will pull the application to the backend
# folder (the folder will be created automatically)
# Also, don't forget to use your app_id
realm-cli pull --local backend/ --remote <app_id>
Now go to the client folder, and install the realm-web SDK.
# From project root run the following
cd client && yarn add realm-web

# Make a new file for handling realm auth etc
touch src/RealmApp.js
Add the following code to the RealmApp.js file
import { createContext, useContext, useState, useEffect } from 'react';
import * as Realm from 'realm-web';

const RealmContext = createContext(null);

export function RealmAppProvider({ appId, children }) {
  const [realmApp, setRealmApp] = useState(null);
  const [appDB, setAppDB] = useState(null);
  const [realmUser, setRealmUser] = useState(null);

  useEffect(() => {
    setRealmApp(Realm.getApp(appId));
  }, [appId]);

  useEffect(() => {
    const init = async () => {
      if (!realmApp.currentUser) {
        await realmApp.logIn(Realm.Credentials.anonymous());
      }

      setRealmUser(realmApp.currentUser);
      setAppDB(
        realmApp.currentUser
          .mongoClient(process.env.REACT_APP_MONGO_SVC_NAME)
          .db(process.env.REACT_APP_MONGO_DB_NAME)
      );
    };

    if (realmApp) {
      init();
    }
  }, [realmApp]);

  return (
    <RealmContext.Provider value={{ realmUser, appDB }}>
      {children}
    </RealmContext.Provider>
  );
}

export function useRealmApp() {
  const app = useContext(RealmContext);
  if (!app) {
    throw new Error(
      `No Realm App found. Did you call useRealmApp() inside of a <RealmAppProvider />.`
    );
  }

  return app;
}
Modify the App.js file and add the following changes to it
// Add the RealmApp import
import { RealmAppProvider } from './RealmApp';

// Wrap the BrowserRouter inside the RealmAppProvider
function App() {
  return (
    <RealmAppProvider appId={process.env.REACT_APP_REALM_APP_ID}>
      <BrowserRouter>
        <Routes>
          <Route path='/' element={<Layout />}>
            <Route index element={<Dashboard />} />
            <Route path='/new' element={<NewTransaction />} />
          </Route>
        </Routes>
      </BrowserRouter>
    </RealmAppProvider>
  );
}
Create an env file named .env at the root of the react project and add the following keys and their respective values
REACT_APP_REALM_APP_ID=<realm_app_id>
REACT_APP_MONGO_SVC_NAME=mongodb-atlas
REACT_APP_MONGO_DB_NAME=<db_name>
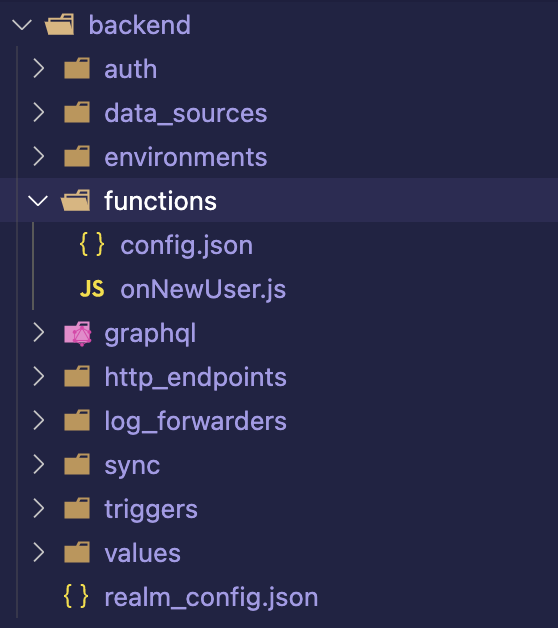
At this point, the project structure looks like the following
The client folder
The backend folder
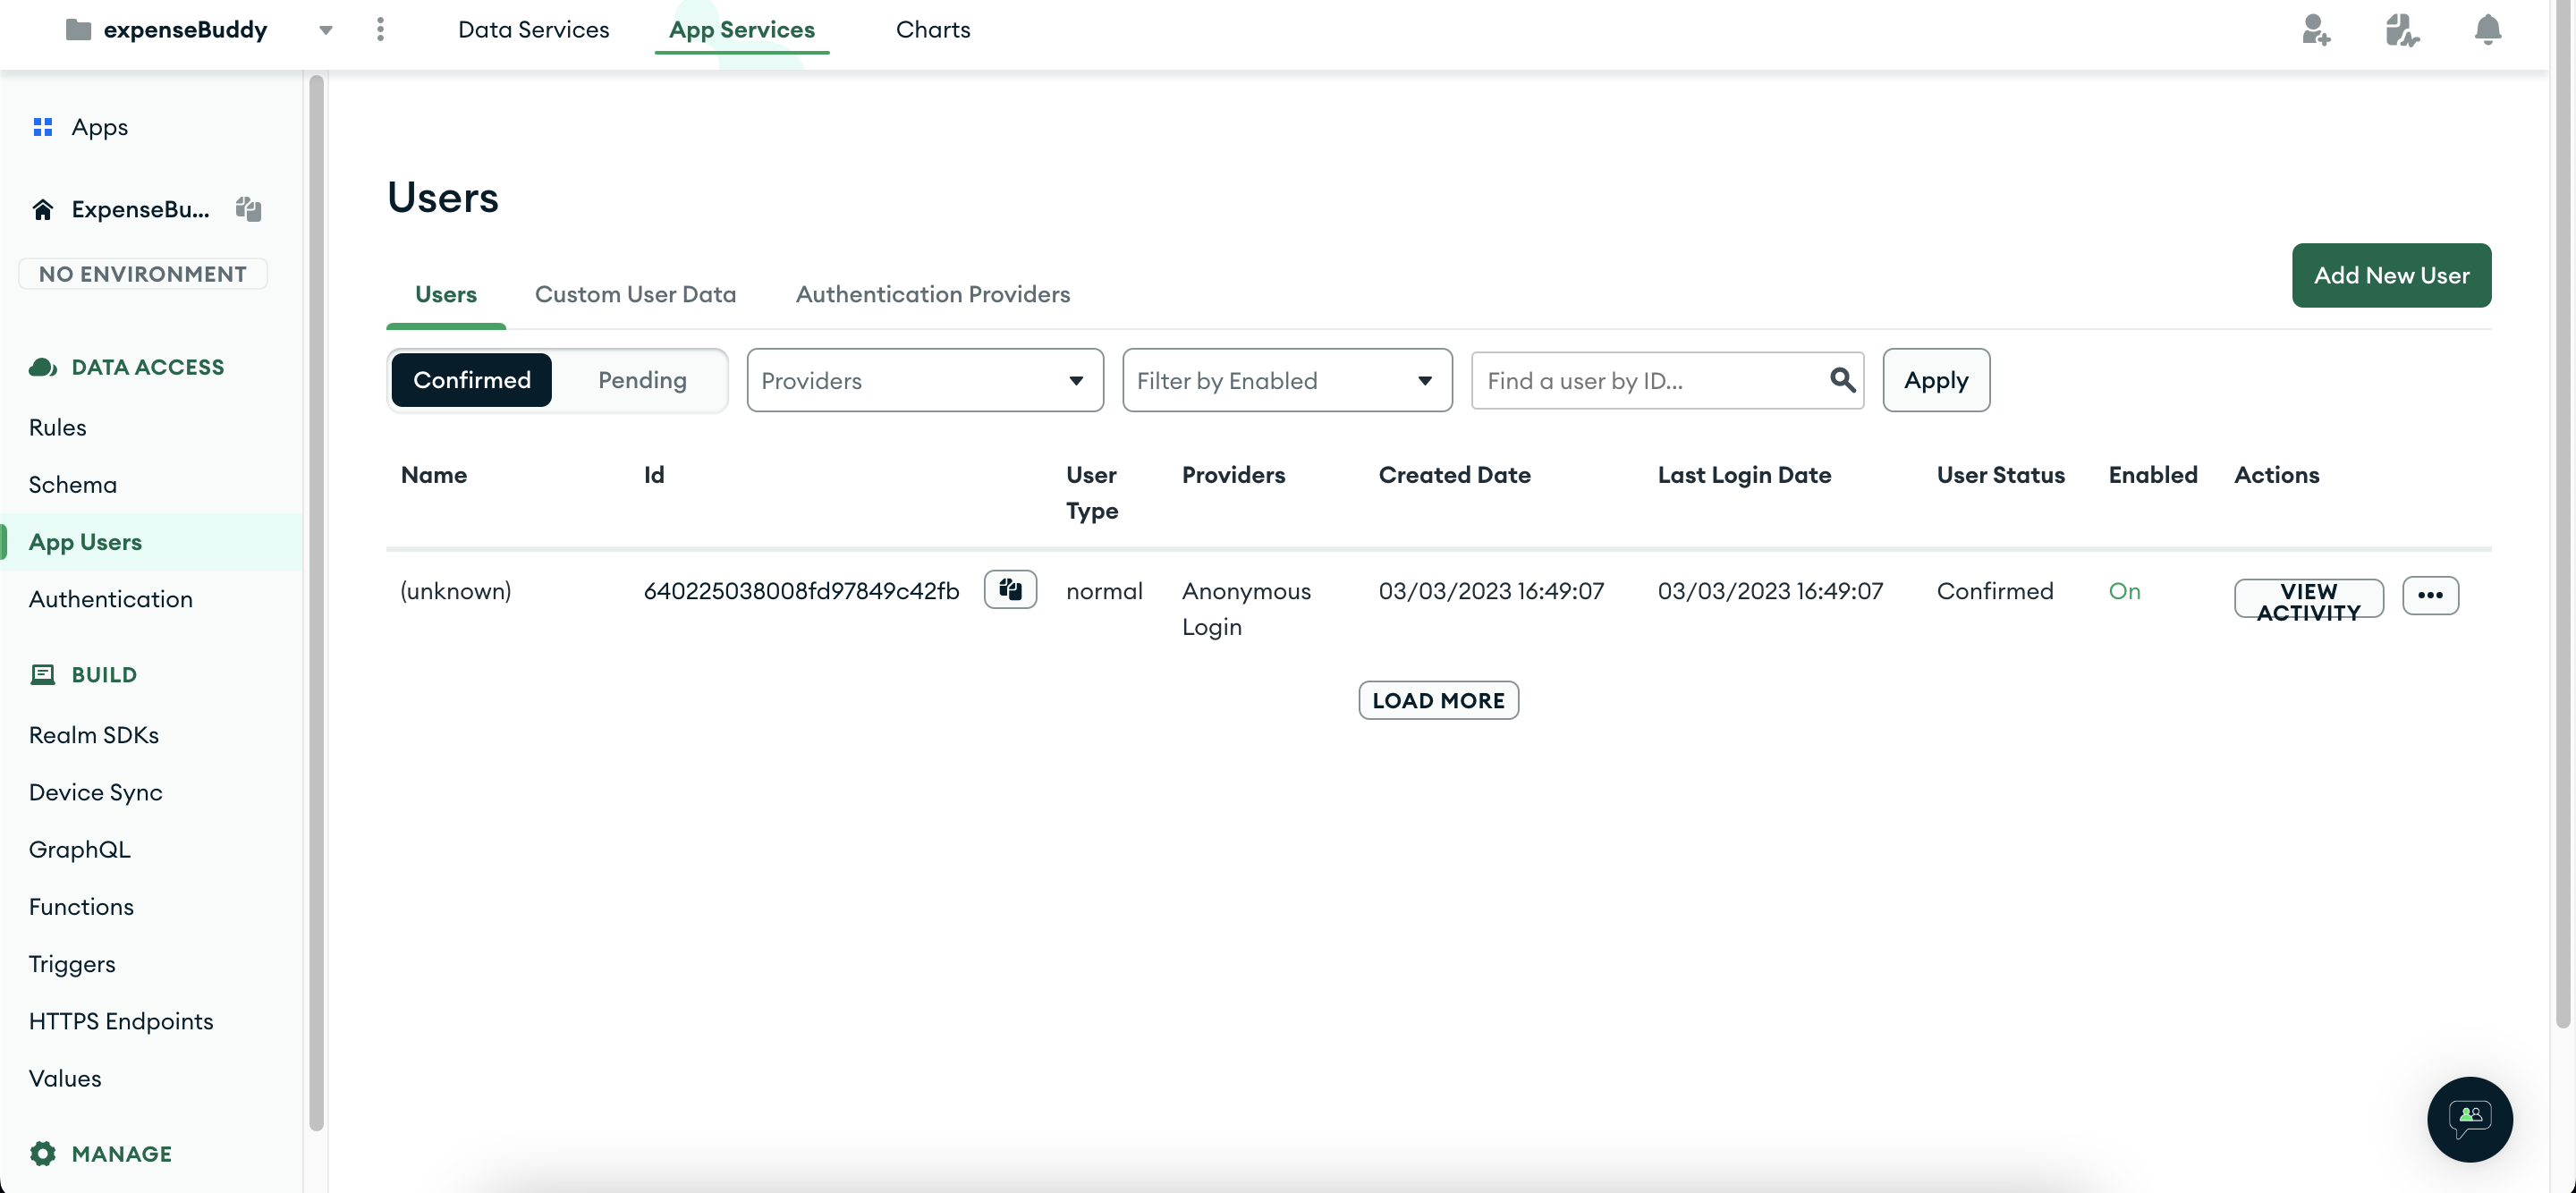
Restart the dev server for the env values to take effect. As soon as the application loads in your browser, an anonymous user should have been created in the realm app. You can check it by going to your App Services dashboard, and clicking App Users from the left sidebar menu. To view the function logs, we can click on "Logs" from the same sidebar menu.
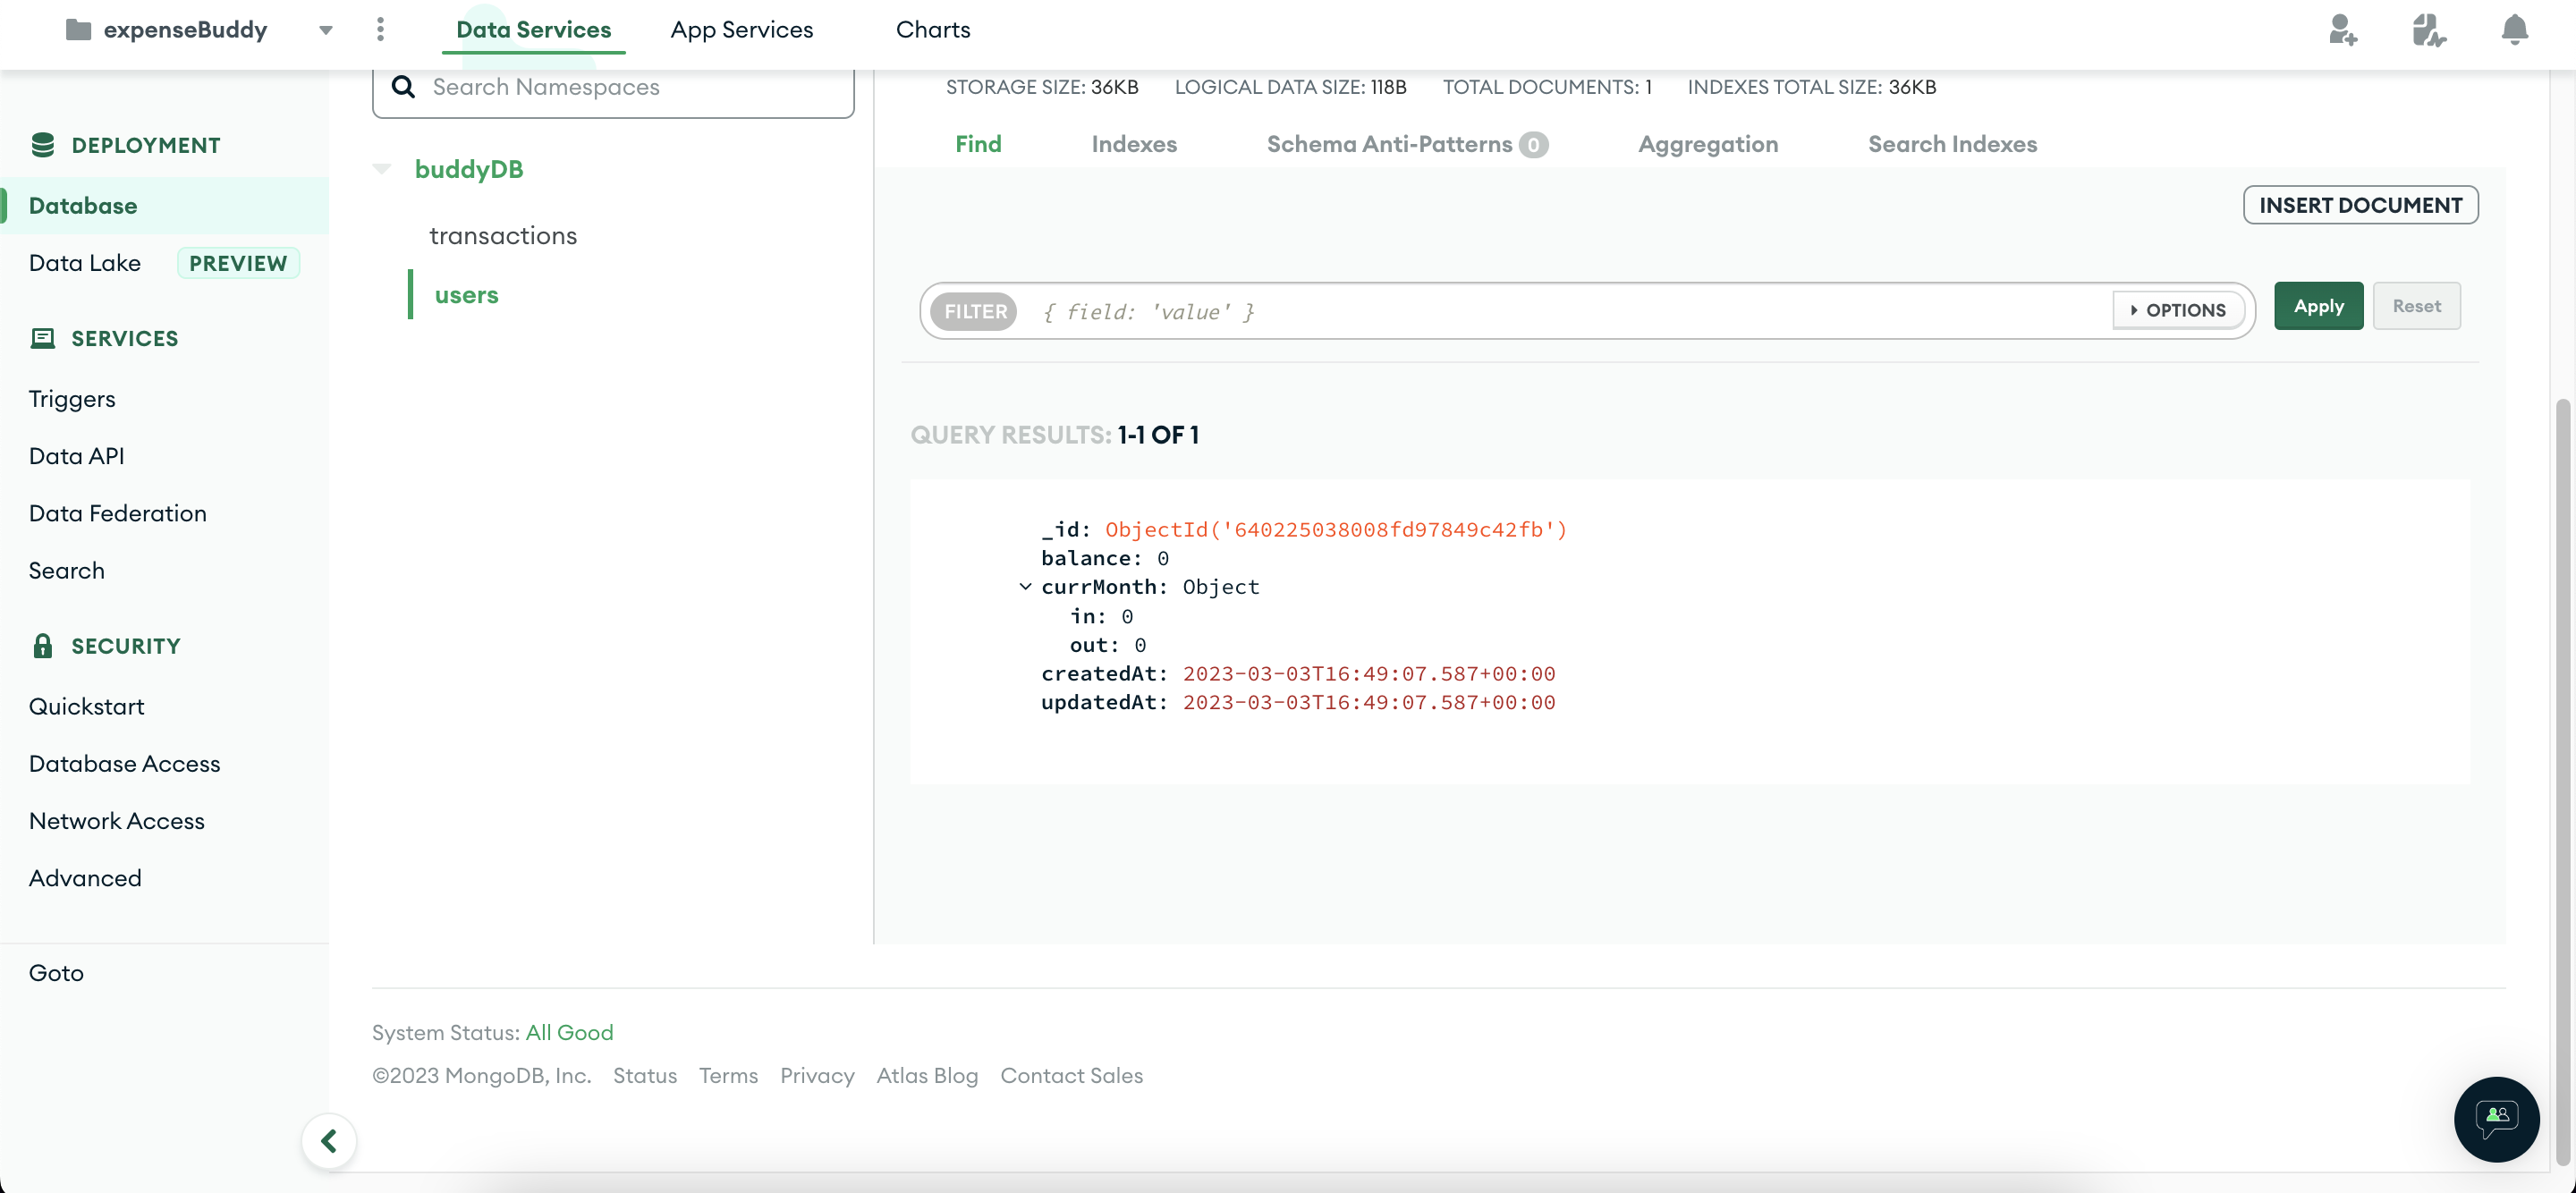
Also, if you go the "Data Services" tab, and browse your database's users collection, you should see an entry there. This was created by the Auth Trigger we had created earlier.
Congratulations are in order. You've made it this far, you were able to create a trigger, and make it work successfully :-).
Database interactions from the client
For interacting with our database through the Realm SDK, we need to define the data access rules first. Without that we won't be able to read or write to the database. You can verify this by doing the following changes to our Dashboard.js file.
// Add the following import
import { useRealmApp } from '../RealmApp';

export const Dashboard = () => {
  // ...

  // Add the following before the return statement
  const { appDB } = useRealmApp();

  useEffect(() => {
    const getUser = async () => {
      const res = await appDB.collection('users').find({});
      console.log('got some user', res);
    };

    if (appDB) {
      getUser();
    }
  }, [appDB]);

  // ...
}
After saving the code if you try to get the user from the database you'll get the following error message
no rule exists for namespace '<your_db_name>.users'
Then how could the user entry creation in the database get through earlier, you might ask? Well, the backend triggers are run as the system, so it has the required privileges. You can verify whether the triggers run as "system" or not by adding the following console log to the auth trigger function code.
console.log('context.user.type:', context.user.type)
Also, the rules we're talking about here are for the Realm App (used by the React App) to access the database on our behalf. Click on Rules from the sidebar under DATA ACCESS menu section. Then click on the "users" collection in the middle panel, and click on Skip (start from scratch) at the bottom of the rightmost panel.
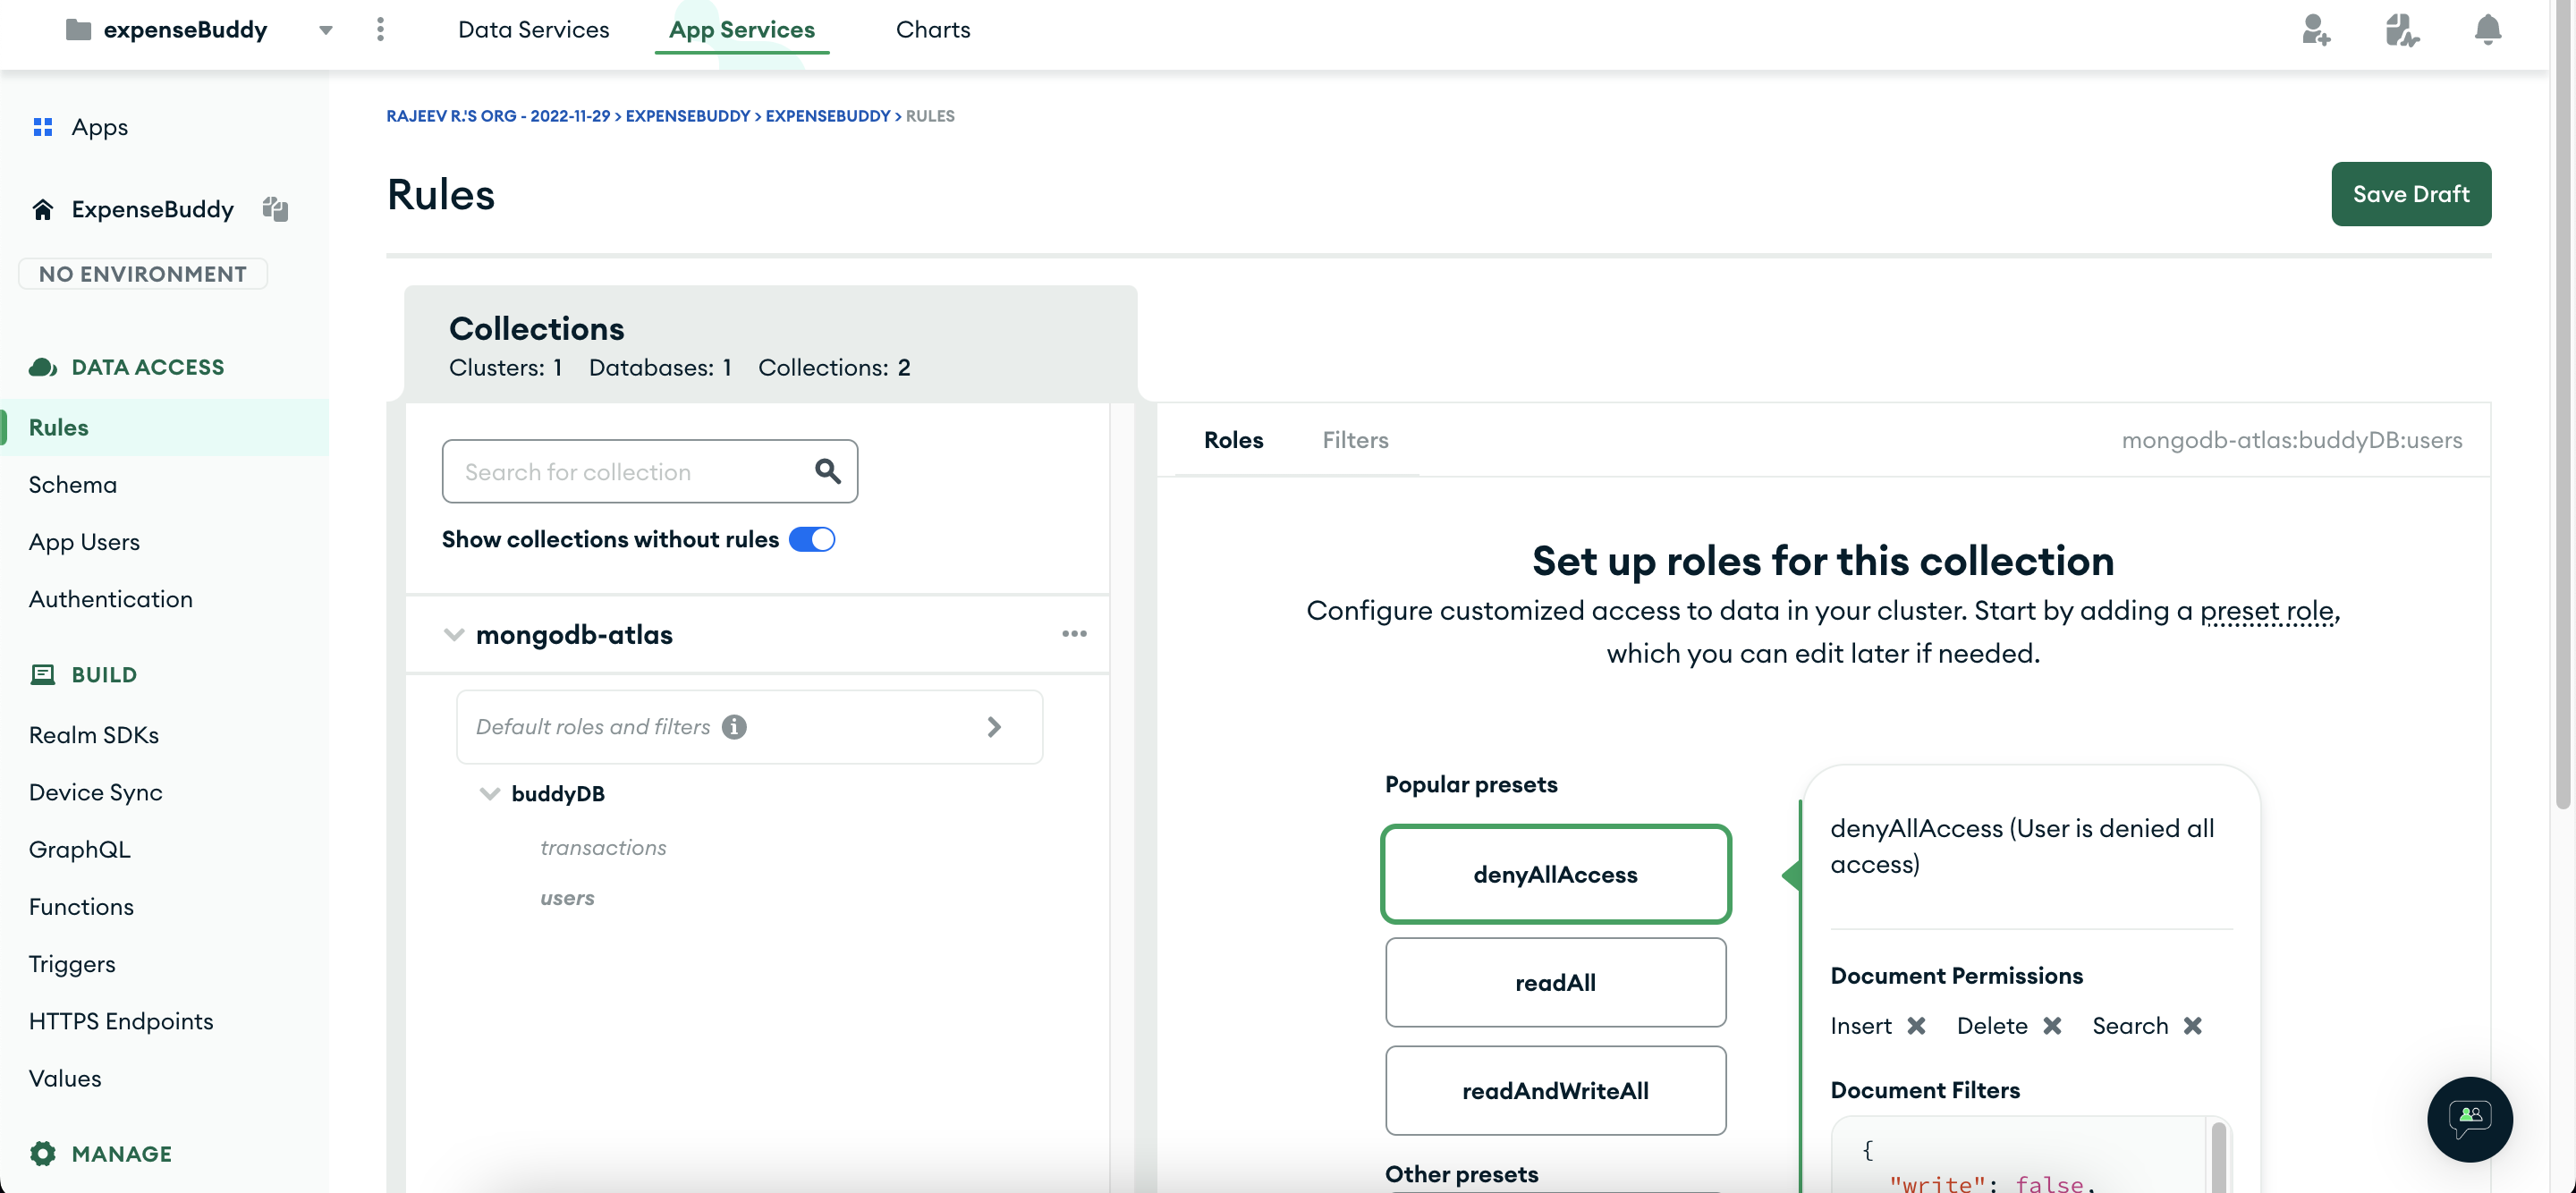
Give this rule a proper name, say ReadWriteOwn, and click on Advanced Document Filters, and add the following JSON expression to both the read and the write text boxes. Select Read and write all fields from the dropdown menu at the bottom, save the draft, and then deploy your changes.
{
    "_id": {
        "%stringToOid": "%%user.id"
    }
}
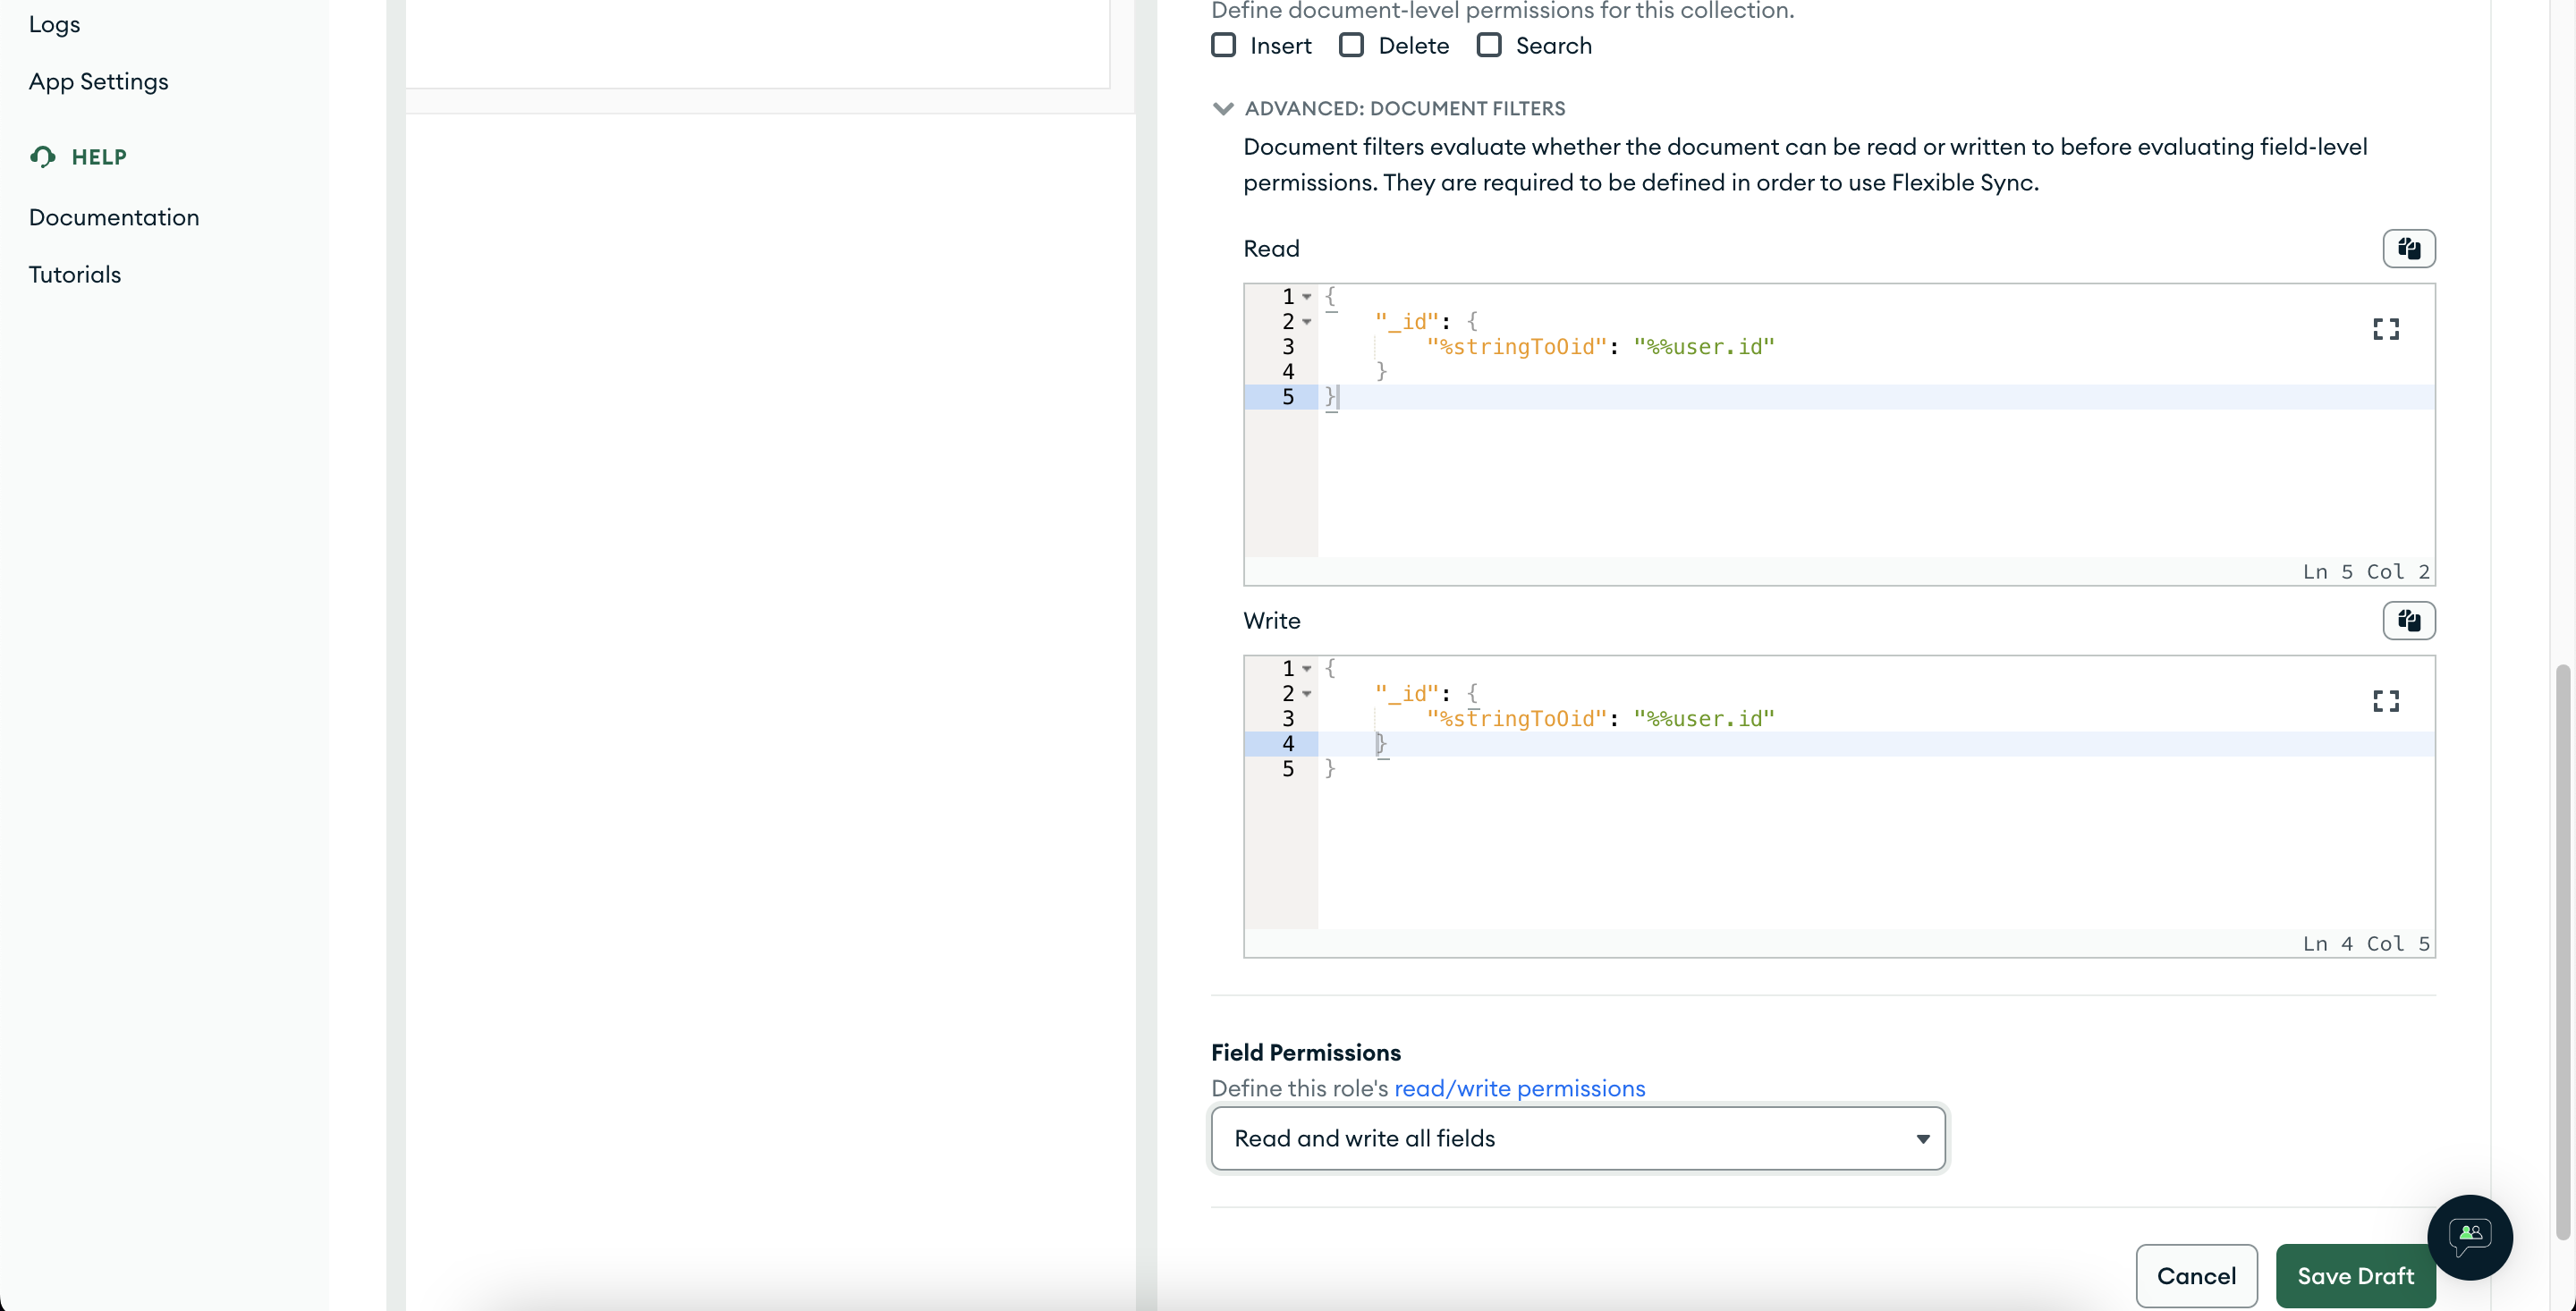
What we're doing above is: matching the incoming userId (from the HTTP request that the Realm SDK makes) against the _id(which is the document owner's user id ) of the document. If both are the same, the user making the request will be authorized to read/write, else the access will be denied. This is necessary if we don't want any unauthorized access to our data, which is true in this case. Also, "%stringToOid": "%%user.id" converts the incoming user id (which is a string) to the mongo ObjectId so that we can compare it against _id (which is an ObjectId).
Now if you reload the dashboard page, you can verify that the user data is getting returned successfully from the database through the console log we've added there.
Add Transactions
We're ready to create transactions now. Let's make the same data access rules for the "transactions" collection with two minor changes.
- Users should be able to create new transactions on their own, so we need to allow inserting new documents into the collection (as opposed to the
"users"collection where the insert happens only once, and that too from the auth trigger). So we need to check/select the"insert"option (just above theAdvanced Document Filters). - We'll save the transaction's owner id in a new field
owner_id(which will be astring), so we don't need to convert the incoming userId to an ObjectId. Use the following for"Advance Document Filters"read & write text boxes.
{
  "owner_id": "%%user.id"
}
Save the draft and deploy your changes. Head over to the NewTransaction.js file and add the following changes.
// Add the following import statement
import { useRealmApp } from '../RealmApp';

// Call useRealmApp inside the function component
const { appDB, realmUser } = useRealmApp();

// Replace the onSubmit function with the following
const onSubmit = async (e) => {
    e.preventDefault();

    const amount = parseFloat(formState.amount);
    const comment = formState.comment.trim();

    if (!amount || !comment || !formState.type) {
      alert('Please fill in all fields');
      return;
    }

    try {
      const finalData = {
        amount,
        comment,
        type: formState.type,
        owner_id: realmUser.id,
        createdAt: new Date(),
      };

      setLoading(true);
      const res = await appDB.collection('transactions').insertOne(finalData);
      console.log('result of insert op', res);

      setFormState(INITIAL_STATE);
      setMessage({ type: 'success', text: 'Successfully saved the transaction.' });
    } catch (error) {
      console.log('failed to save the transaction');
      setMessage({ type: 'error', text: 'Failed to save the transaction.' });
    }

    setLoading(false);
  };
Now try creating a transaction, you should be able to see the created transaction in the database. But the main balance in the user document won't change as we haven't written any trigger for that. Let's remedy that and create our second trigger in the next section.
Creating a Database Trigger
What we want to do here is: whenever a new transaction is created by the user, we update the main balance as well as the in/out values for the current month. Remember the user document had the below structure
const userData = {
    _id: BSON.ObjectId(user.id),
    balance: 0,
    currMonth: {
      in: 0,
      out: 0,
    },
    createdAt: time,
    updatedAt: time,
};
Head over to the App Services Triggers section and create a new database trigger.
Select your cluster and database from the dropdowns, and choose transactions as the collection name. Again select function as the event type and create a new function by giving it an appropriate name.
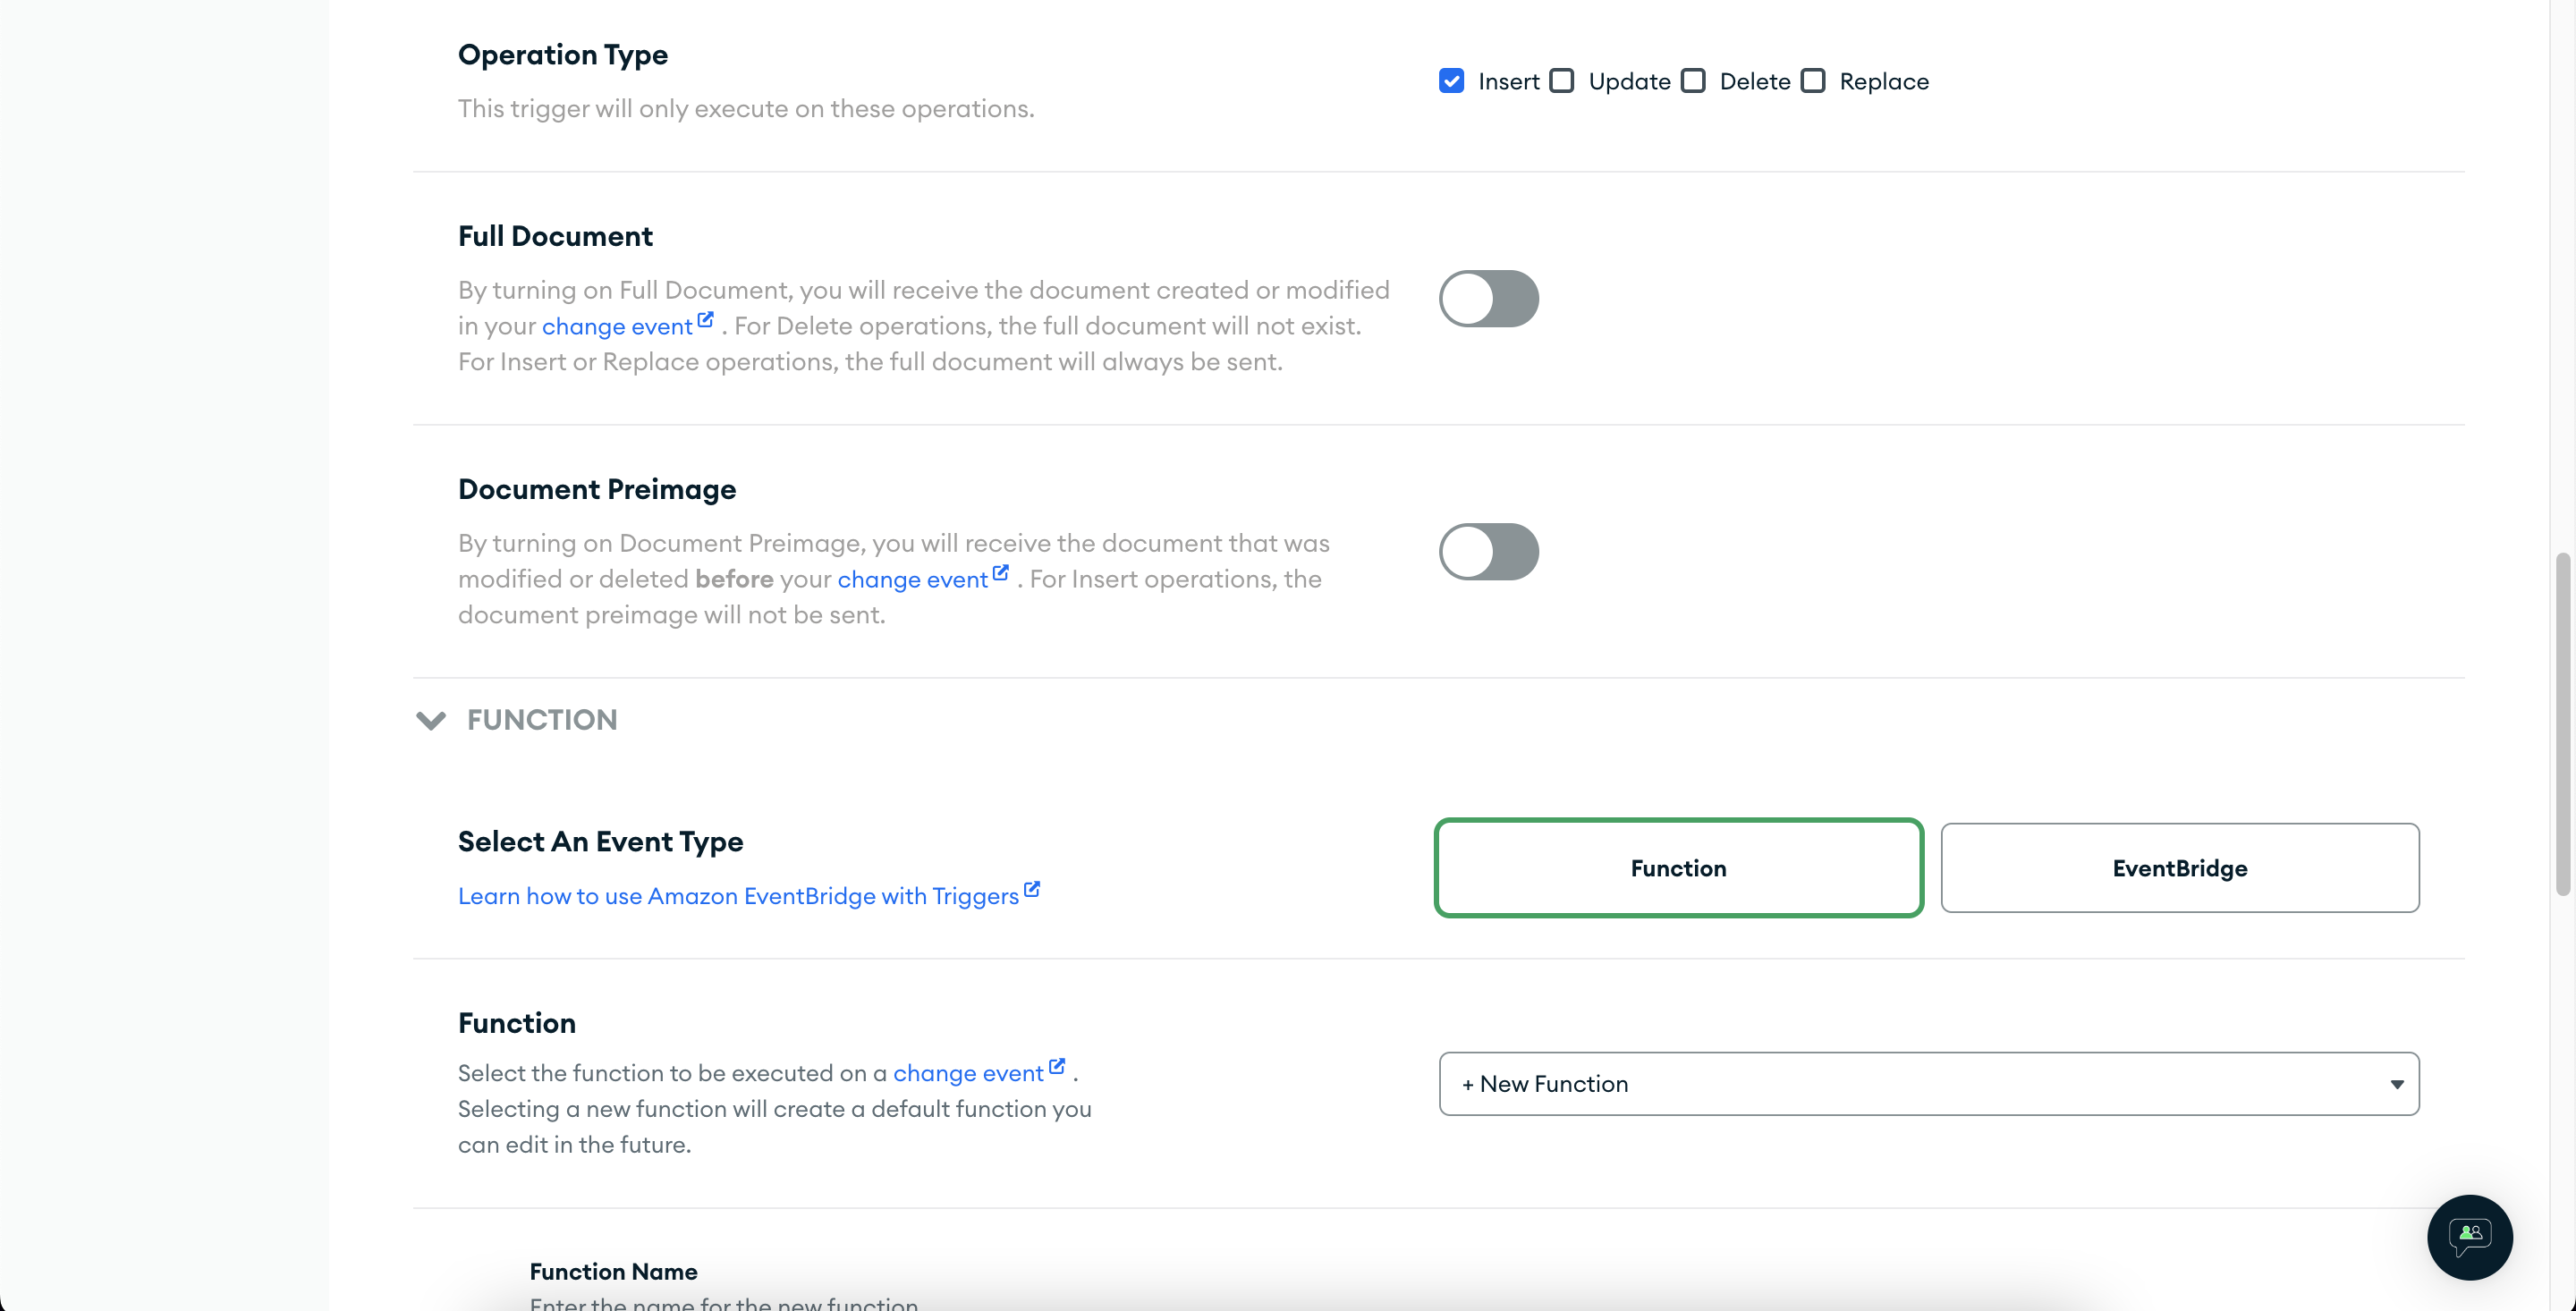
Add the following code to the code panel for the function. What the code essentially does is: get the inserted document, extract the owner_id from it, and then update the corresponding user document. We use the $inc pipeline of mongoDB to increment (or decrement in case of deduction by making the value negative) the respective fields.
exports = async function(changeEvent) {
    const doc = changeEvent.fullDocument;

    console.log('incoming doc:', JSON.stringify(doc))

    const filter = { _id: BSON.ObjectId(doc.owner_id) };
    const update = {
      $set: { updatedAt: new Date() },
      $inc: {},
    };

    if (doc.type === 'IN') {
      update.$inc.balance = doc.amount;
      update.$inc['currMonth.in'] = doc.amount;
    } else {
      update.$inc.balance = -doc.amount;
      update.$inc['currMonth.out'] = doc.amount;
    }

    // Replace the DB name with your db name
    const usersCollection = context.services
      .get('mongodb-atlas')
      .db('<db_name>')
      .collection('users');

    const res = await usersCollection.updateOne(filter, update);
    console.log('update op res:', JSON.stringify(res));
};
Now go to the Dashboard.js file and make the following changes to the component code
// import BSON from 'realm-web
import { BSON } from 'realm-web';

// Destructure realmUser also from useRealmApp
const { realmUser, appDB } = useRealmApp();

// Update the useEffect to the following
useEffect(() => {
    const getUser = async () => {
      const res = await appDB
        .collection('users')
        .findOne({ _id: new BSON.ObjectId(realmUser.id) });
      console.log('got some user', res);
      setUser(res);
    };

    const getTransactions = async () => {
      const res = await appDB.collection('transactions').find({});
      console.log('got transactions res', res);
      setTransactions(res);
      setLoading(false);
    };

    if (appDB) {
      getUser();
      getTransactions();
    }
}, [appDB, realmUser]);
We're using the realm user id to get the user data now. Also, we've added the code to fetch the user's transactions. After saving the code, make a couple of transactions to see if everything is working properly (it is better to delete the transactions before the database trigger was created for the Math to add up). You should get a screen like the below screenshot
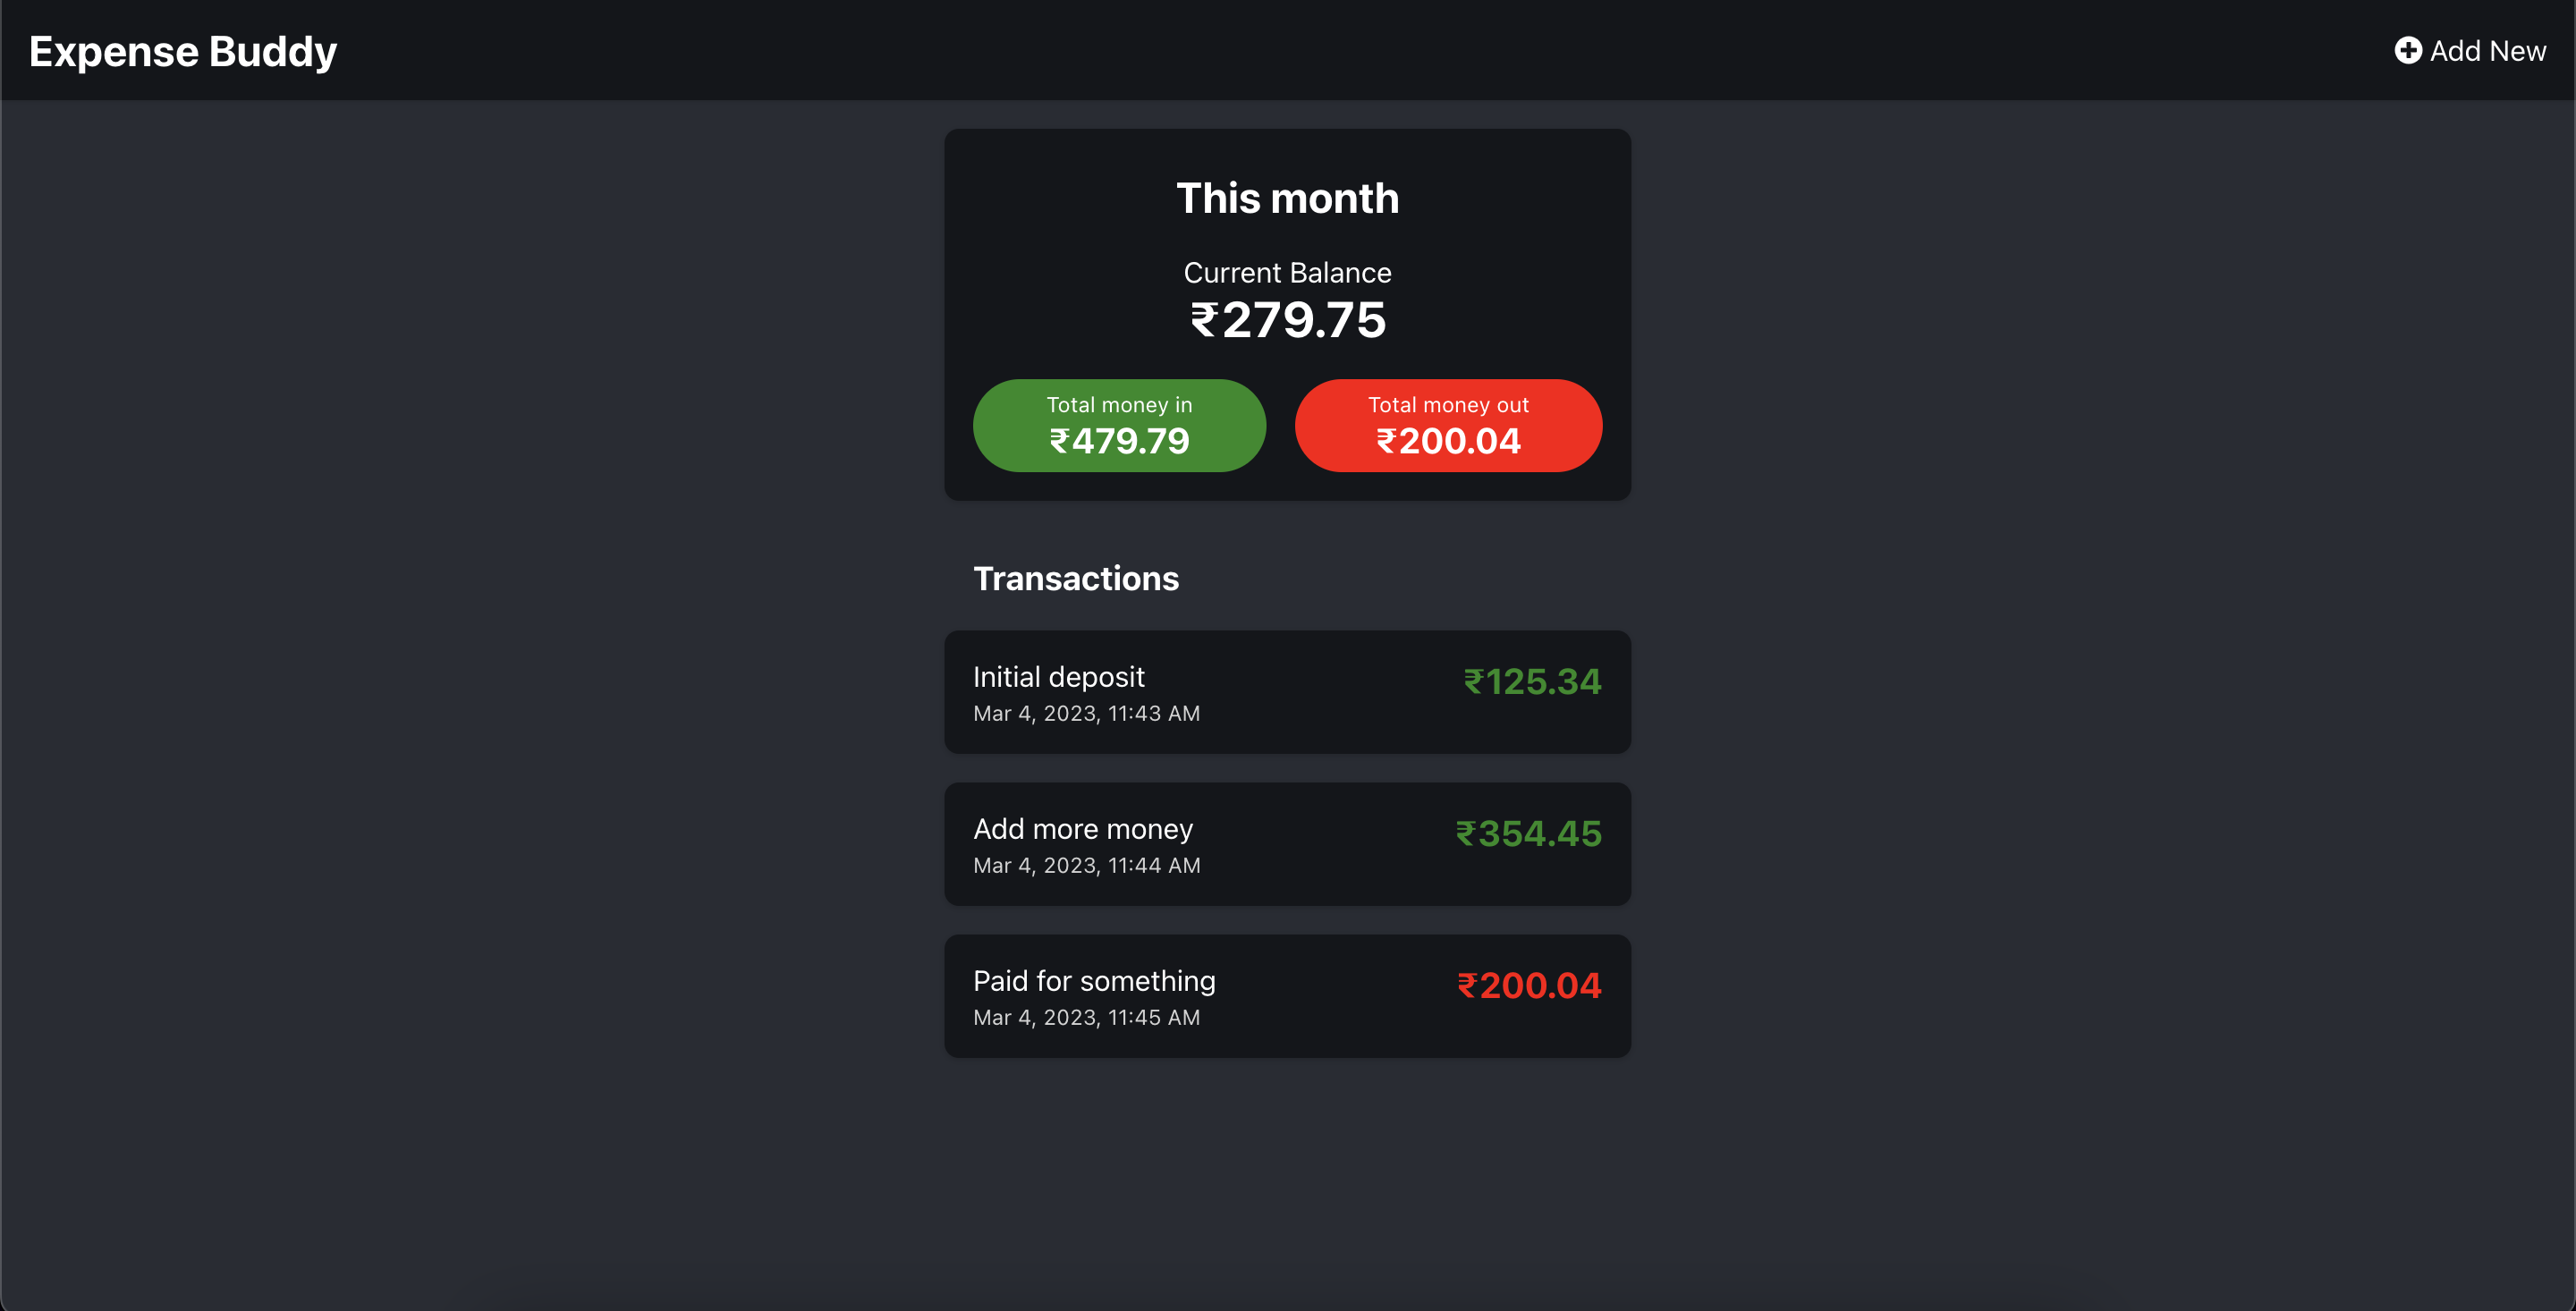
If you observe, you'll see that the transactions are in the order in which they were added to the database. Also, we only want to show transactions for the current month in the dashboard. You can verify this by adding an entry for the last month directly to the database, and then on dashboard refresh that entry also shows up (do note that this also changes the main balances as there is no date/month guard for the insert trigger).
To rectify the above issues, make the following changes to the realm call
const date = new Date();
date.setDate(1);
date.setHours(0, 0, 0, 0);

const res = await appDB.collection('transactions').find(
    {
        createdAt: { $gte: date, $lte: new Date() },
    },
    {
        sort: {
            createdAt: -1,
        },
    }
);
We've added the descending sort order for the matched entries. Also, we're only asking for the documents added on or after day 1 of the current month using the $gte (greater than or equal to) pipeline. I've added the upper bound till the current time ($lte pipeline, less than or equal to) also, though it is not needed. After making these changes you should get the transaction entries in the correct order, and only for the current month.
Congratulations on creating and making the second type of trigger work. 👏
Handling Month Changes
Now the only thing remaining is: what happens when the month changes? Since we only want to show the inflows and outflows for the current month, we need to reset them to 0 on the month change, and this should happen automatically. The way to do this is a Scheduled Trigger (also known as a CRON job).
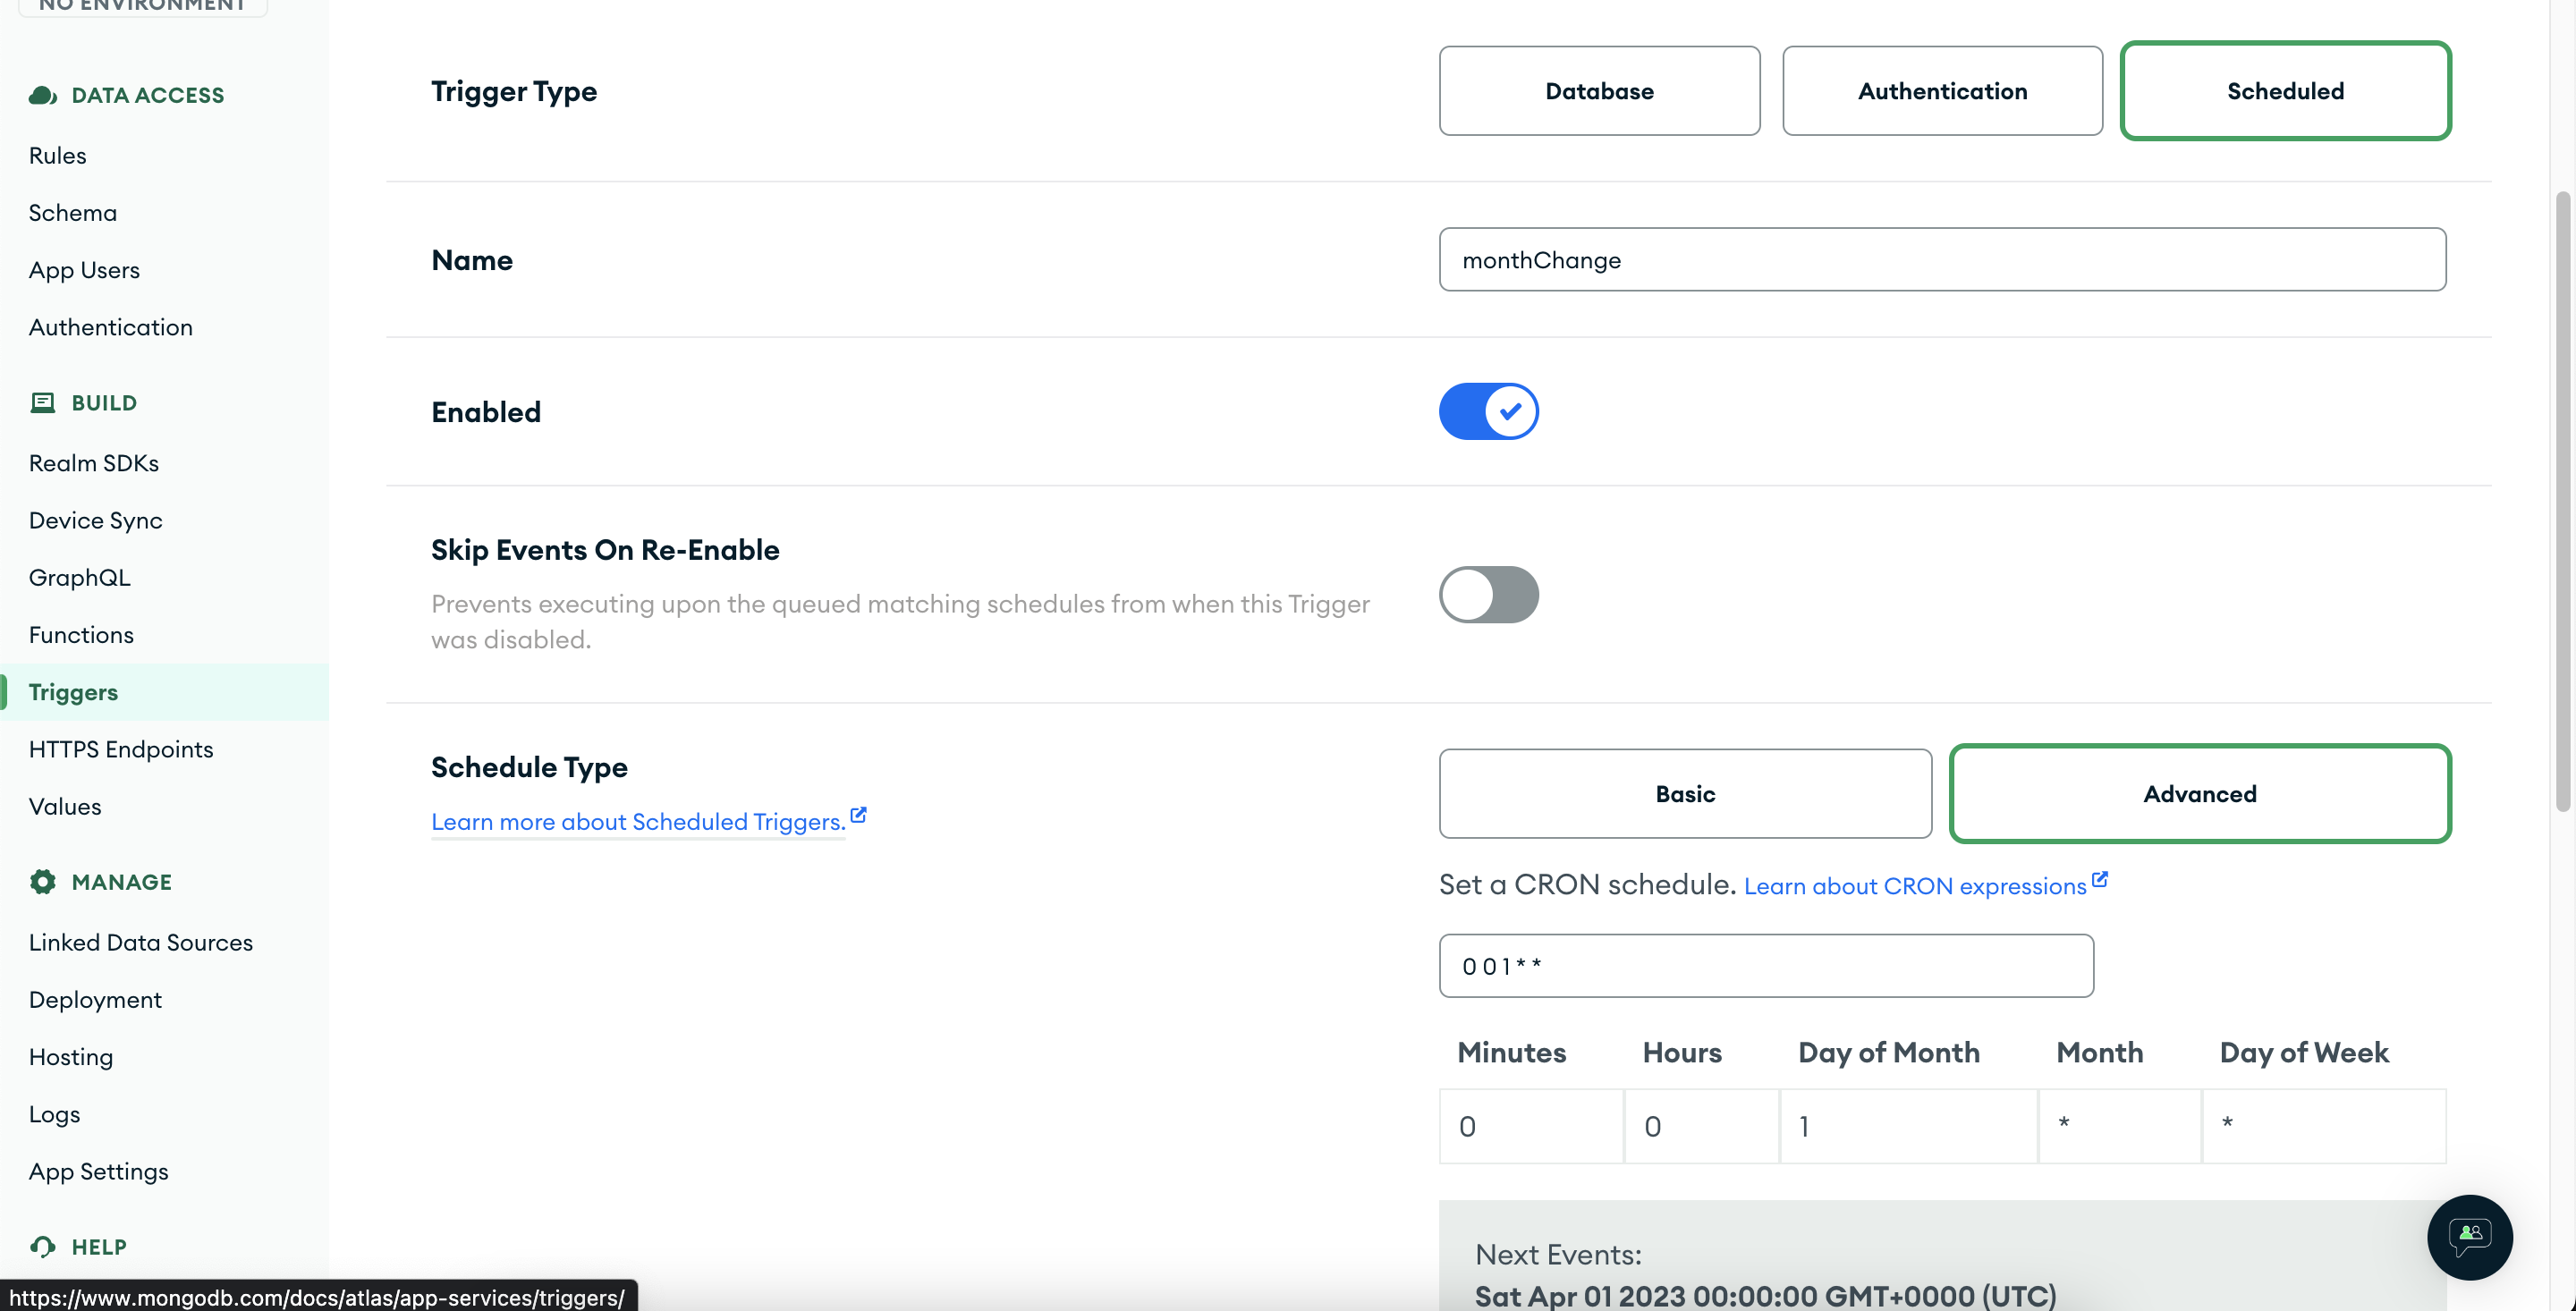
Let's go to the app services dashboard one final time, and click on Triggers in the left sidebar. Then click on "Add a Trigger" button, and select Scheduled as the "Trigger Type". Change the "Schedule Type" to Advanced and use 0 0 1 * * as the CRON schedule. You can see the dates with times when the next event will occur. Please note that these times are as per the UTC timezone. You can make appropriate changes in hours & minutes if you want to use other timezones.
Finally select Function as the event type, and add the following code in the code text box. We just fetch the users who've done any transaction during the last month (the in/out field(s) would be non-zero), and set them to 0.
exports = async function () {
  const usersCollection = context.services
    .get('mongodb-atlas')
    .db('<db_name>')
    .collection('users');

  // Use the $or pipeline to fetch only those users
  // who've any transaction last month
  const users = await usersCollection.find({
    "$or": [
      { "currMonth.in": { "$gt": 0 } },
      { "currMonth.out": { "$gt": 0 } }
    ]
  }).toArray();

  console.log(`find op users length: ${users.length}`);
  const bulkOps = [];
  for (const user of users) {
    bulkOps.push({
      updateOne: {
        filter: { _id: user._id },
        update: {
          $set: {
            updatedAt: new Date(),
            'currMonth.in': 0,
            'currMonth.out': 0,
          },
        },
      },
    });
  }

  if (bulkOps.length) {
    await usersCollection.bulkWrite(bulkOps);
    console.log('after the bulk write ops');
  }
};
And we're done. Every month on the first day at midnight UTC, we'll make the in & out for every user 0.
Conclusion
Congratulations on completing this basic tutorial on using MongoDB Atlas App Services and its triggers, and creating a simple react expense tracker app with it. But don't stop here as you can improve the app further. Below are some of the shortcomings of the app which we just built
- Our app is prone to the javascript floating point math precision issues. You can use the Decimal BSON type provided by MongoDB to handle it in a better way. See this excellent guide on this issue.
- Our ScheduledJob looks for and updates all the users who've made any transaction in the last month. For smaller apps this is fine, but for apps with a large number of users we can't do this from one function. Atlas App functions have a runtime limitation of 180 seconds which may not be enough to do everything
- Right now the scheduled trigger fires at midnight UTC, ideally it should fire in each of the user's timezone, etc.
I hope you work on solving some of these problems. If you've any questions, don't hesitate to leave a comment.
Thanks a lot for following along with this tutorial. I hope you found it useful and were able to gain something from it. Please check out the final code on GitHub for your reference.
Keep adding the bits, only they make a BYTE. :-)